
Your cart
There are no items in your cart.

 © Ian Spriggs
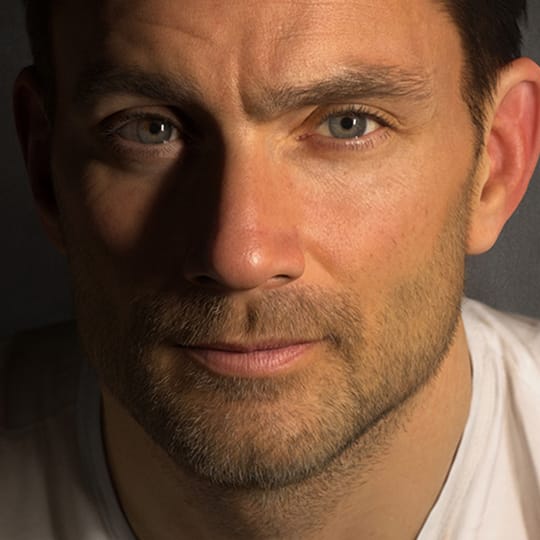 © Ian Spriggs
Ian Spriggs’ 3D character portraits don’t just cross the uncanny valley, they boldly leap over and rejoice on the other side. It’s easy to assume that the gobsmacking detail and realism in Ian’s work is the result of complicated processes and settings. But this couldn’t be further from the truth.
It’s actually quite simple. And when it comes to materials and rendering, the simpler the better. “For the longest time, I was using V-Ray Fast SSS, but I’ve graduated to the alSurface shader [for the skin],” Ian discloses. “It's pretty simple: I just use Diffuse, Specular, Bump, and a little bit of Glossiness — and that's basically it. I just have those four maps that plug into it and I usually keep all the default settings.”
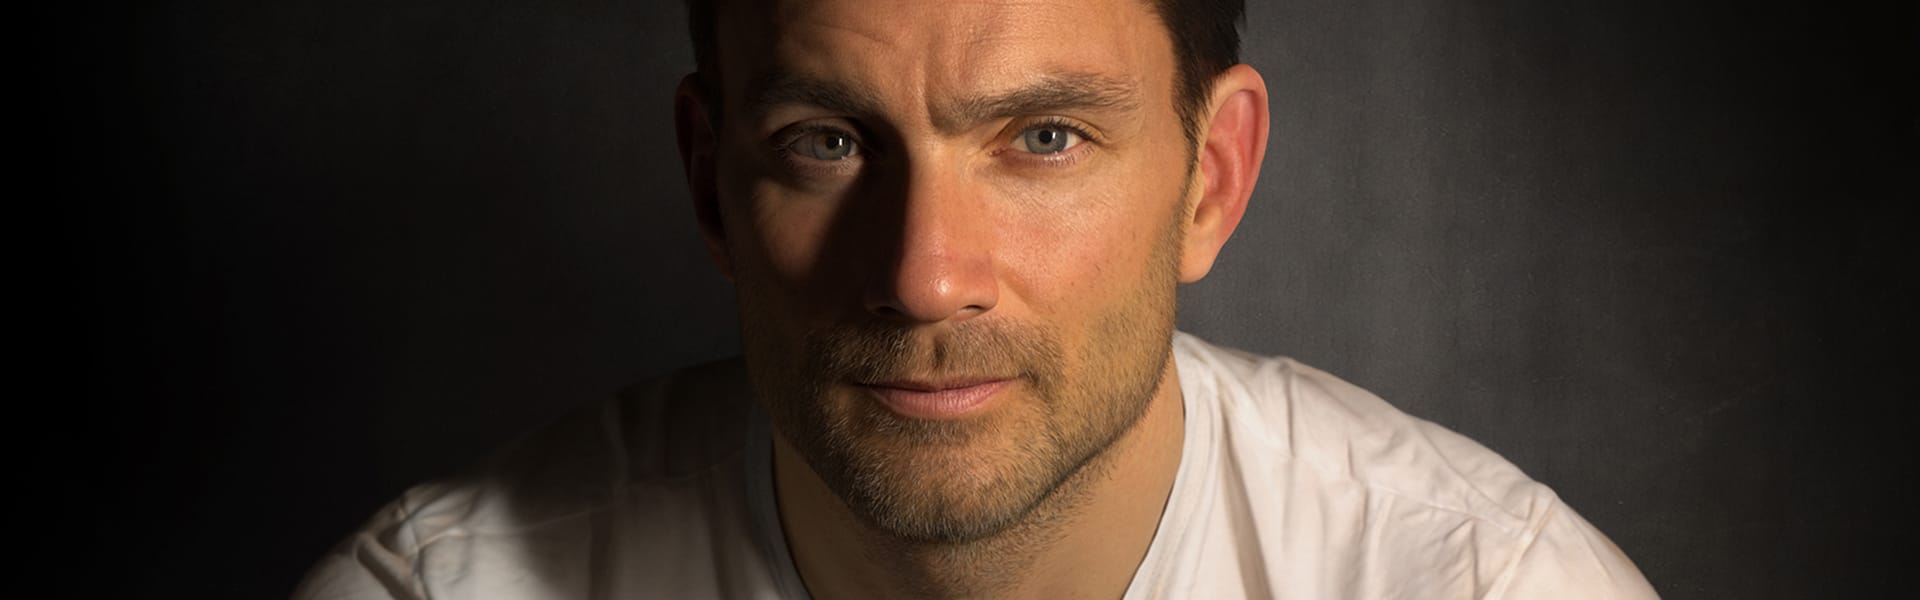
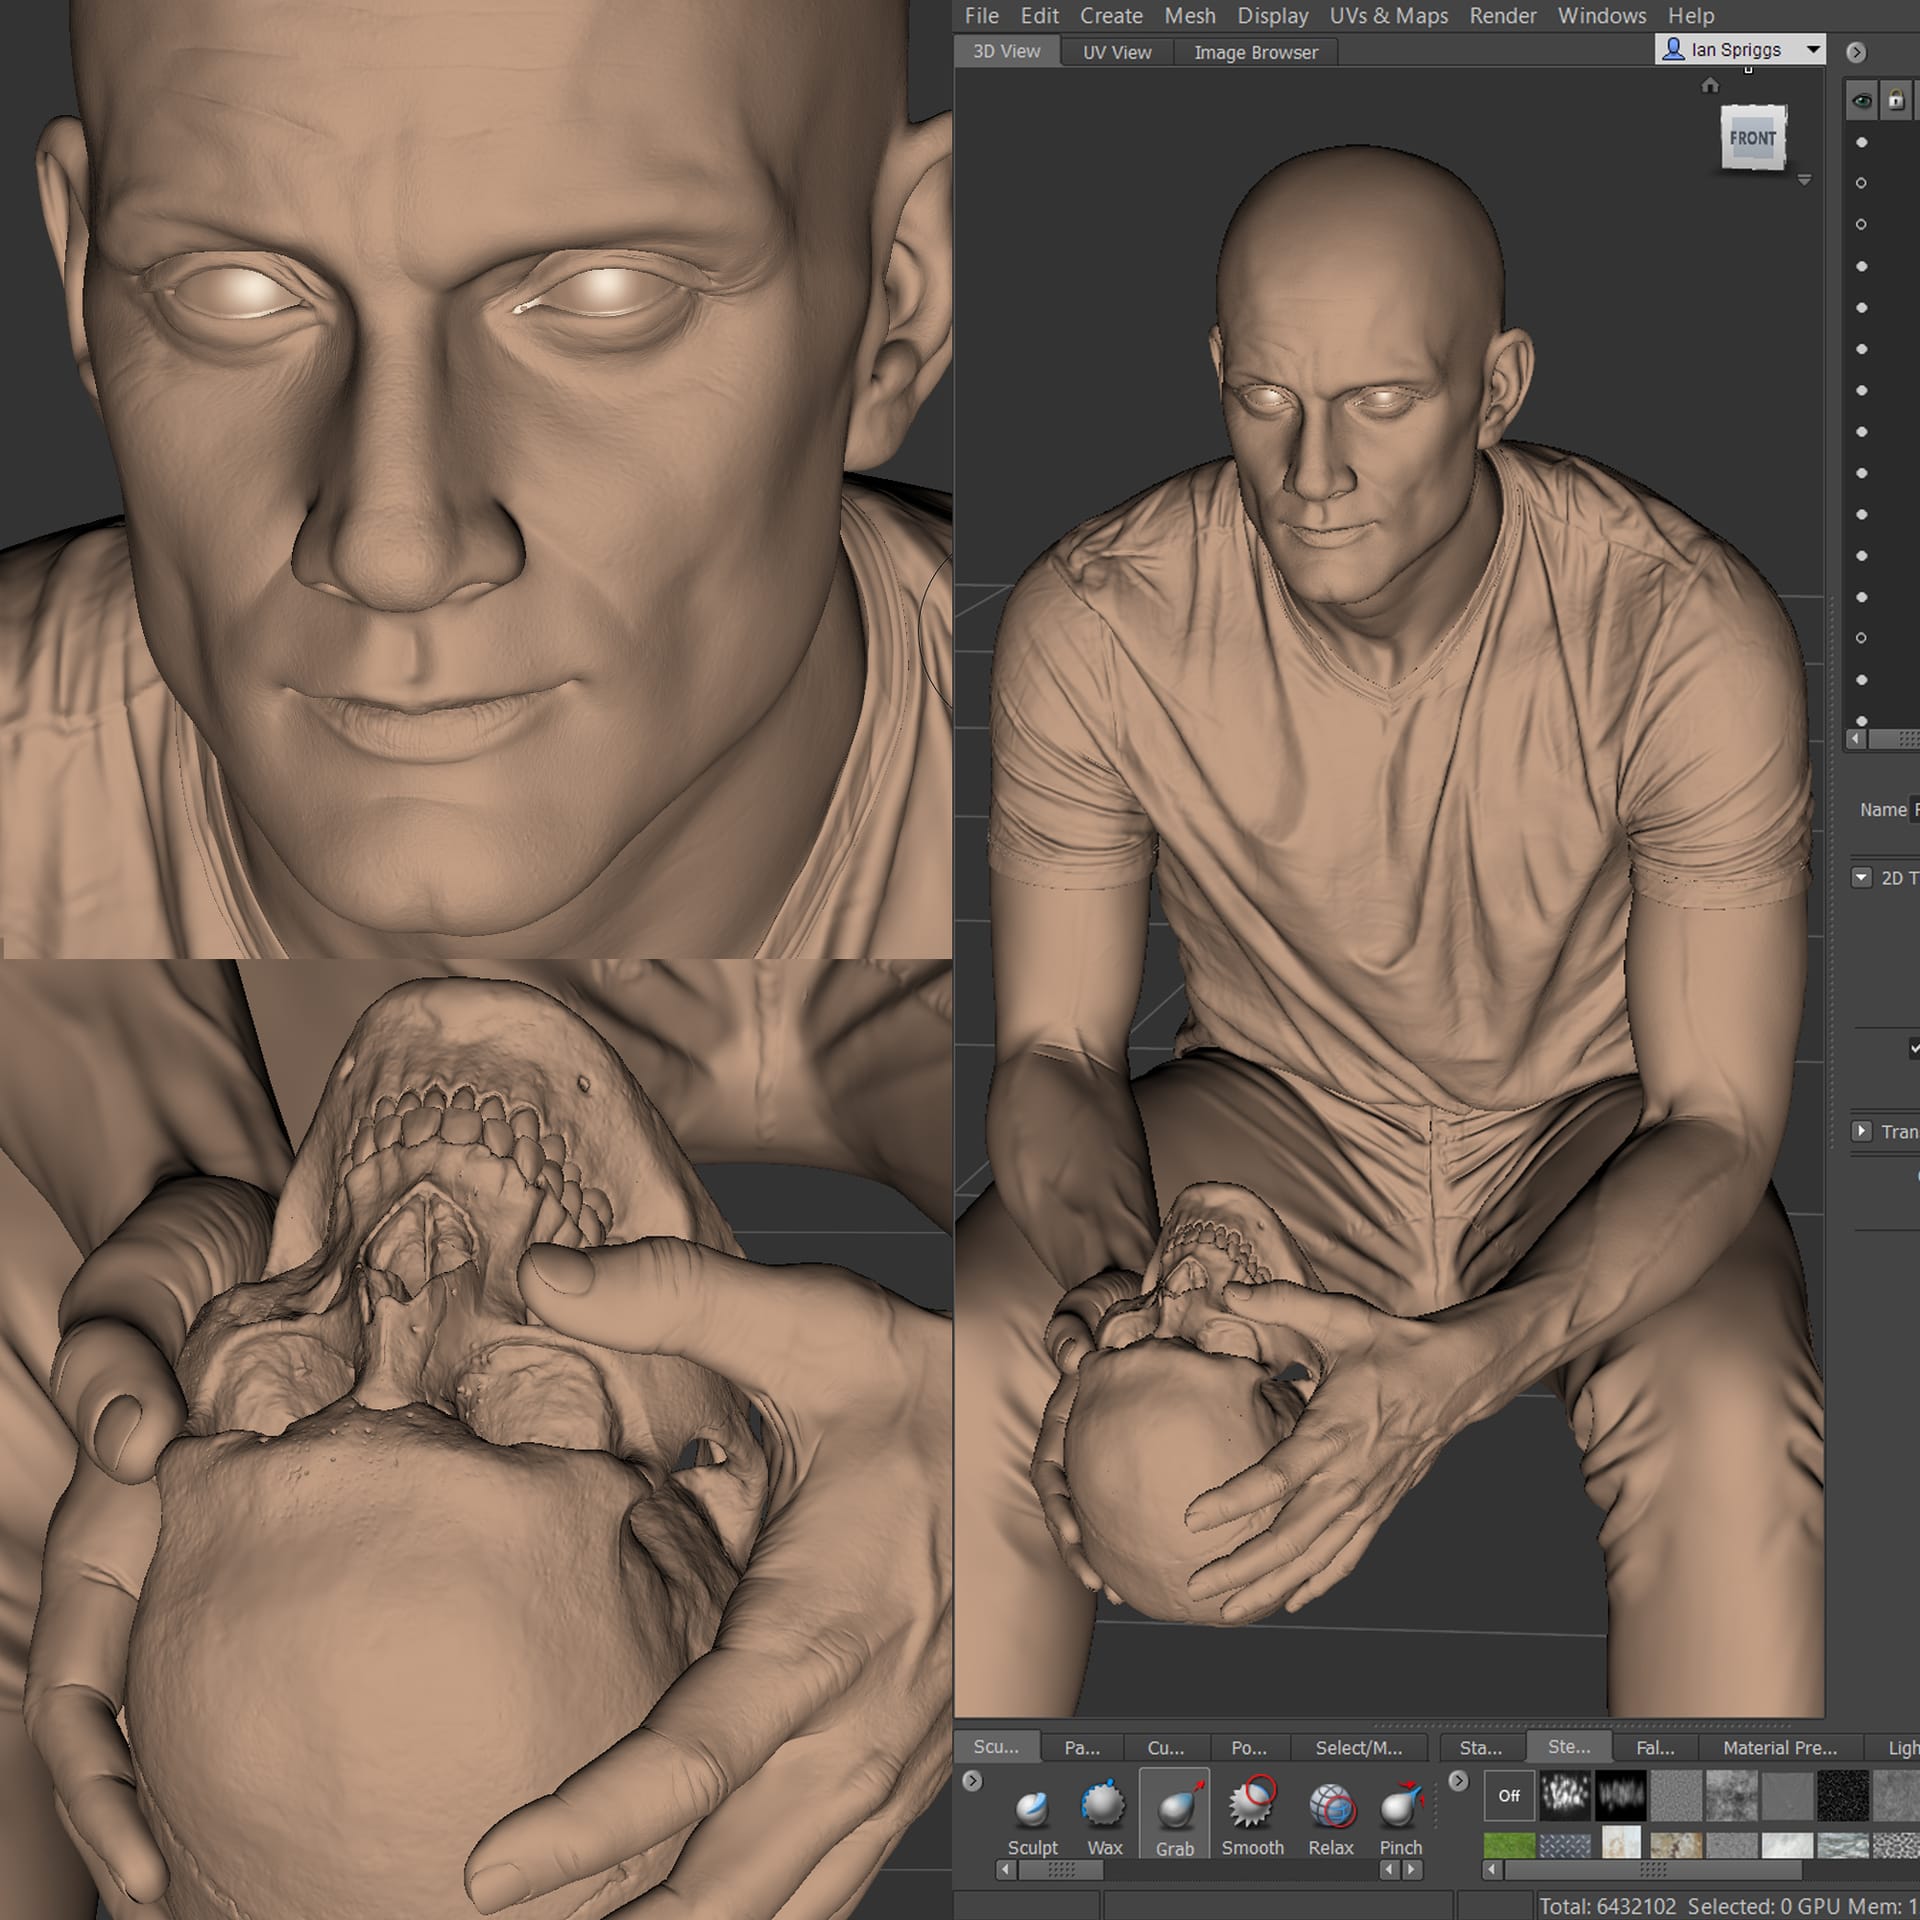
Portrait of Scott Eaton is a brand-new 3D illustration revealed today by Ian Spriggs. Rendered in V-Ray Next for Maya.
You see, Ian actually relies on V-Ray Next’s defaults a lot. He explains: “V-Ray has been awesome for the out-of-the-package default stuff; if you just leave it how it is, it usually works phenomenally. I add as little into that as possible.” Because the more layers and variables you have, the harder it can be to pinpoint errors and make revisions. Ian adds: “If I look back at the portrait, I’m like, ‘Okay, well, the red part of the cheek doesn't look good; well, I know that's the diffuse map,’ so I can just go and paint the diffuse map.”
So, just how do Ian’s portraits look so unbelievably realistic with these simple settings?
If your foundations are strong, your materials and textures will behave naturally. You can see just how much of the quality comes from Ian's underlying sculpt.
Well, laying a solid foundation helps. Ian’s meticulously sculpted models are a masterpiece in and of themselves. In fact, most of the quality comes from Ian’s sculpting handiwork, which allows the textures and shaders to just act, well, very naturally. What’s more, Ian doesn’t go crazy with his lighting setups either; just like his shaders, he uses out-of-the-box lighting for both speed and efficiency. And the results are stunning. By doing this — and keeping things simple — the variables are massively reduced and the adjustments-to-perfection are relatively pain-free.
We know what you’re thinking: How do we reach Ian’s level of sculpting genius? Well, being self-critical is a good start. “For me, if it looks weird, it's not final,” Ian clarifies. “There's no way to know how many revisions or how many iterations you're going to need; I just keep on working on it non-stop, and if I see a problem, I'll fix that problem. Every time I see a problem I try and fix it until there are no more problems that I can see.” Like every artist, Ian looks back on past portraits after they’ve been finalized and sees things he can improve, but the key is just knowing you’ve achieved the highest level possible at the time.
Ian takes care of the sculpting work in Mudbox; here you can see some screenshots of the sculpt in the Mudbox interface.
So there it is. You don’t need to be a master of advanced settings to render a masterpiece. And now that we’ve burst that bubble, let’s enjoy a few behind-the-scenes secrets of Ian’s two latest creations — both rendered in V-Ray Next for Maya.
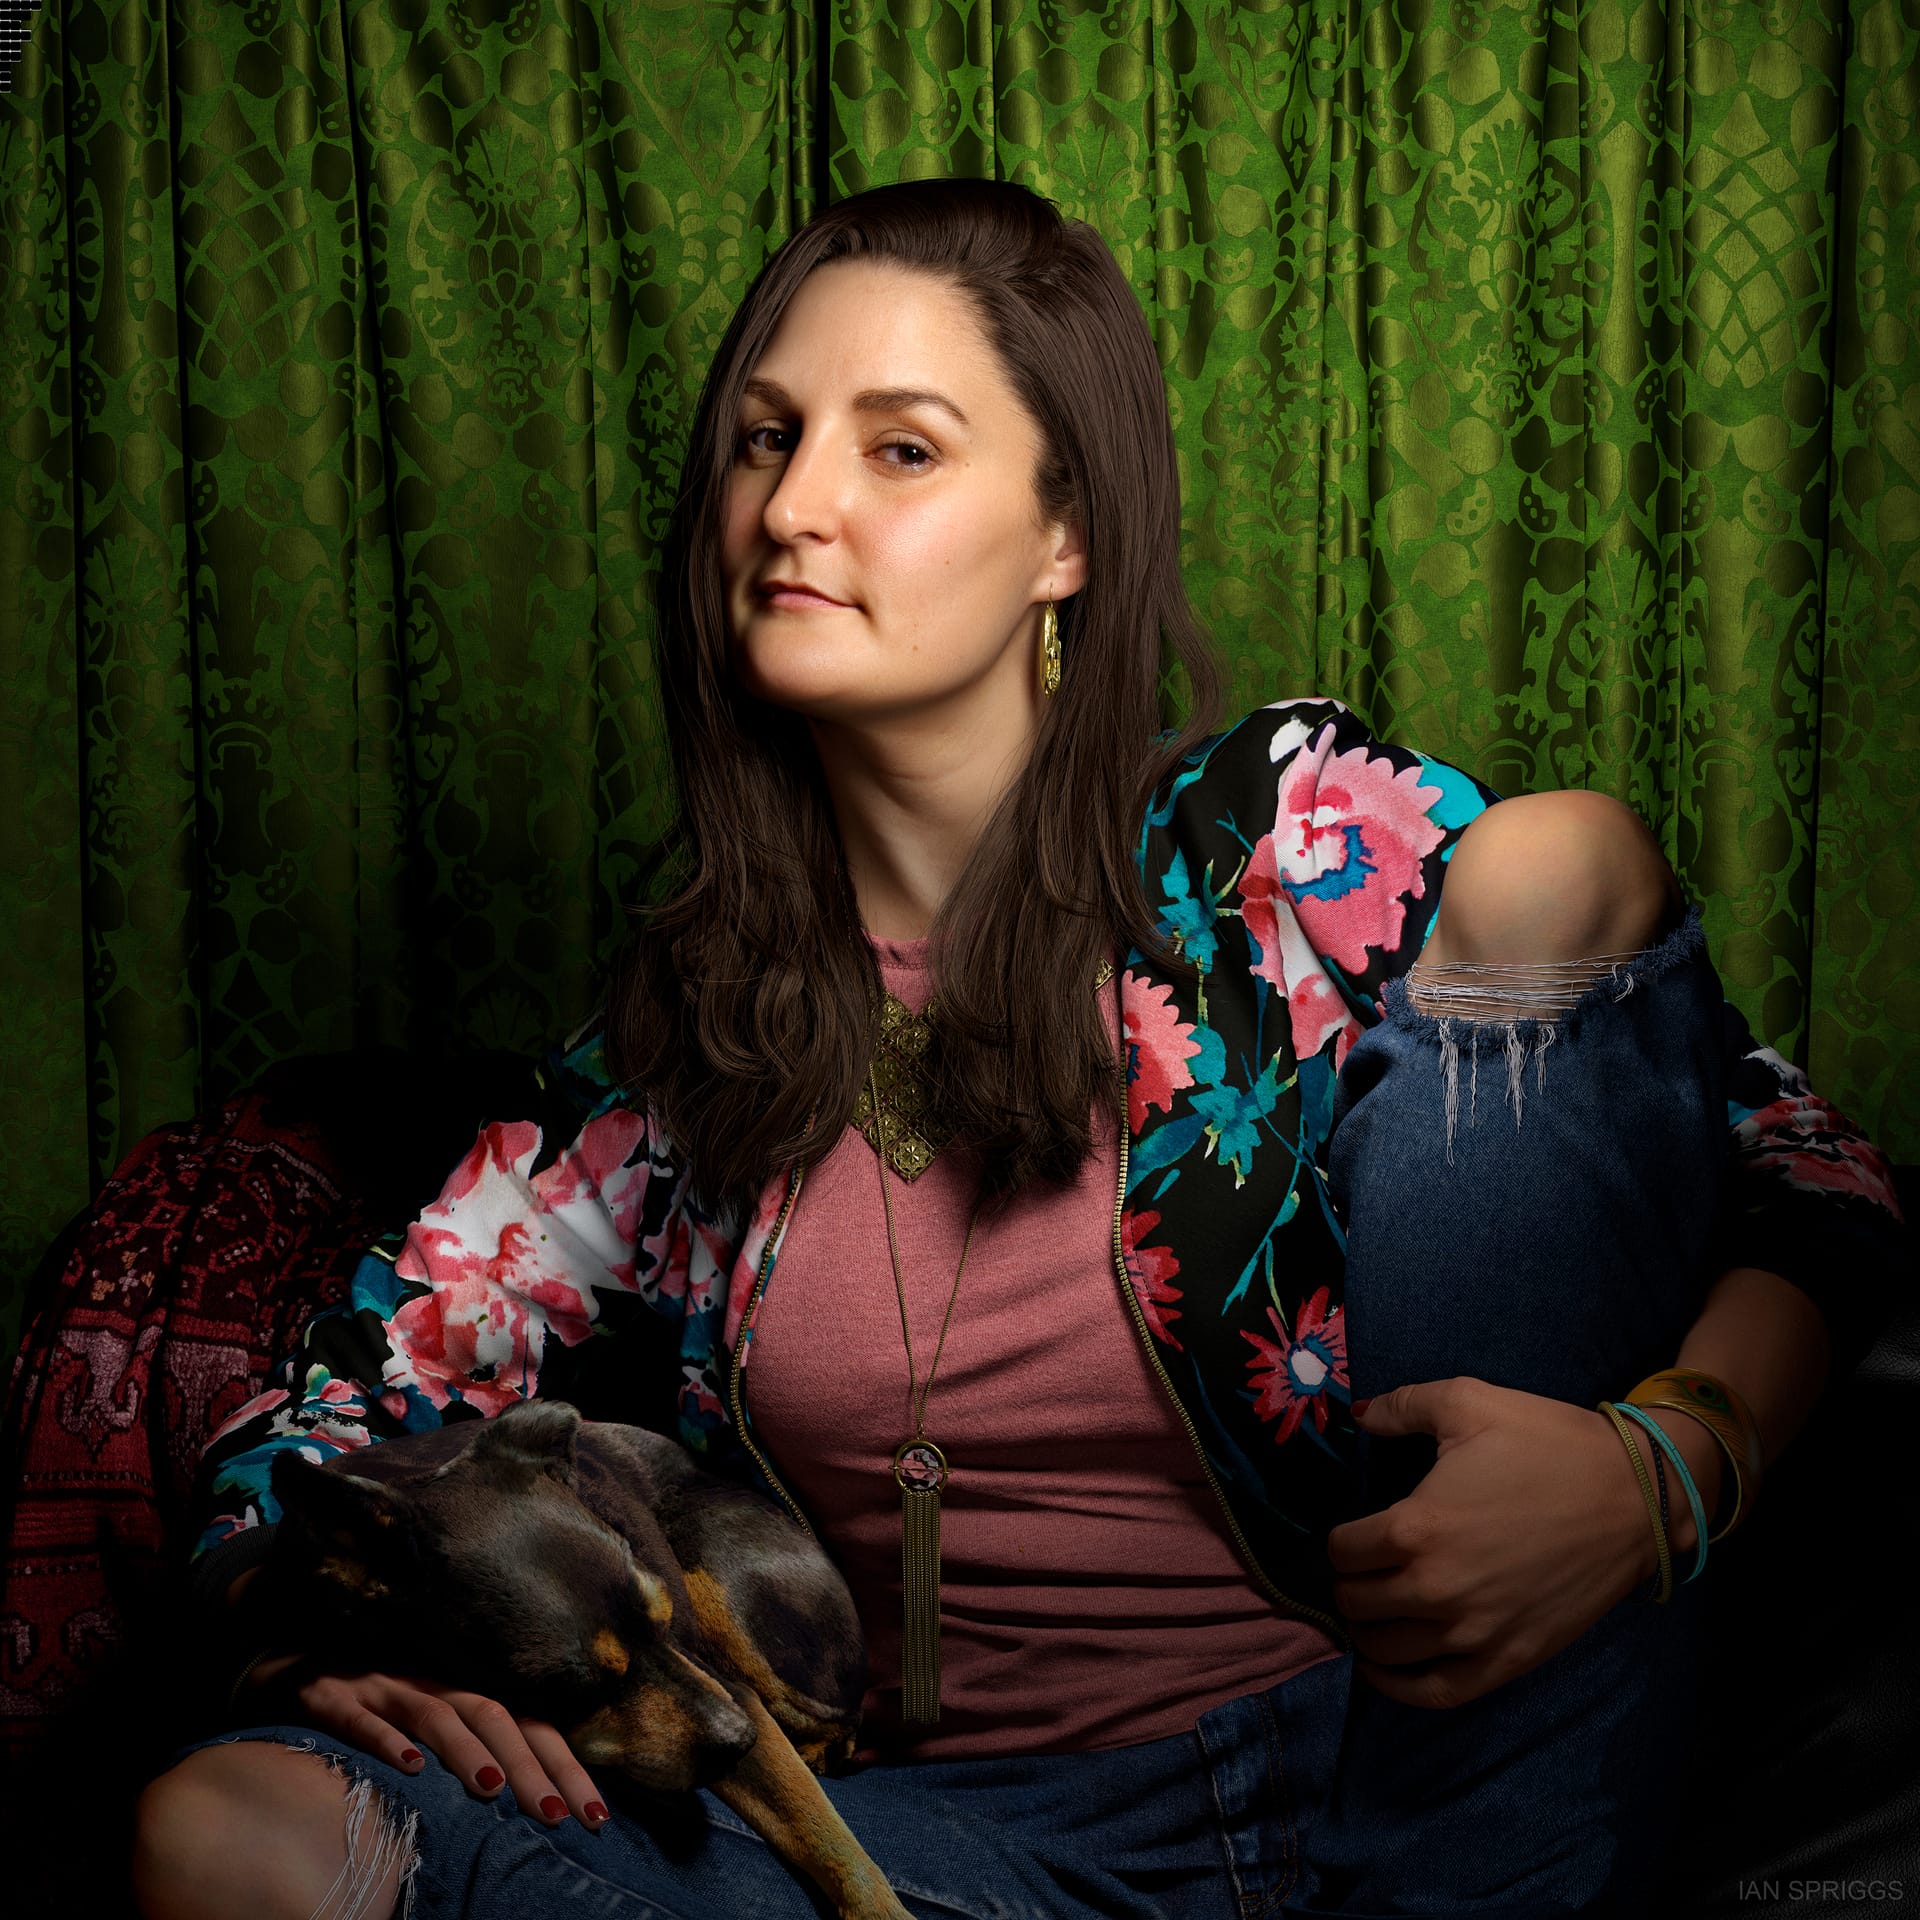
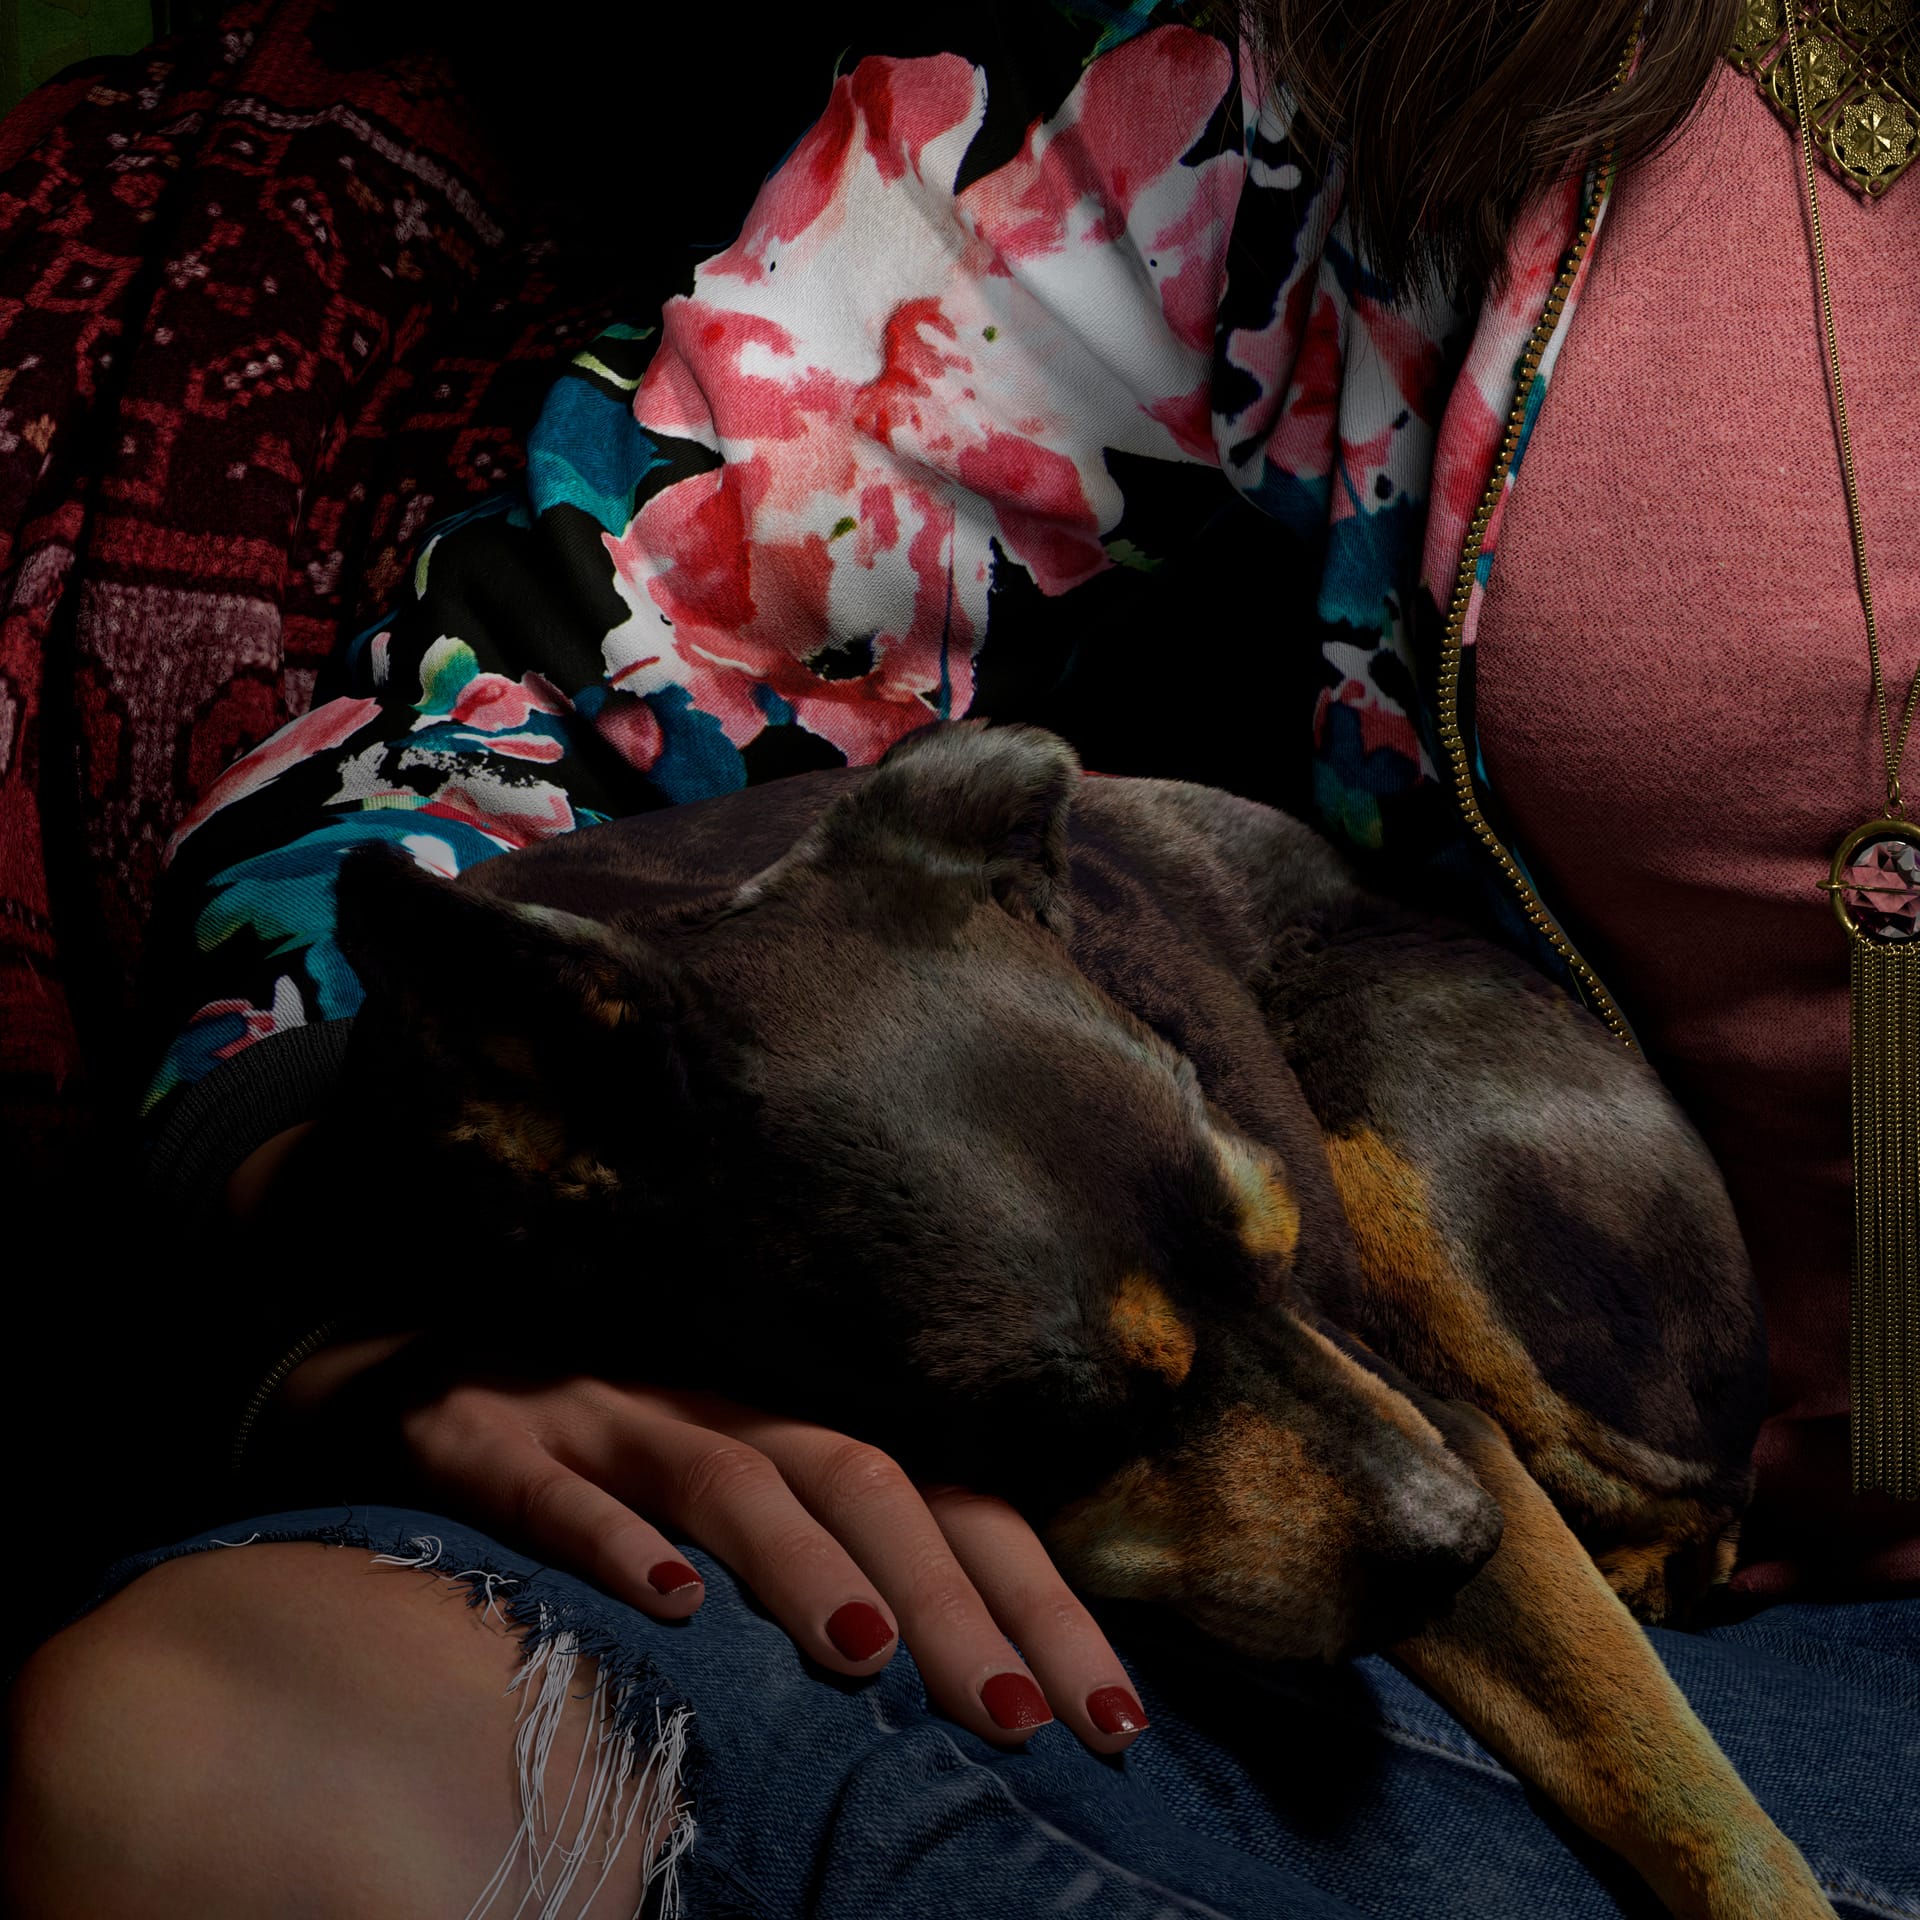
Portrait of Erica is a 3D illustration of Ian’s girlfriend, featuring her one true love, Carmine the dog. This 3D portrait was modeled and textured in Maya, Mudbox and Photoshop, with hair created using XGen. The skin details included some XYZ textures, and the work was rendered with V-Ray Next for Maya on a Lenovo workstation with NVIDIA Quadro P6000 graphics cards. This setup allowed him to make use of V-Ray Next’s GPU rendering to dramatically speed up the time it took to make iterations and adjustments. Final touch-ups were taken care of in Photoshop.
Portrait of Erica — a beautiful illustration that includes Erica’s four-legged friend — presented a challenge that Ian had never faced before: how to model and groom a dog. “Even aesthetically, just trying to make a dog look like a dog was a challenge,” Ian reveals. “Learning dog anatomy and then doing the fur, and then understanding the shininess of the fur; it’s just so completely different to a human.”
So just how did he tackle his first dog portrait? Well, it started with a wolf. Ian describes: “It was a werewolf model that I’d used once for a freelance project, and I just like scaled it down, changed proportions — and then it looked nothing like a werewolf.”
Do all dogs come from wolves? Carmine sure does. She was modeled from a werewolf right down to her true pint-size. (And she's perfect.)
Our modern-day master is inspired by some of the greatest paintings in history. In fact, Portrait of Erica was inspired by Hans Holbein’s The Ambassadors. “It shows two people and it’s not about their faces; it’s about their clothing and belongings,” Ian explains. “It’s showcasing how wealthy they are; their job descriptions. Working with a similar theme, Ian approached Erica’s portrait and incorporated Carmine, her dog, as her prize possession. “Carmine is the thing she loves the most, so obviously I had to put her dog in there,” Ian adds.
In Hans Holbein’s The Ambassadors, there’s an intriguing elongated skull stretched in the foreground of the painting. “I think it’s basically saying that, no matter how rich or wealthy you are, death is at the end of everything,” Ian suggests. And here’s where Ian’s love of details gets exciting: look closely at Erica’s earring and you’ll see an elongated skull. “It’s also like Johannes Vermeer's painting The Pearl Earring, where the earring is the center point of the piece. I’ve always thought that was interesting,” Ian adds.
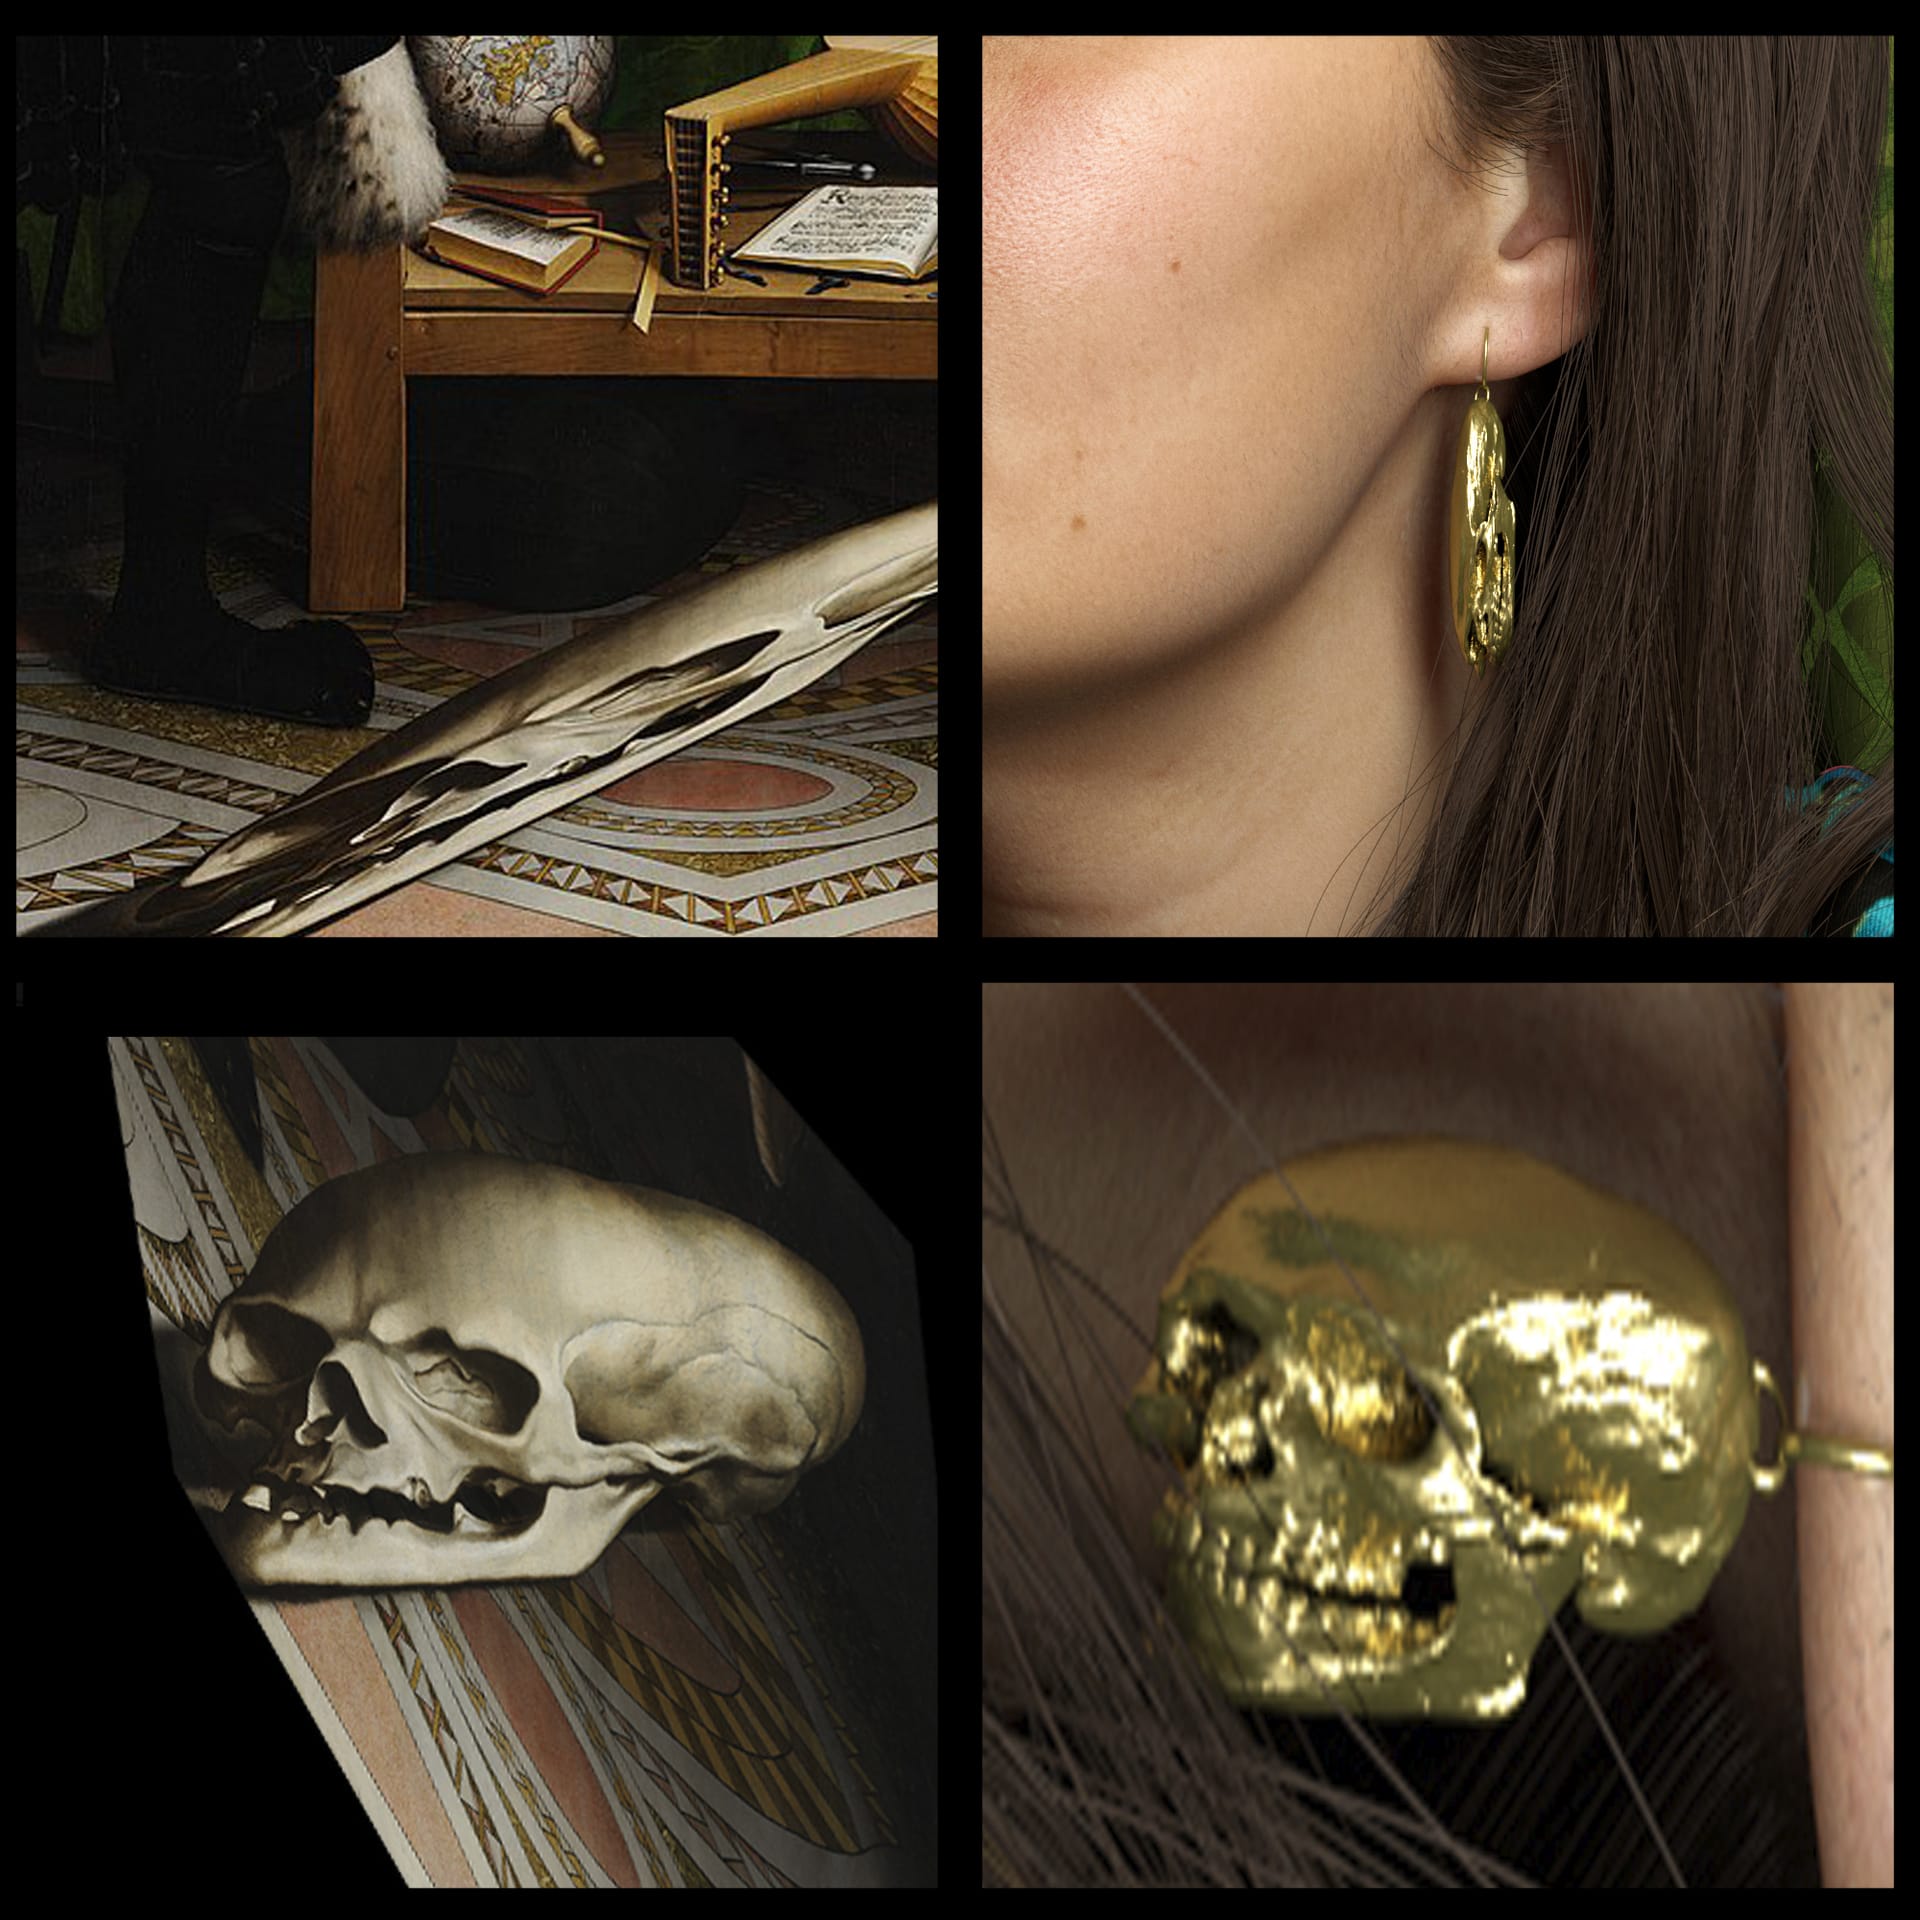
The girl with the elongated skull earring. Every little detail in Ian's 3D portraits carries a meaning.
But that’s not all. Let’s keep looking at the details.
Notice the render buckets in the top-left? (Clue: Yes, he did finish rendering.) Ian spells out his artistic decision here: “In the corner of Hans Holbein's painting, behind the curtain, there's a cross with Jesus on it. I don't think he really believes that death is the end. So in Erica's portrait, I put the render buckets in the top corner, because I think we’ll live forever through technology. And it’s also the idea that work is never finished; it’s always a render in progress.”
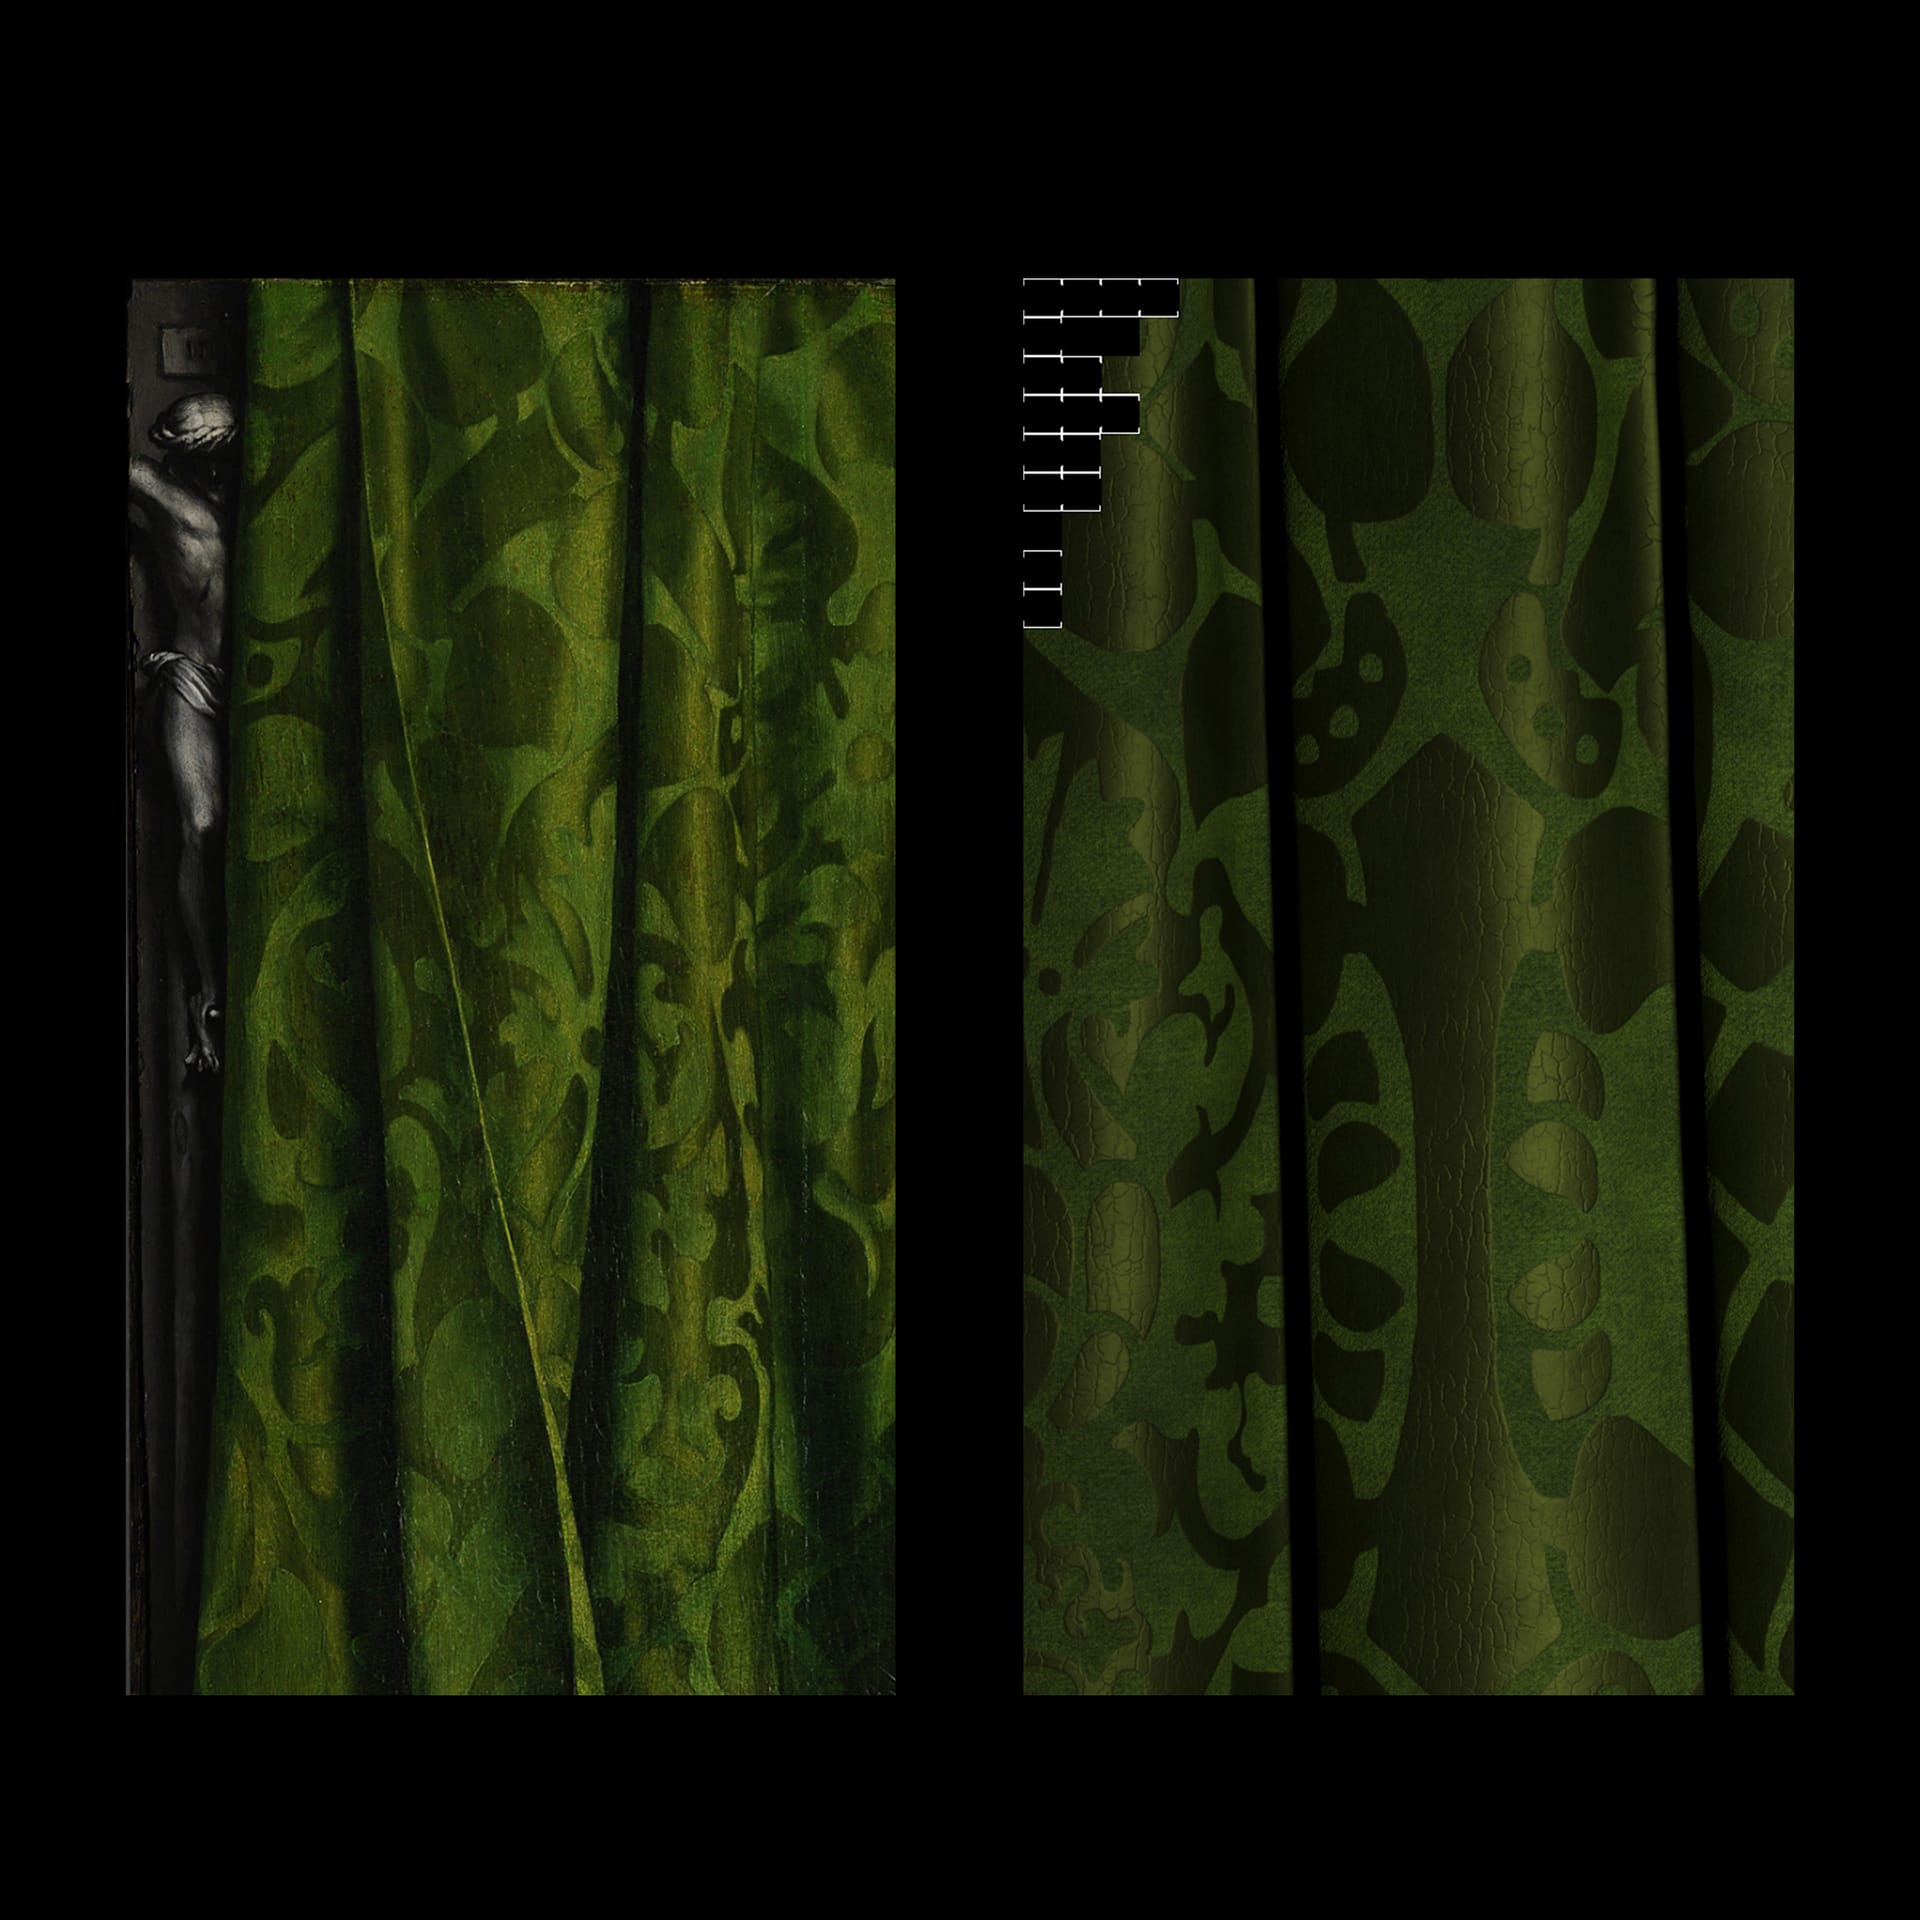
It may look like Ian's render didn't quite finish, but it's all symbolic. These details are as important as the portraits themselves.
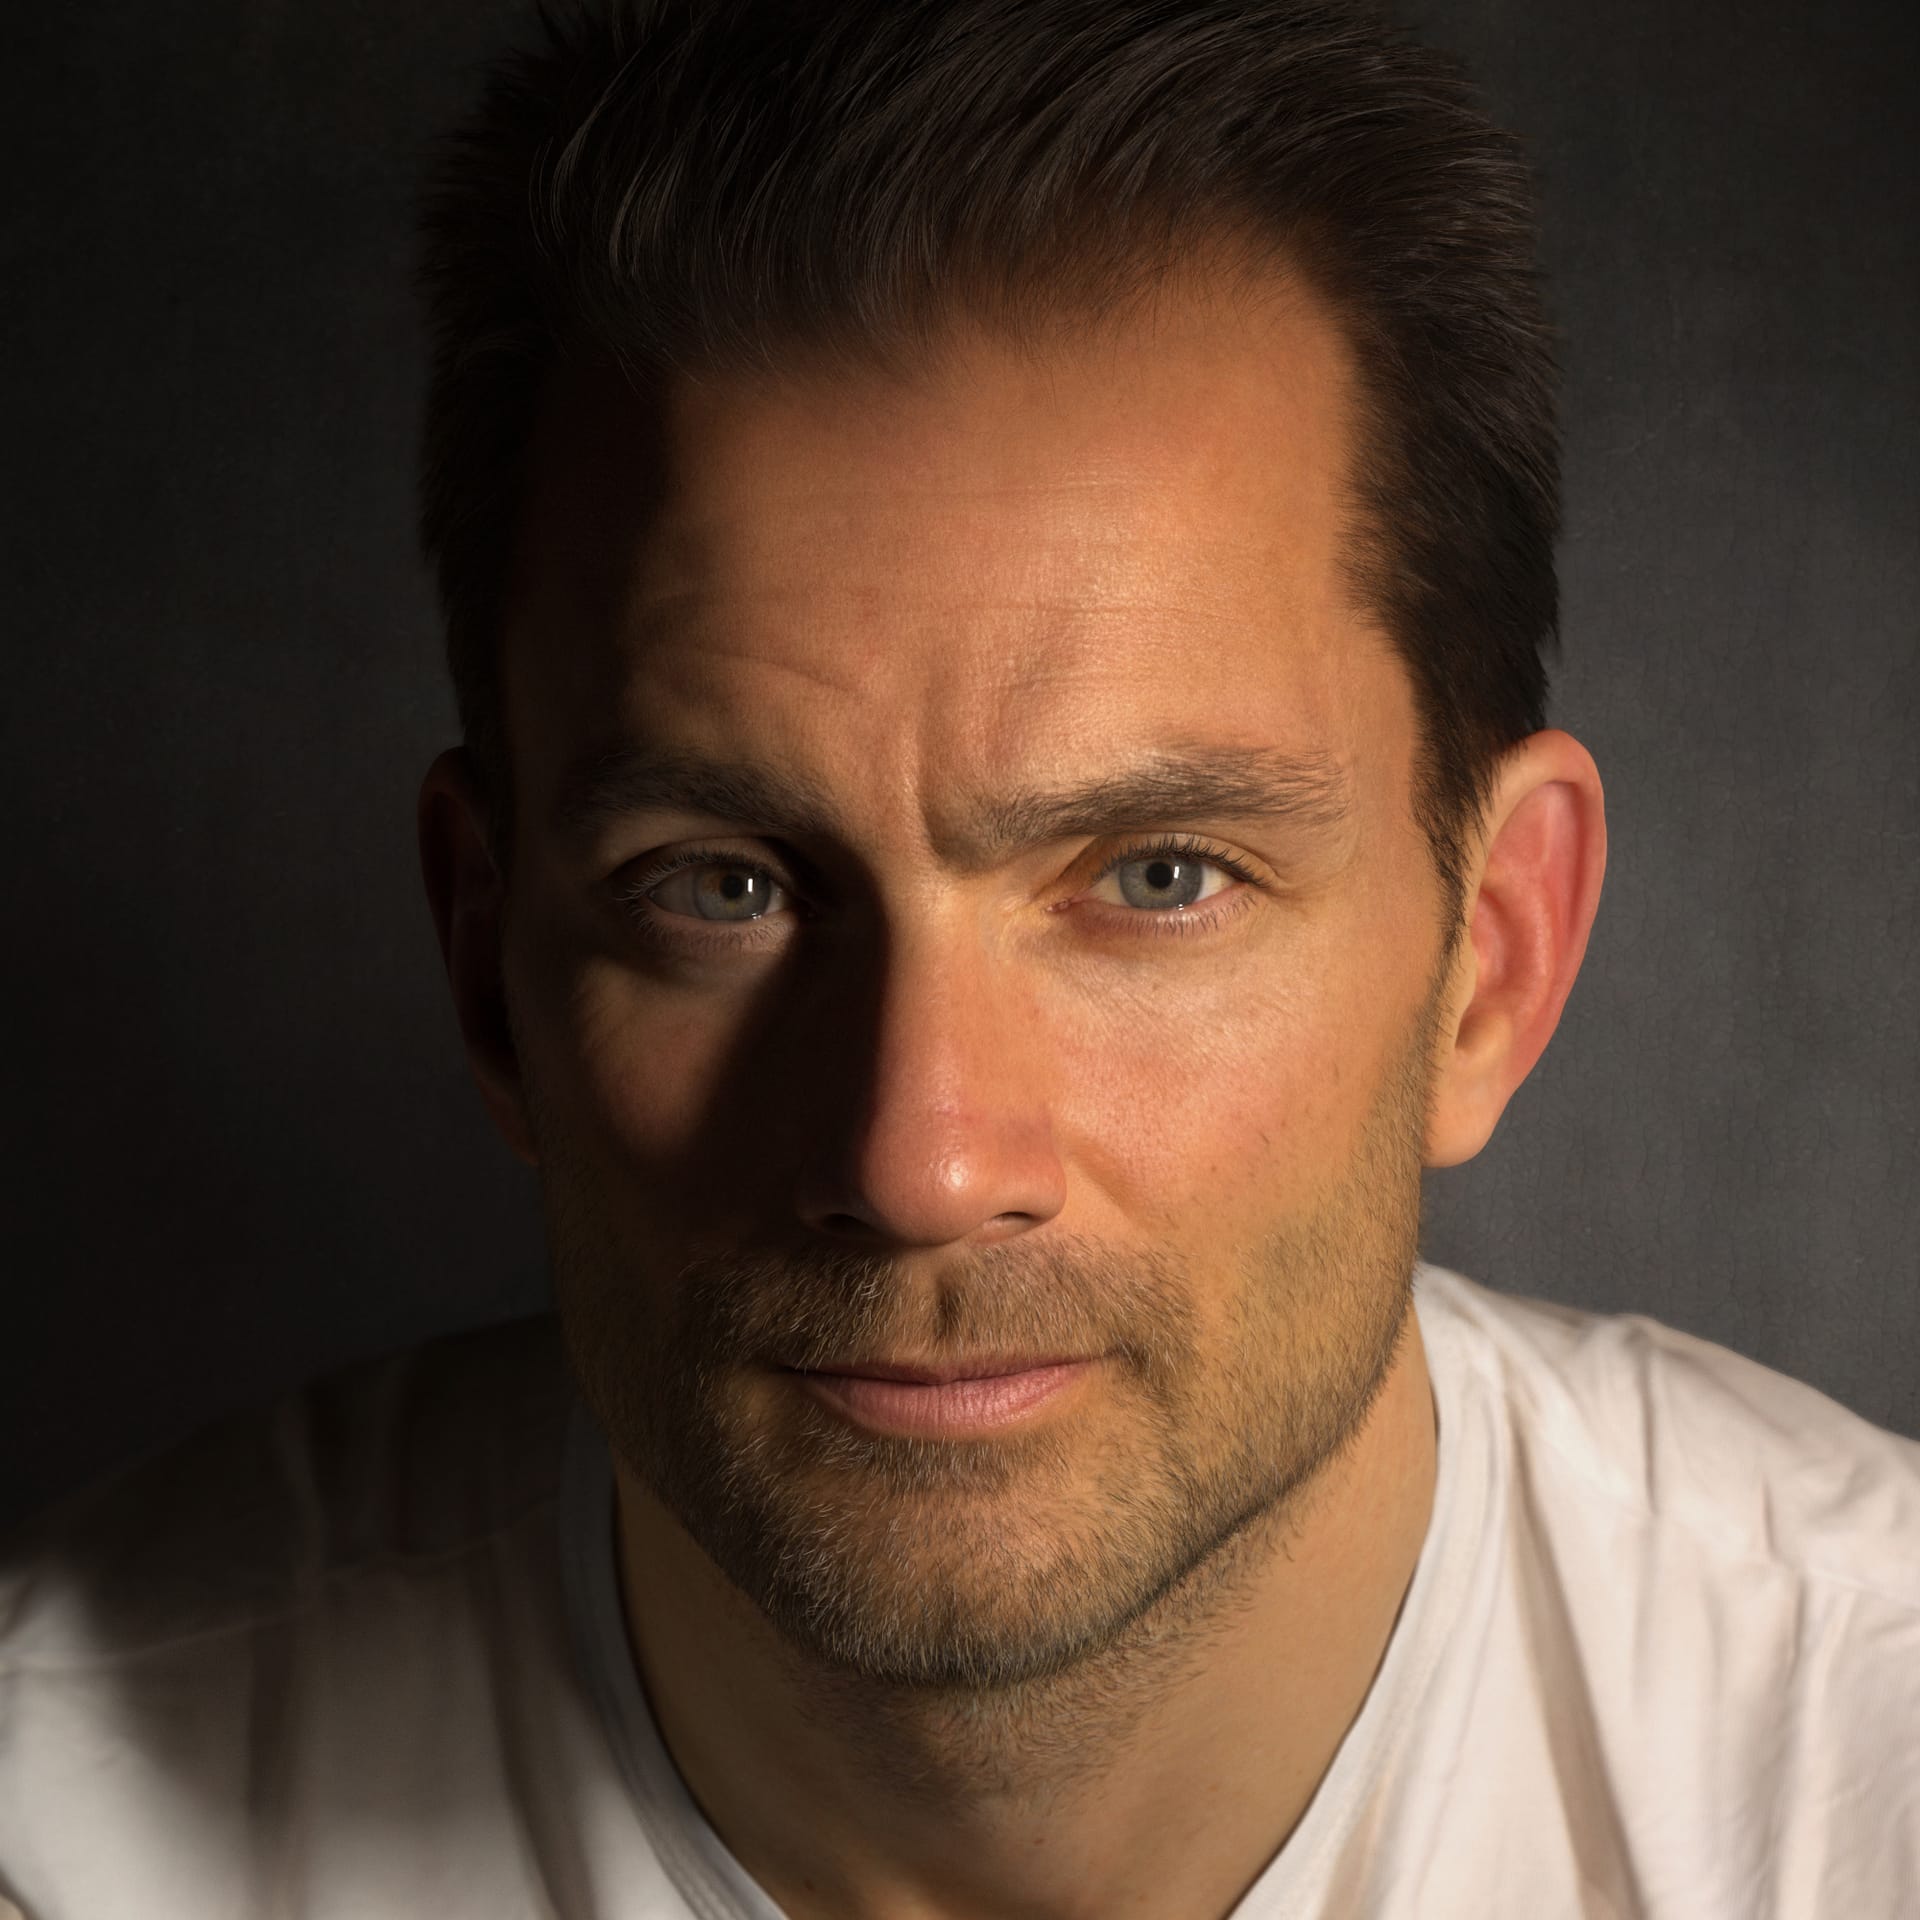
Once upon a time, back when Ian was learning character modeling, he took some of Scott Eaton’s anatomy classes. He watched the videos and kept repeating them until he had learned as much as he could. Fast-forward to 2017 and Scott and Ian were both speakers at the Trojan Horse was a Unicorn festival in Portugal, where Ian was once again blown away by Scott’s knowledge of anatomy. A huge influence on Ian’s career, this portrait came to Ian as a way he could thank Scott for helping him to become a better character artist. Scott’s portrait was rendered using V-Ray Next for Maya on a Lenovo workstation with NVIDIA Quadro P6000 graphics cards (Ian has four P6000s, to be precise).
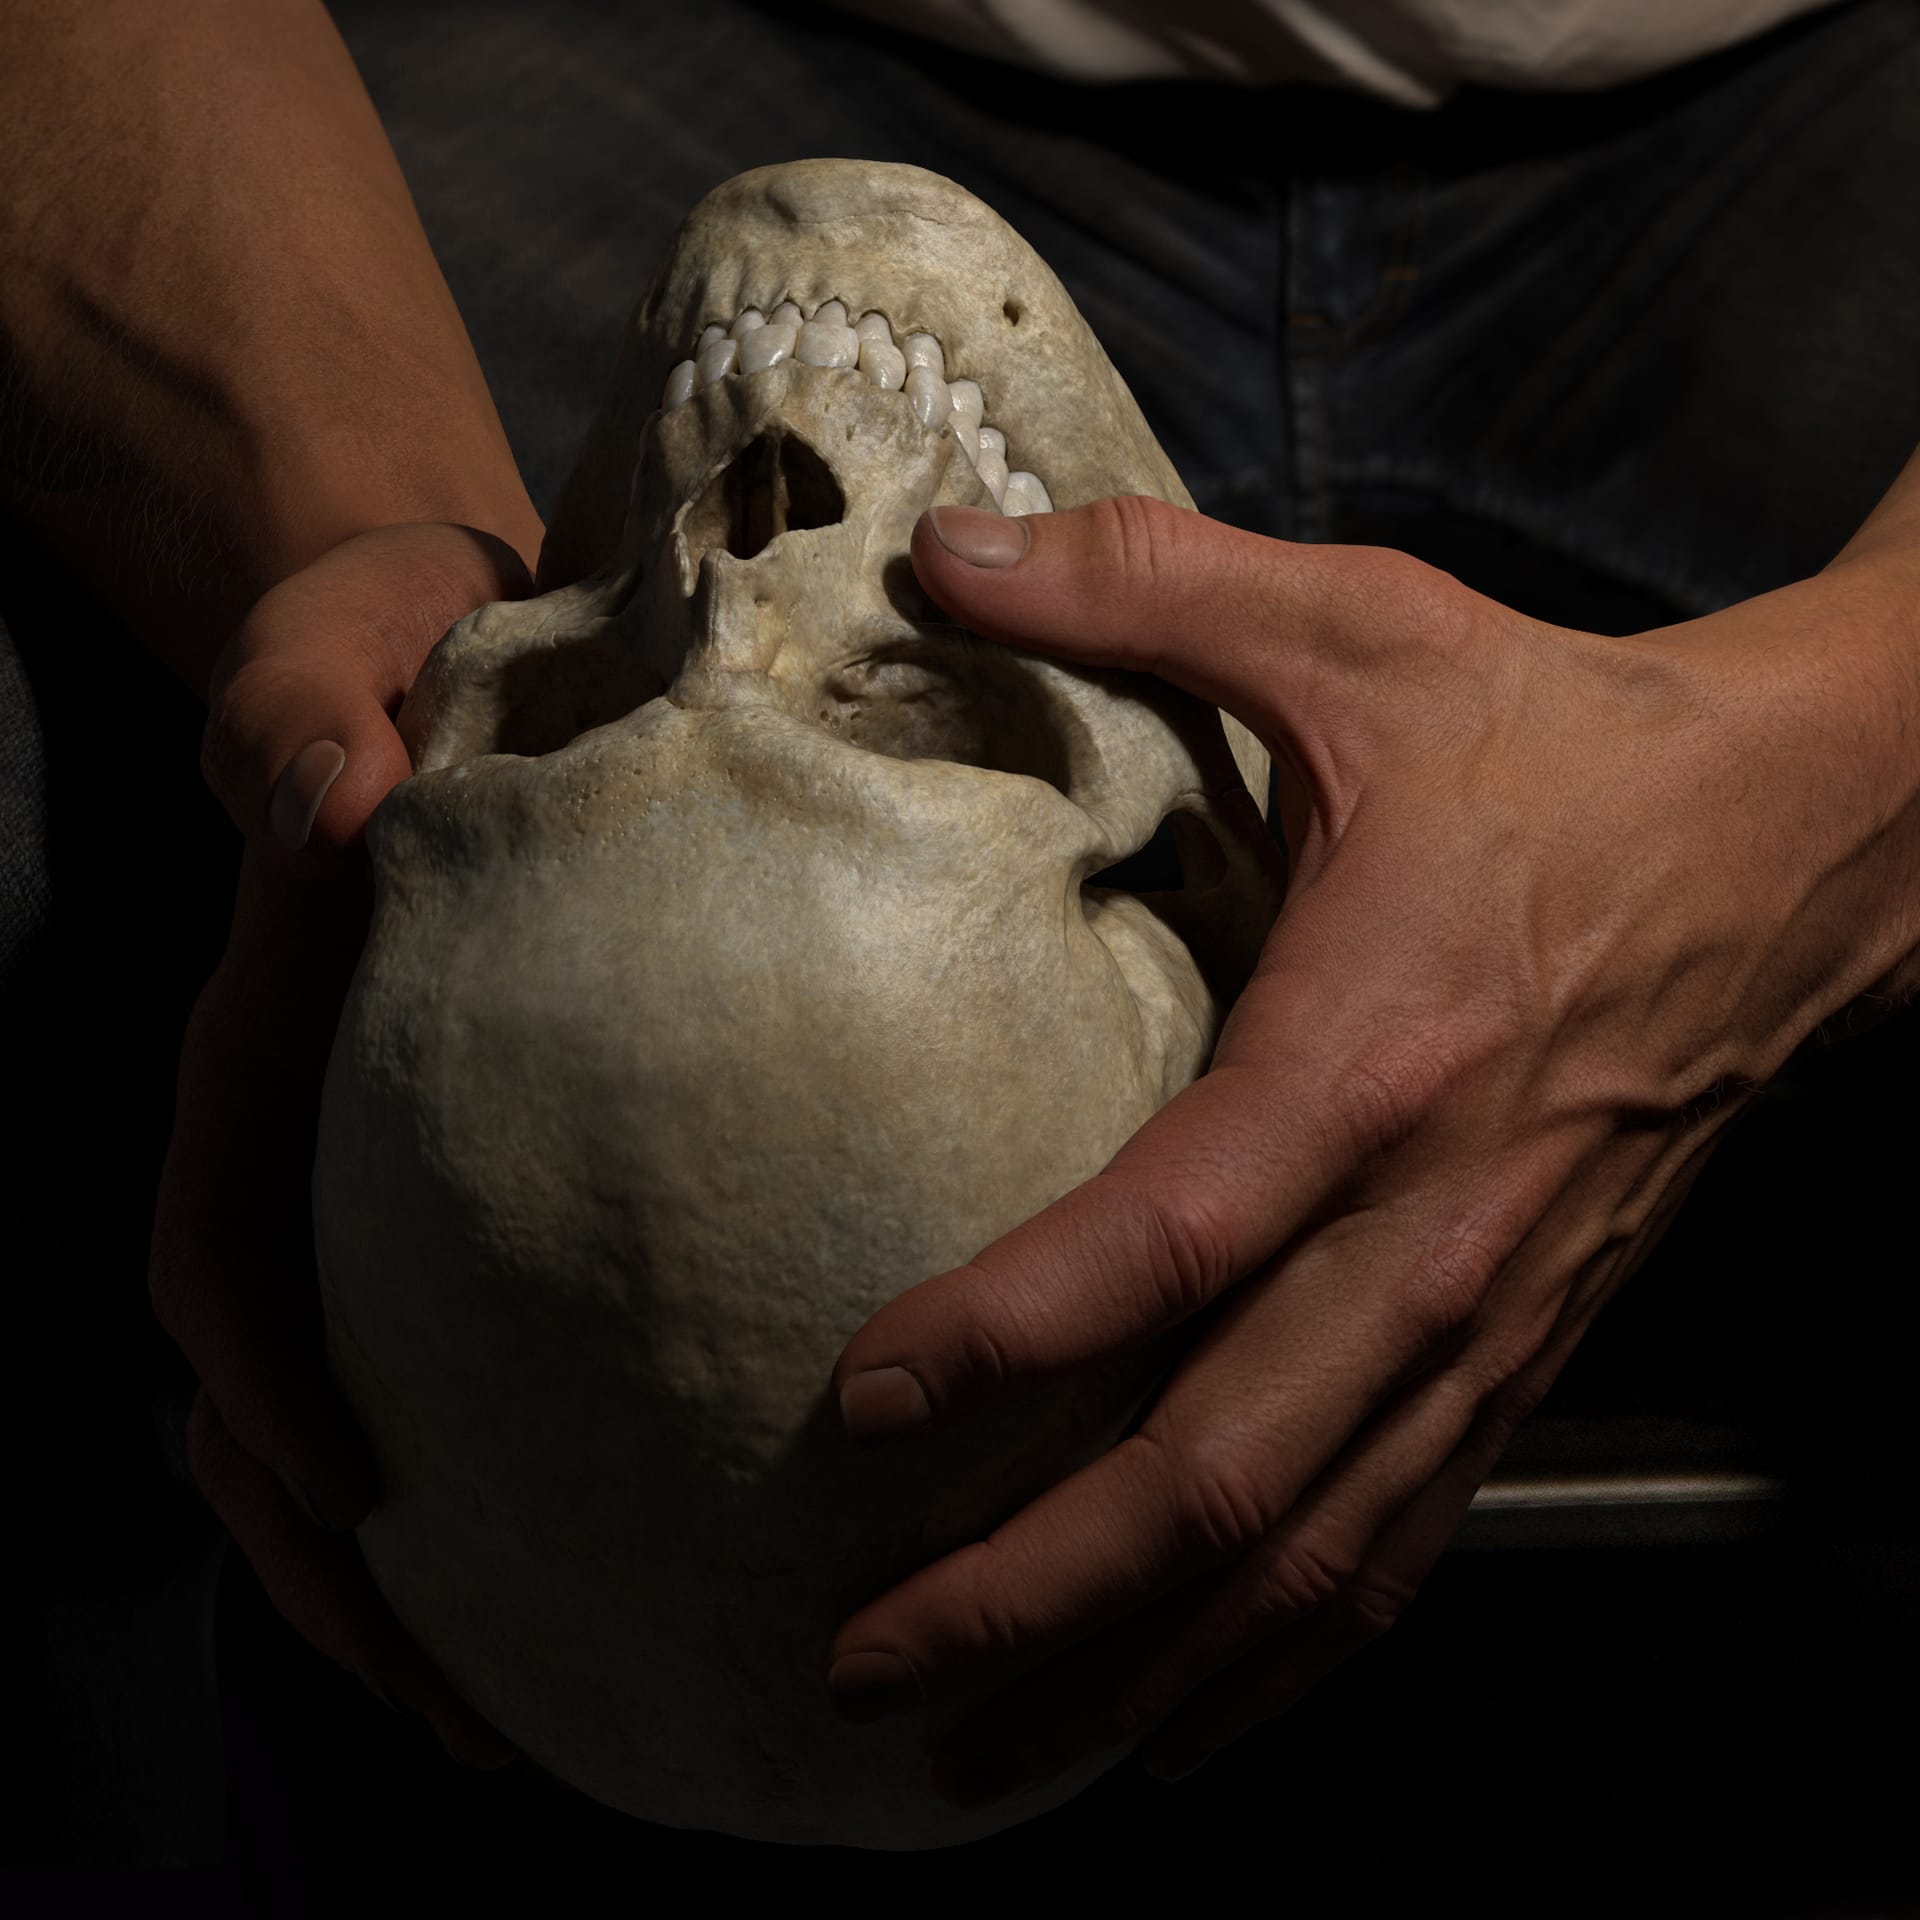
It’s easy to assume that portraits are primarily about faces. But hands are also equally as expressive. Ian states: “There's so much expression from a face, but hands are equal to a face, I would say. If you put your hand on your cheek, that means something. So, hands are like faces; they cannot lie. You can fake an expression while thinking about something else, but hands can sometimes tell even more of a story than the face.” In art history, it interestingly cost more money to have a portrait with hands. “If you have two hands in a painting, it means that you can afford two hands,” Ian points out. “If you only have one hand, you're probably fairly wealthy compared to someone with a portrait without any hands; it's another show of status and wealth.”
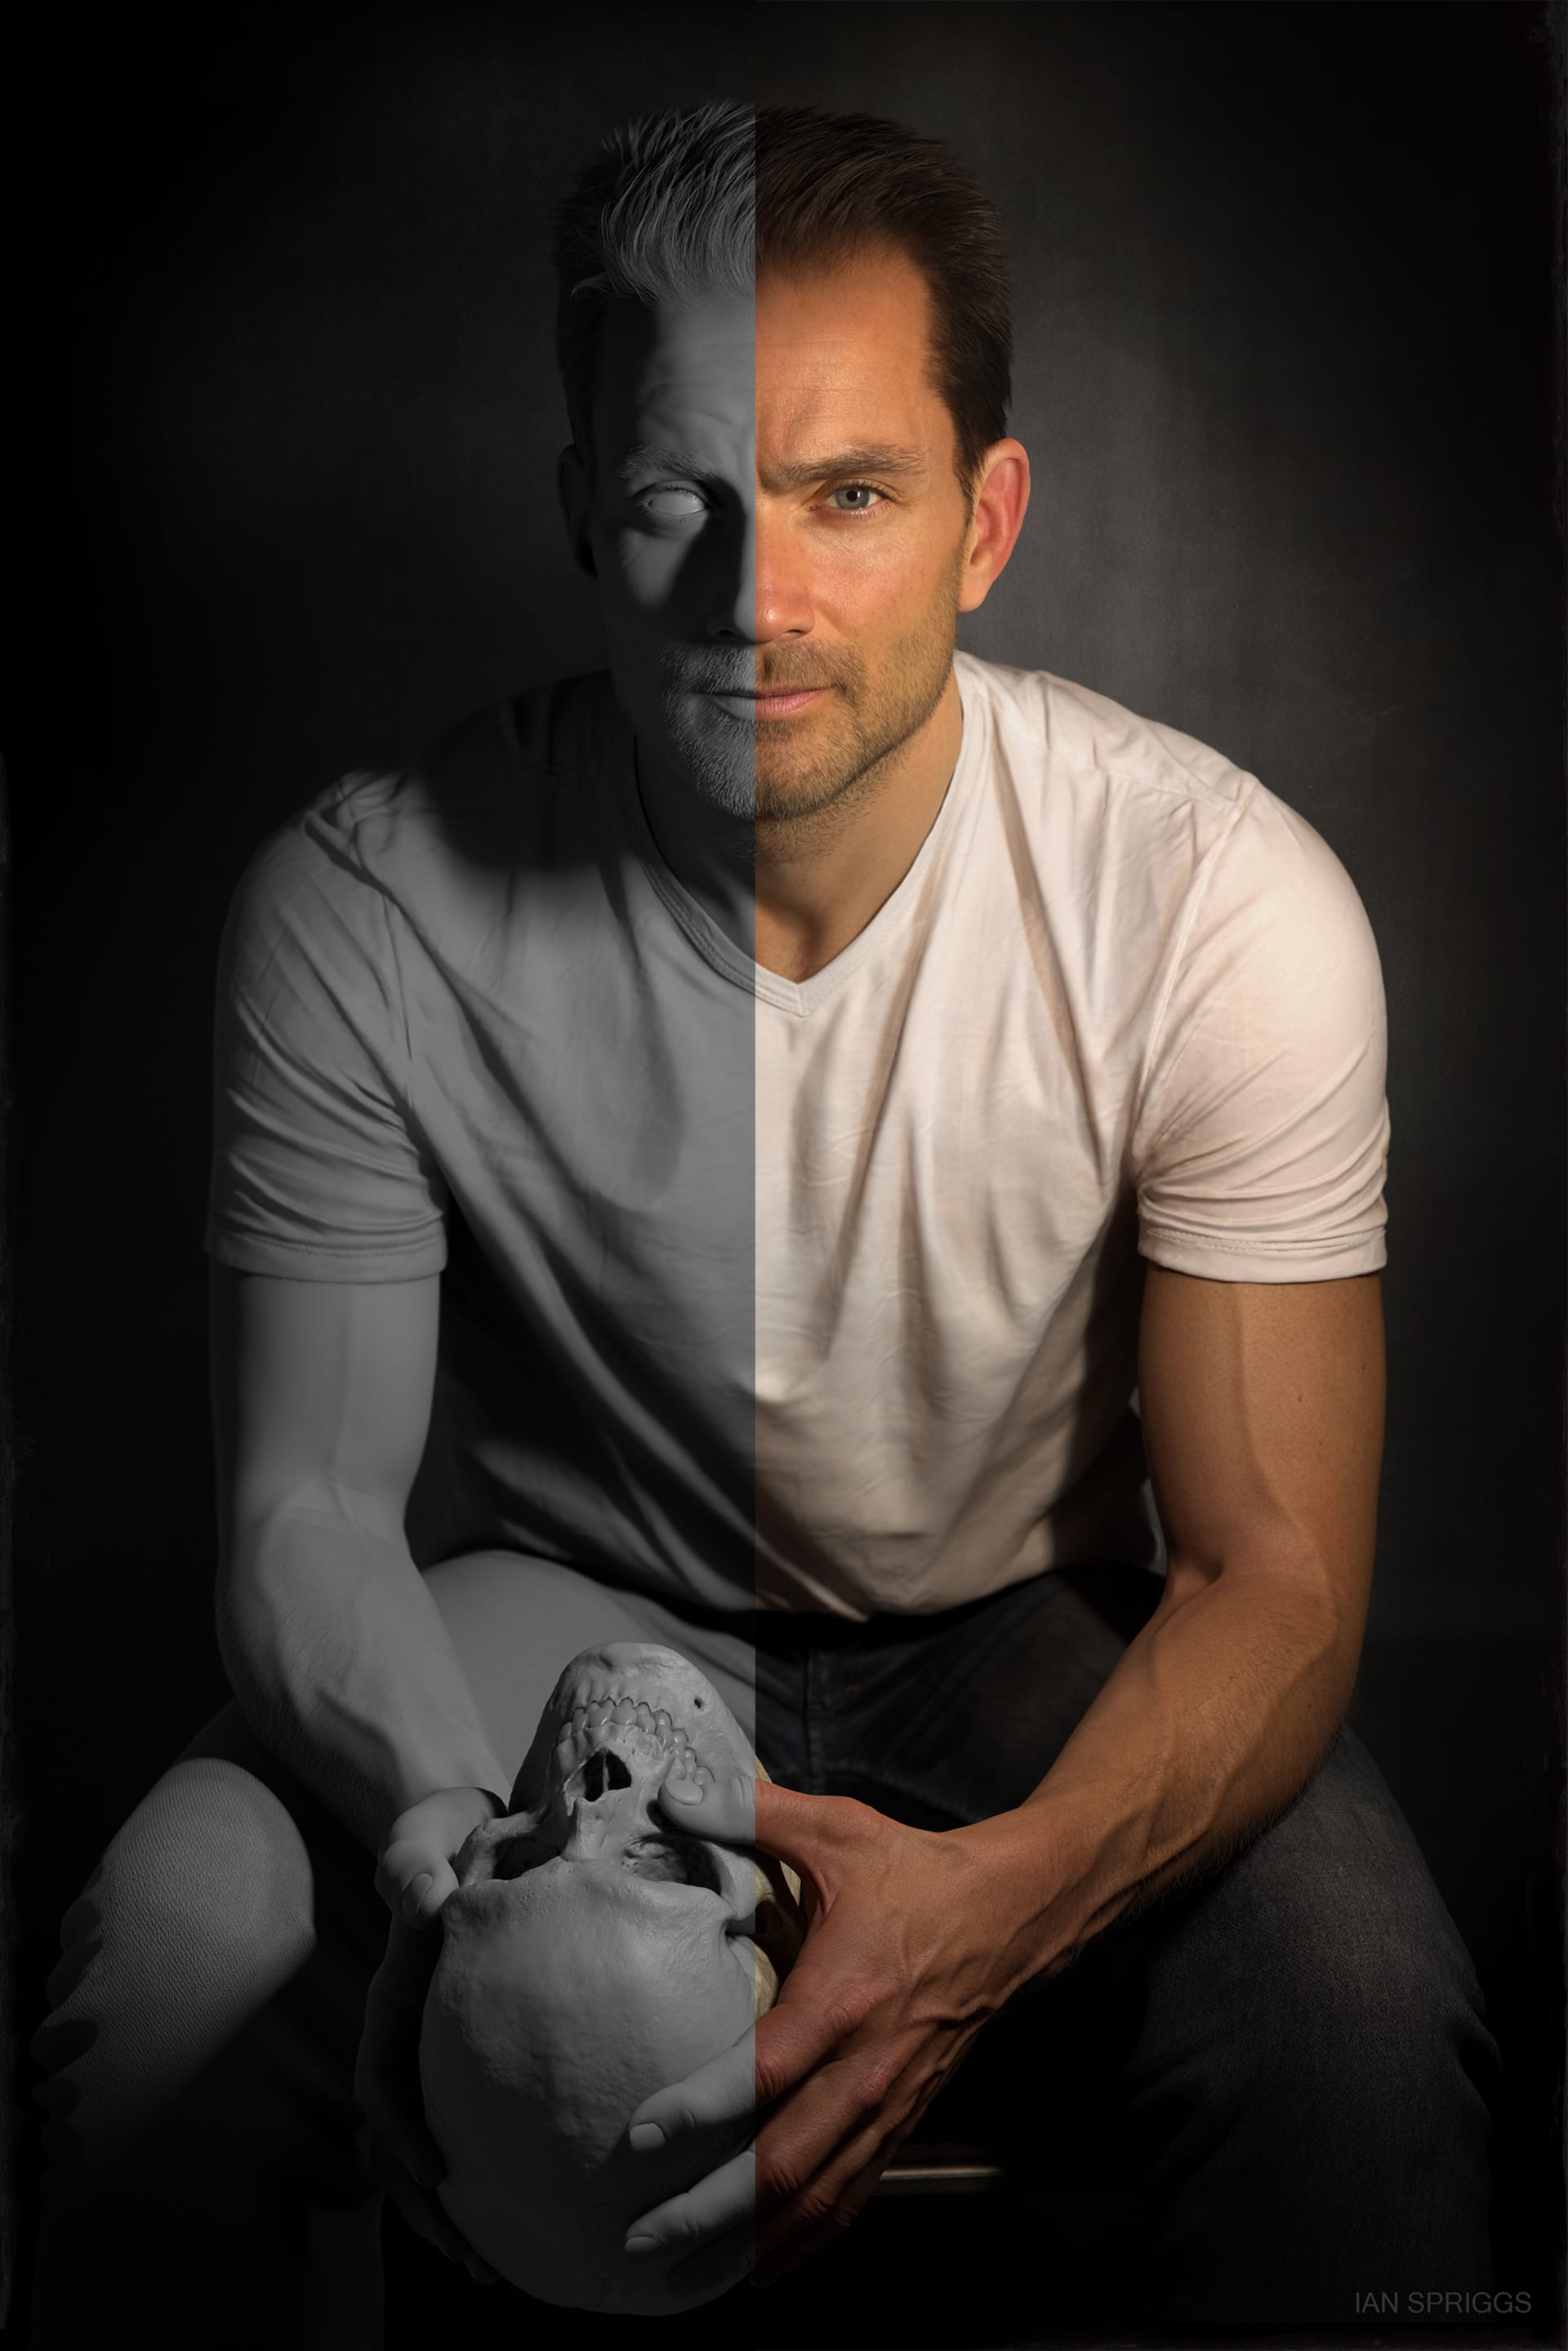
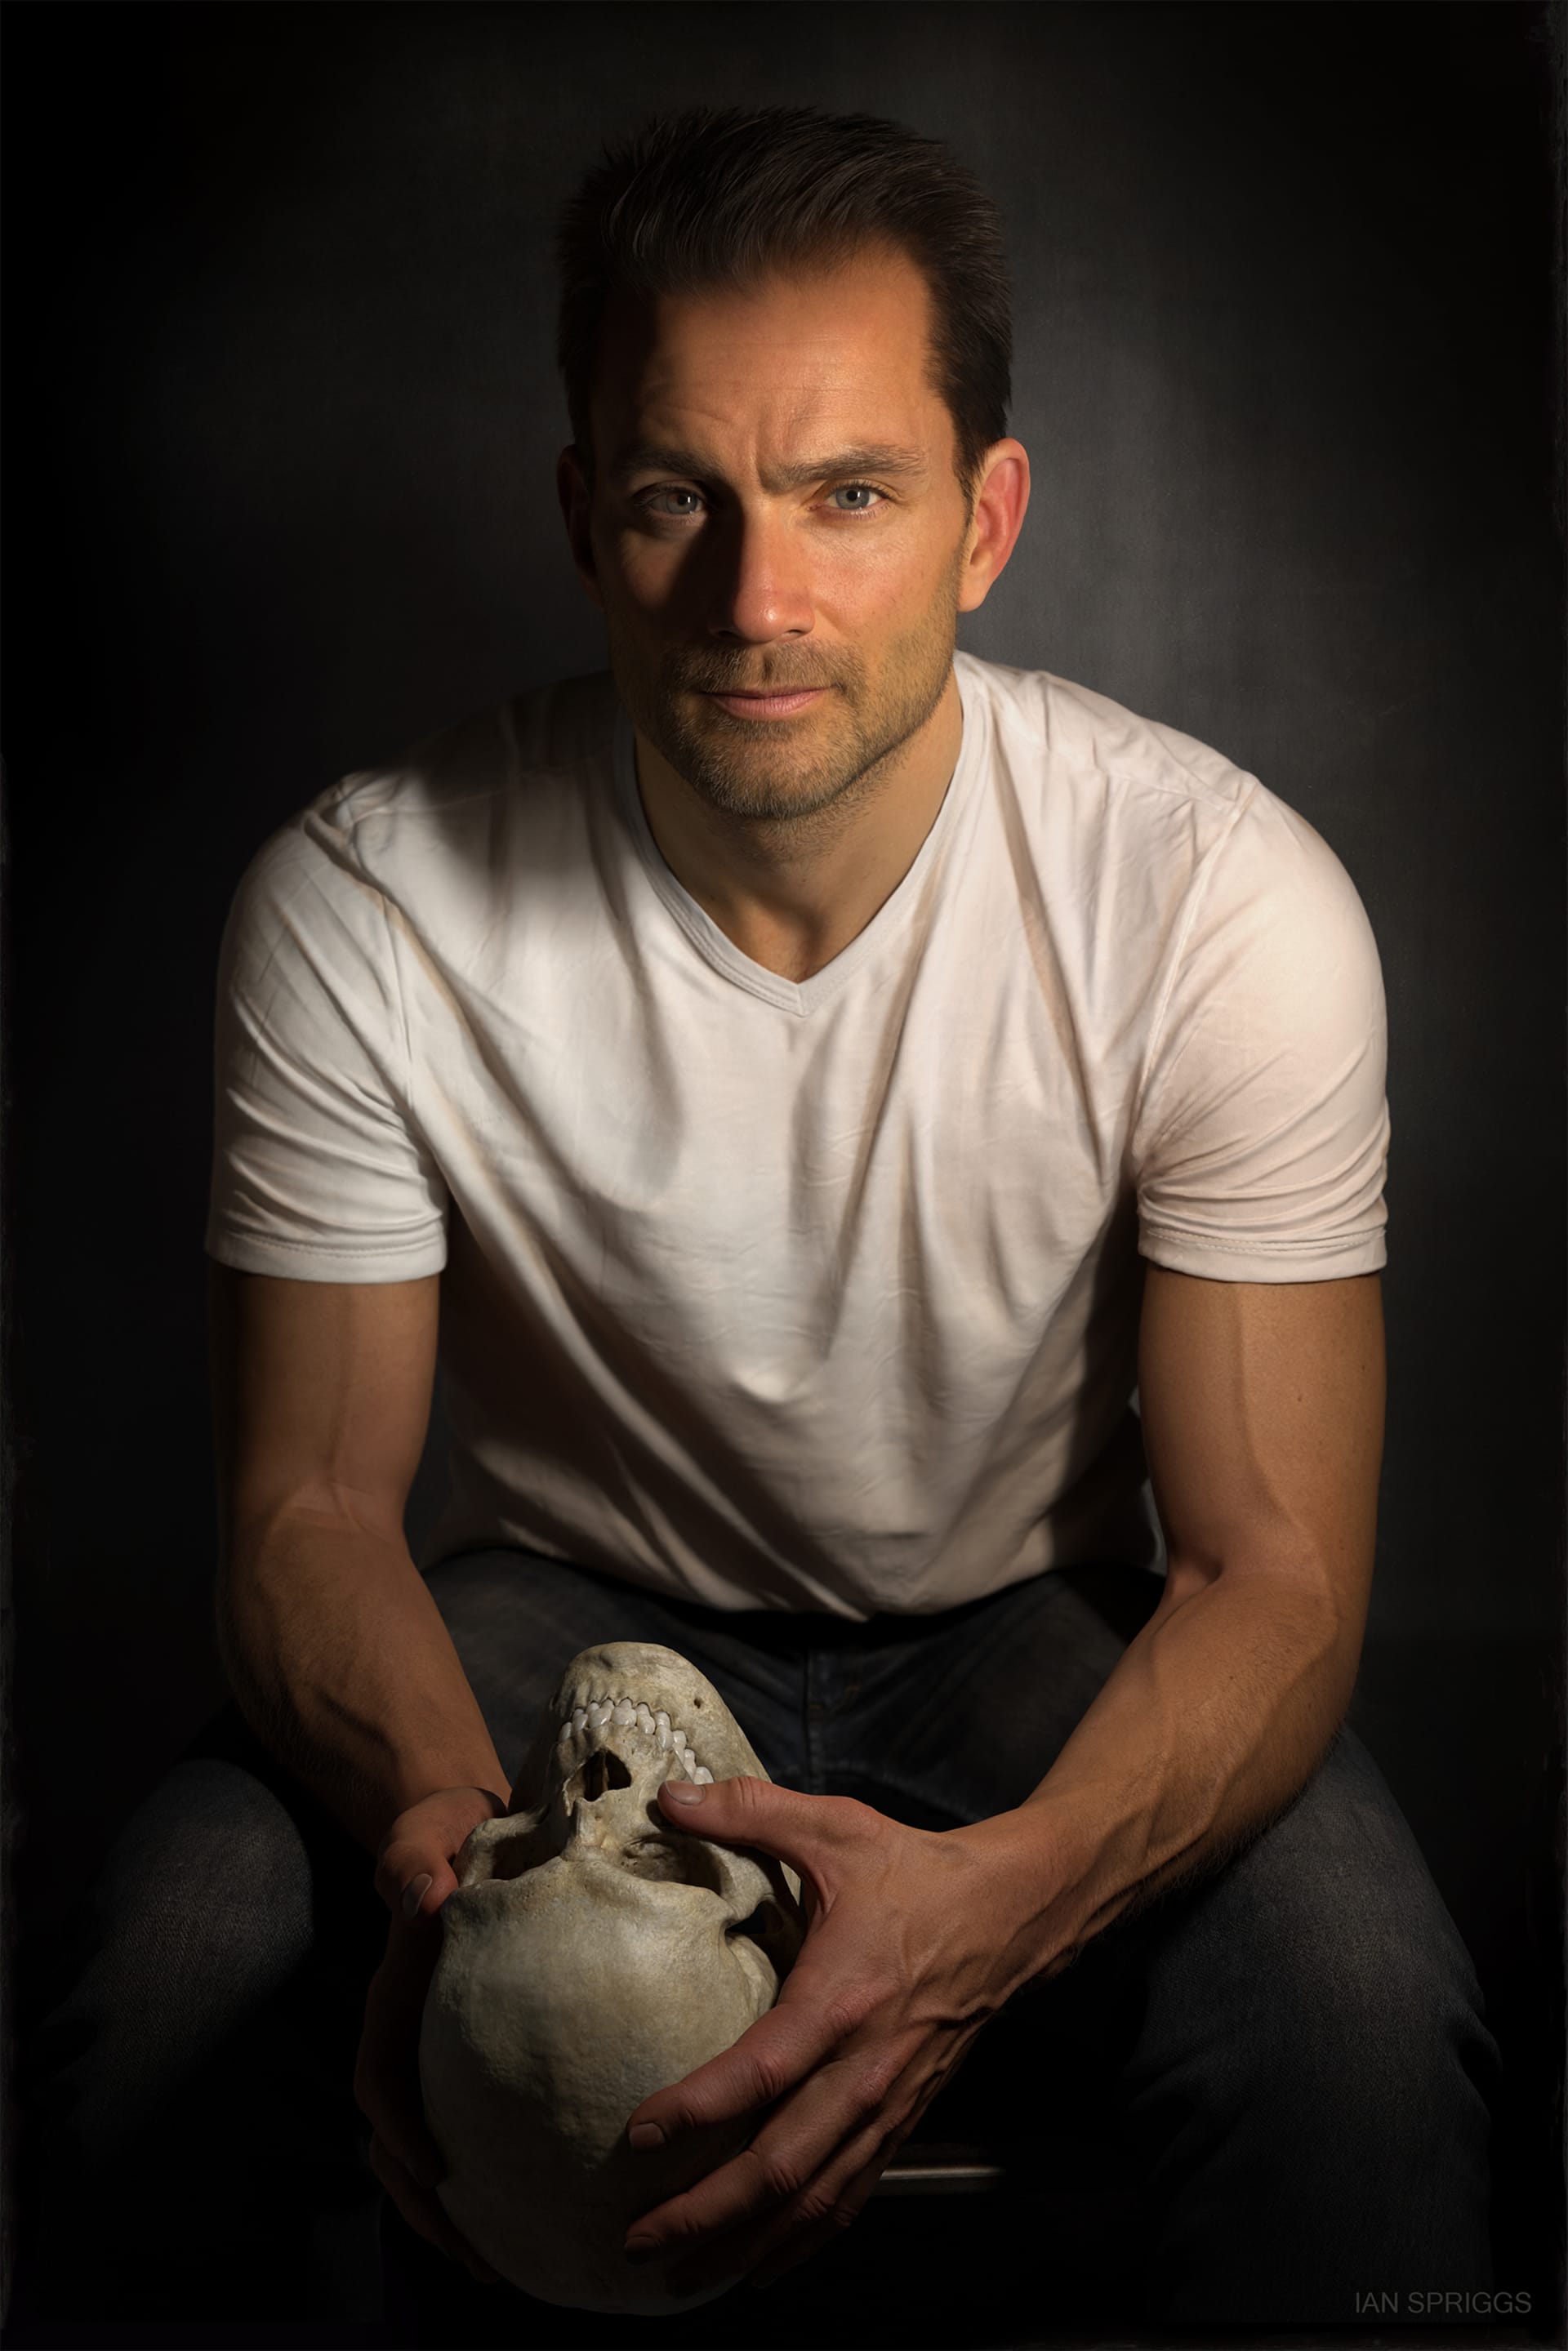
In Portrait of Scott Eaton, Ian wanted Scott’s hands to not necessarily describe wealth, but instead to represent his career. “I wanted to show the intimacy between Scott and his career,” Ian answers. “He chooses his path in life; he wants to do anatomy; he wants to give back as an artist. The solid grip of the skull also indicates that he's like taking control over what he loves doing.”
And the details don’t stop there. Take note that the skull is a reverse-forensics of Scott’s own head, meaning he is essentially holding his own skull in his hands. Every detail counts.
Getting the hands right in a portrait is as important as perfecting the face. In Scott's portrait, he's holding this skull as a representation of his exceptional career mastering anatomy. (And in real life, he often carries a skull, too!)
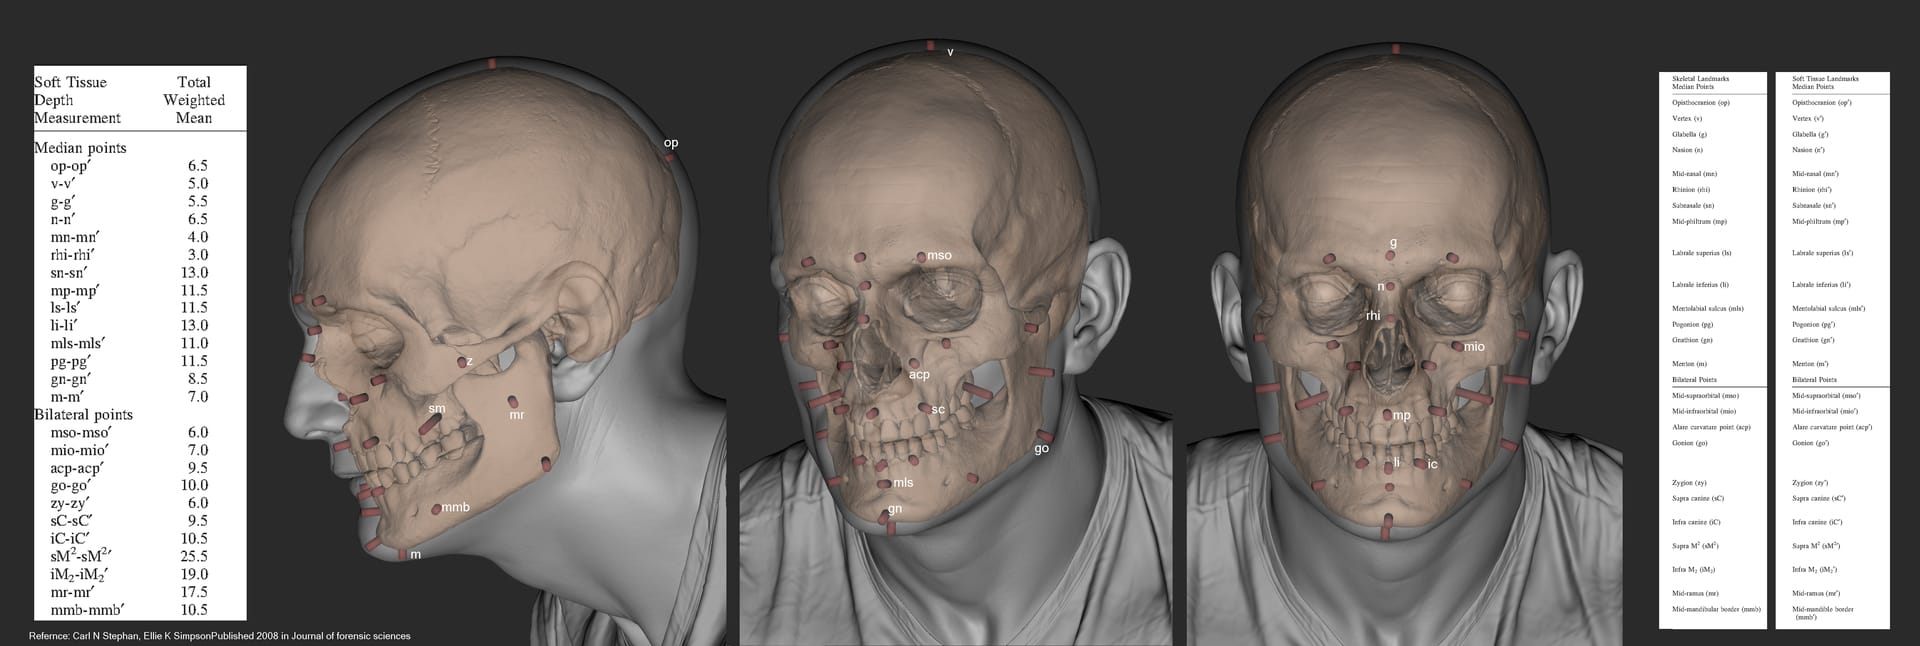
Scott is literally holding his own skull in his hands. Ian dabbled in a little backward-forensics, as shown here.
As well as using his 3D portraits to tackle new challenges, they’re also an opportunity for Ian to explore new compositions. “I've always wanted to create a skull,” Ian says. “I'm fascinated by skulls for many reasons, and in Scott's portrait, it’s compositionally a playing card. It’s like a traditional King playing card with two heads; Scott’s head and his skull tell the story of life and death.”
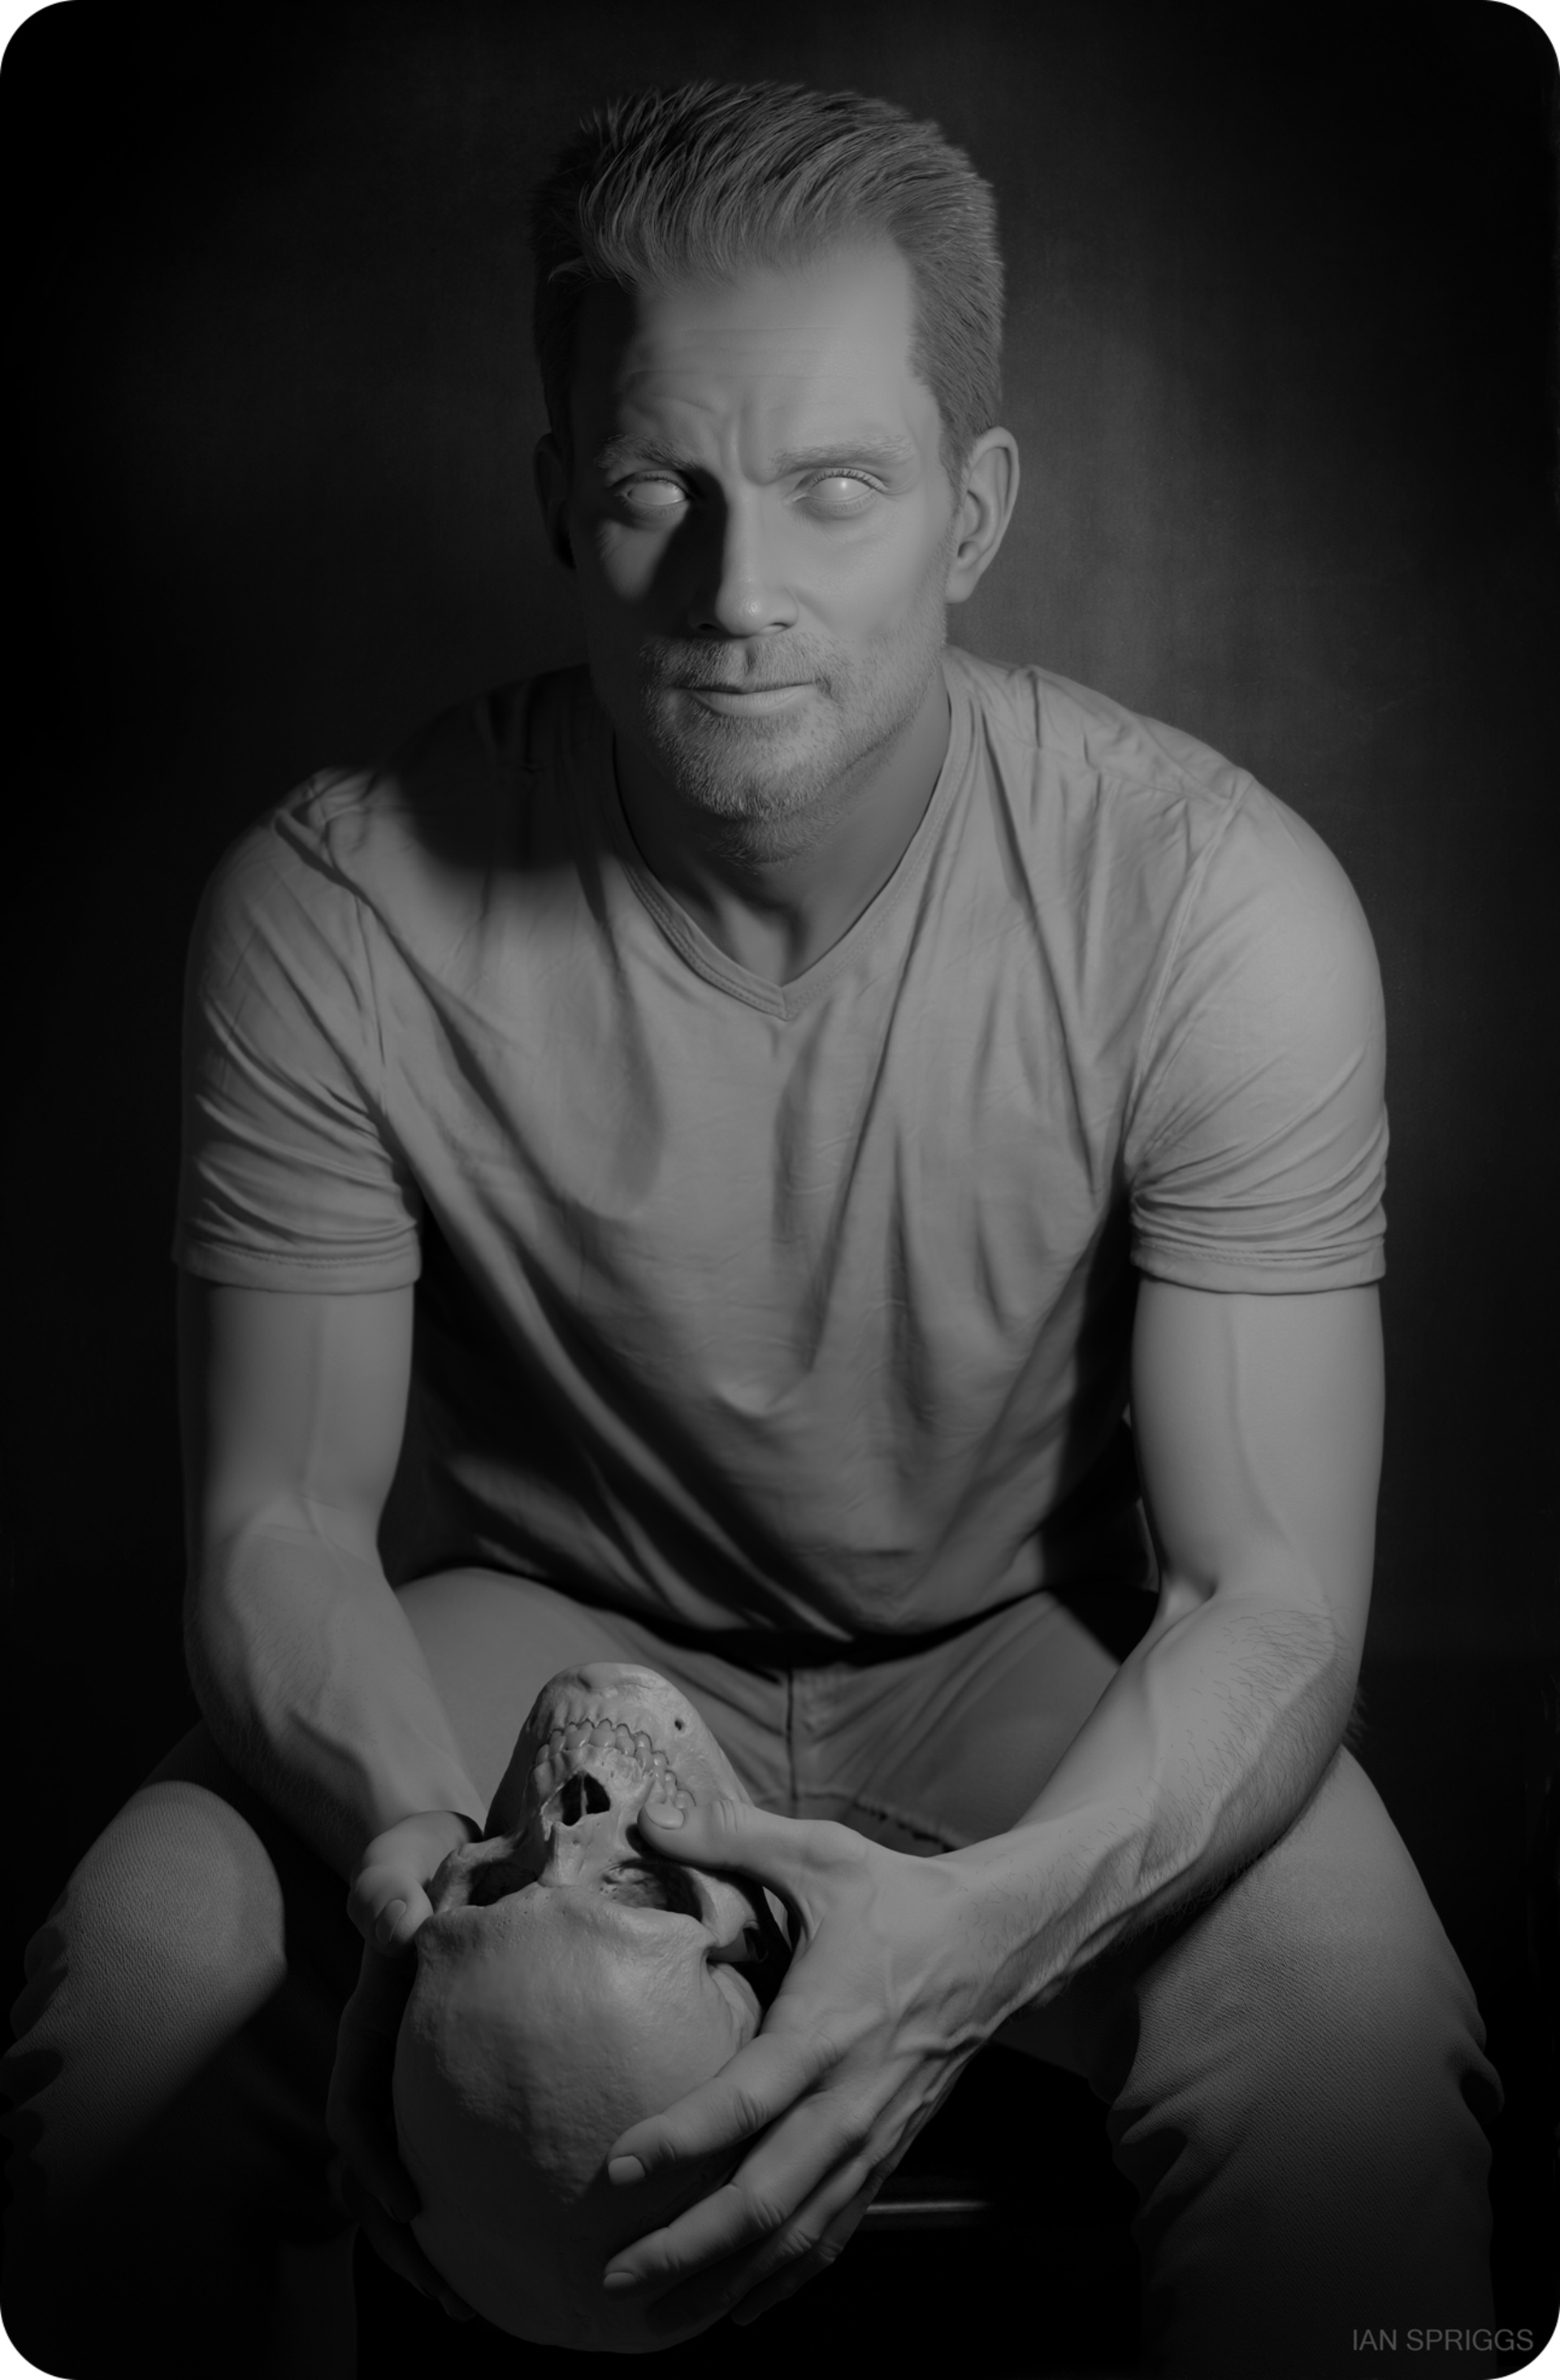
Scott is the king of the composition in Ian's playing-card-inspired portrait.
For Ian’s last three portraits, he’s used XGen hair. “XGen's pretty cool,” Ian comments. “It's a little more randomized than nHair, but XGen's been pretty good so far. You get faster results, and even when still creating each hair — each guide, one by one — you still have complete control. Honestly, I don’t think there's an easy way to do hair. It just takes time.”
The facial hair was a challenge, too. Adding a few grey hairs to the beard and fading those out where Scott doesn’t have any at all meant Ian had to do a few different levels of hair grooming. This detail is very subtle but extremely important to get right. “When you look at a portrait, you won’t even notice a few grey hairs here and there, or realize that there are many different levels with different maps painted for the volume and density,” Ian illustrates. “But if it wasn’t there at all, you’d know something was off right away. It can take a lot of work to get a natural look.”
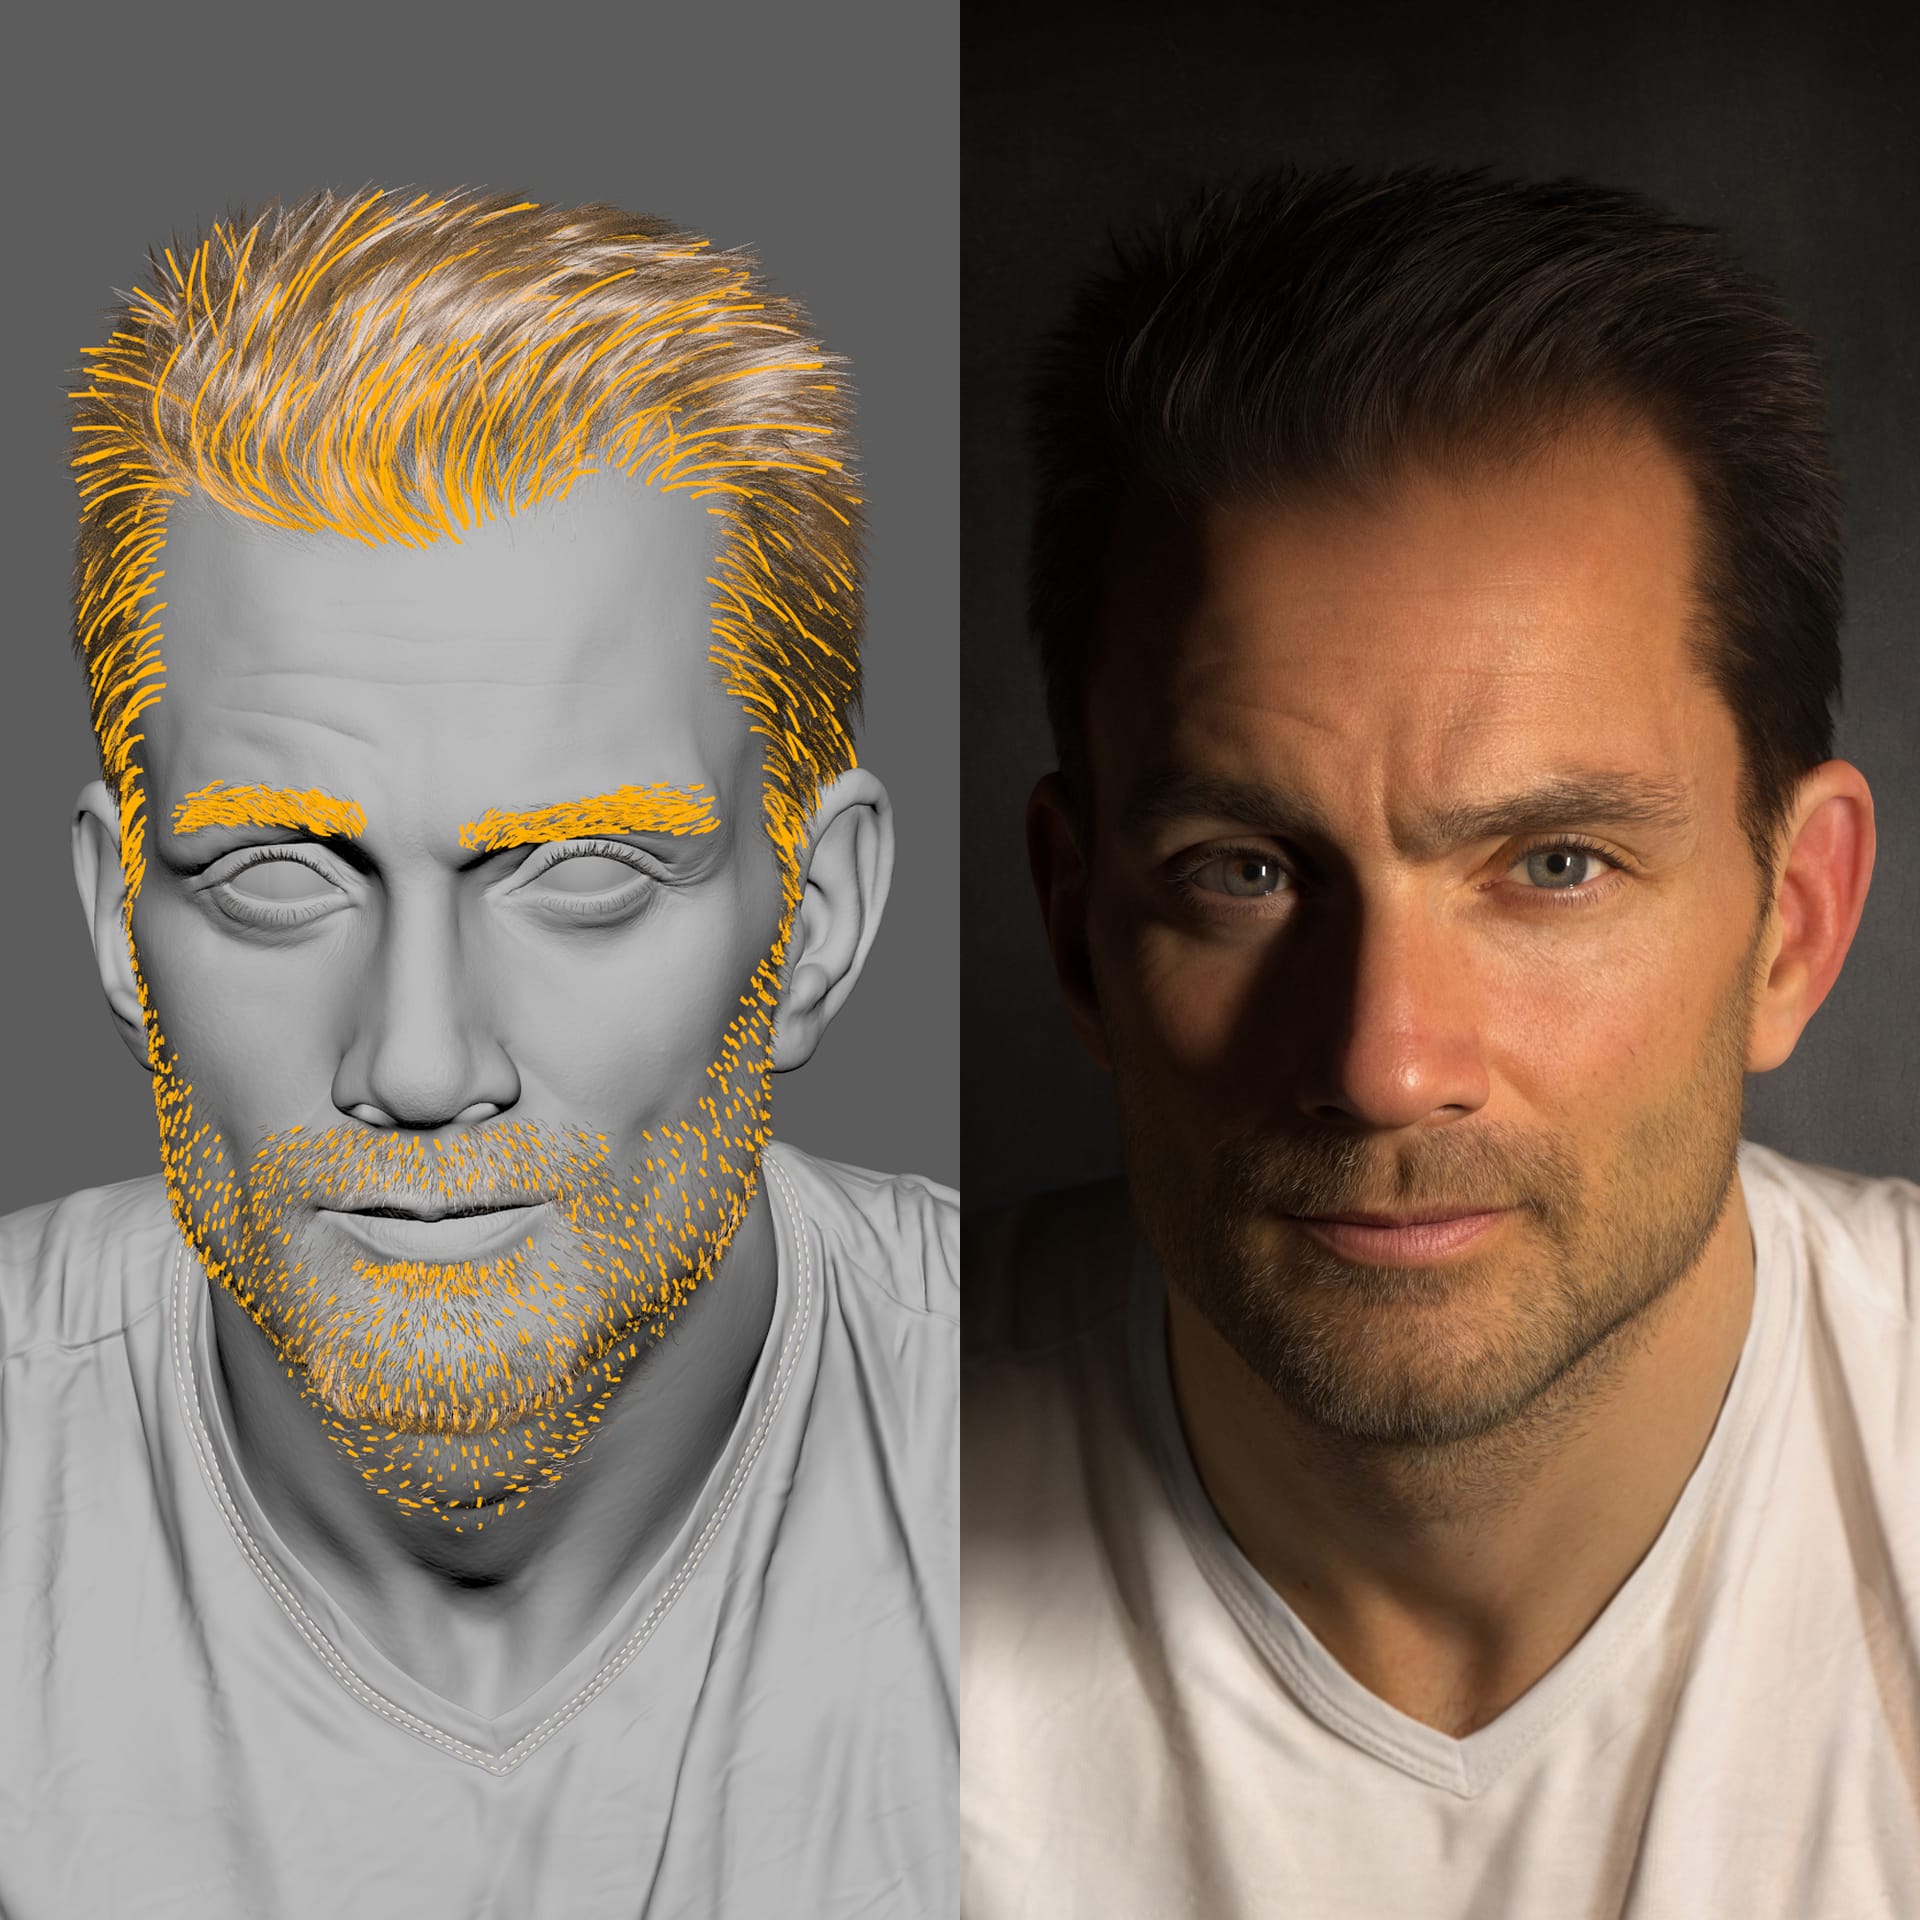
Ian used to groom his portraits using nHair but more recently switched to XGen, adding several different levels of hair to achieve the most natural results.
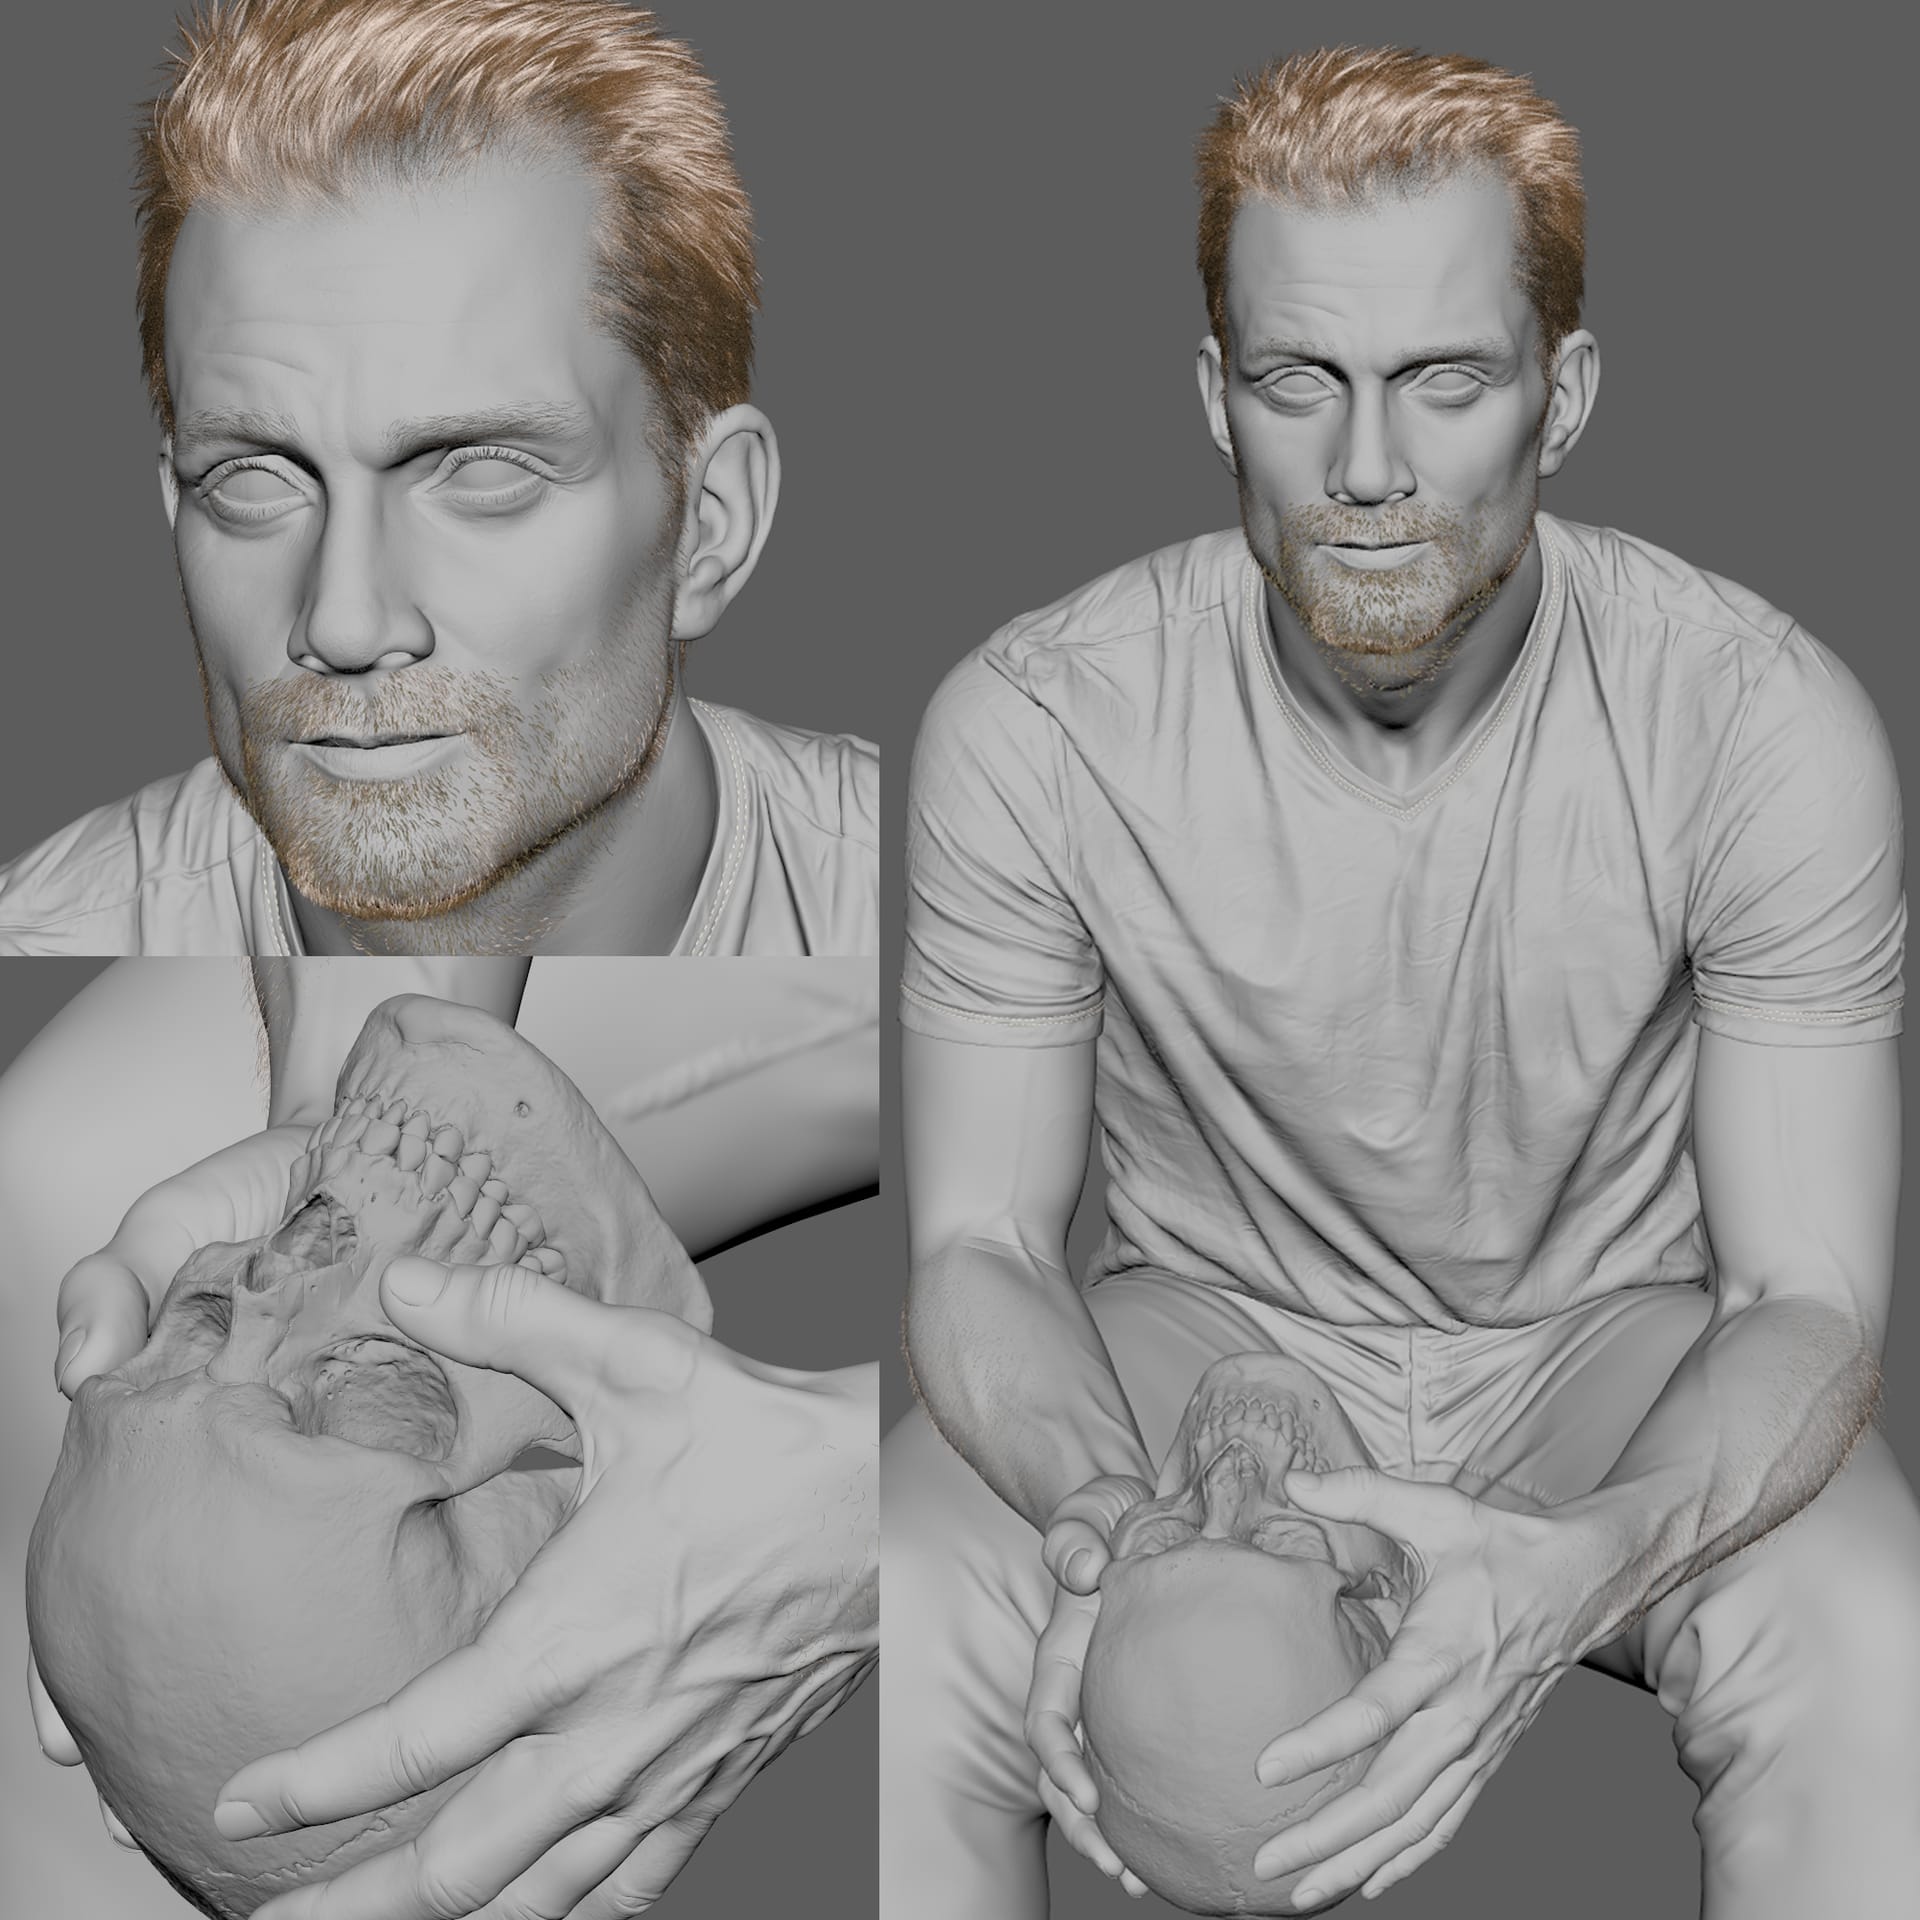
These Maya screenshots show the attention to detail that goes into Ian's sculpting and hair-grooming work.
Scott’s white T-shirt may look a simple choice, but it’s anything but. “It's hard to explain,” Ian begins, “but white shirts are complicated because you don't want them to stand out too much; you don’t want the brightest values of the piece to be all on the T-shirt. You need to be careful to avoid them popping too much, meaning you have to set the values back a little and show every wrinkle and detail.”
Because, when it's a white T-shirt, you’ll notice every detail. For this reason, Ian will create a lot of the sculpt maps so he can make things tileable and then go into Mudbox to use as a sculpt pass. “I can actually get some bumps and some extra creases this way,” Ian shares. “There's a lot of layering. Especially on a white T-shirt where there are large folds, and then the secondary creases. And if you scrunch a T-shirt up, you’ll get all those delicate wrinkles. Using Bump maps, you can also detail the natural fibers in the material.”

Every tiny wrinkle and crease has been sculpted in Mudbox.
The biggest change in Ian’s workflow since upgrading to V-Ray Next is the number of iterations he can achieve, and how quickly he can do them. “Before, I would have to wait 10 minutes per render, and then realize that the spec didn’t look right and have to render it again; keep testing it out,” Ian says. “Now it's just absolutely instant. It's like hundreds, even thousands of iterations in just one day — before I would have only been able to manage 50-100 in a day.”
“And you can still zoom in, which is pretty cool with the GPU,” Ian continues. “Even if you're working on the eye and you want to change something like the color of the eyelashes, you can just zoom in and fix it. If you want to change the spec, you can just change it.”
Stay tuned to the blog for more insights from Ian Spriggs coming soon, including brand-new hair-grooming techniques and how to make the most of GPU rendering to speed up your workflow.
Ian lives in Vancouver, Canada, where he’s currently working full-time as the Character Modeling Lead at Image Engine. He’s also created characters for the likes of ILM for films including Batman v Superman: Dawn of Justice, Harry Potter and the Deathly Hallows: Part 1, and Warcraft: The Beginning. Ian is also a member of the Digital Human League and Chaos Group Labs’ Wikihuman project.
The artwork featured in this article has impressively all been created in his spare time — which was a lot easier when he was freelancing on his own hours. Now back in a nine-to-six regimen, he still manages to produce these incredible portraits in his free time. (Now that’s dedication!) Be sure to check out his full portfolio at artstation.com/ianspriggs.
 © MARVEL 2018
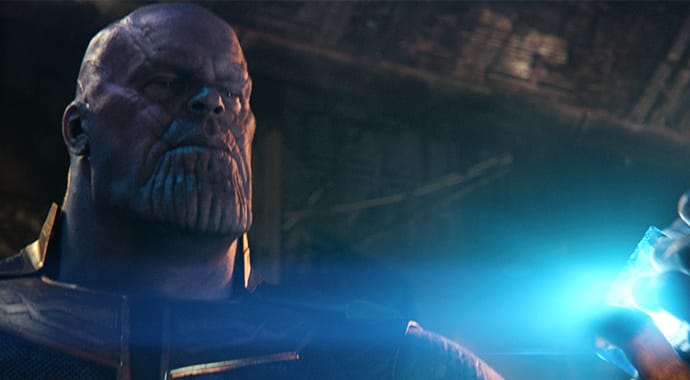
Learn how V-Ray helped Digital Domain maximize the level of detail on Thanos in Avengers: Infinity War and render some of the film’s most challenging moments.
V-Ray Next for Maya is leaps and bounds ahead of 3.6 when it comes to V-Ray GPU capabilities. We’ve compiled some of the most significant improvements.
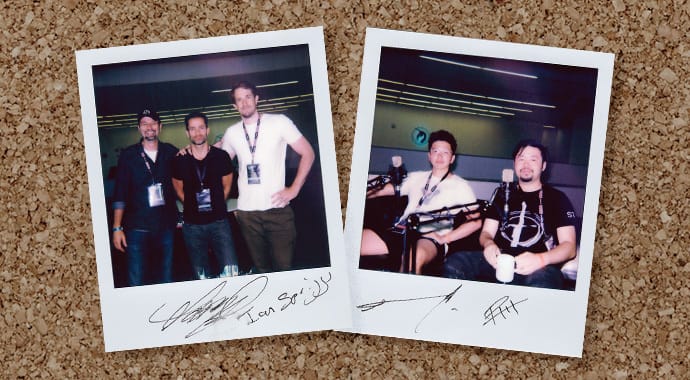
VFX and gaming artists gather in 2-for-1 THU podcast.
 © Škoda Design
Get the latest news, artist spotlight stories, tips and tricks delivered to your inbox.