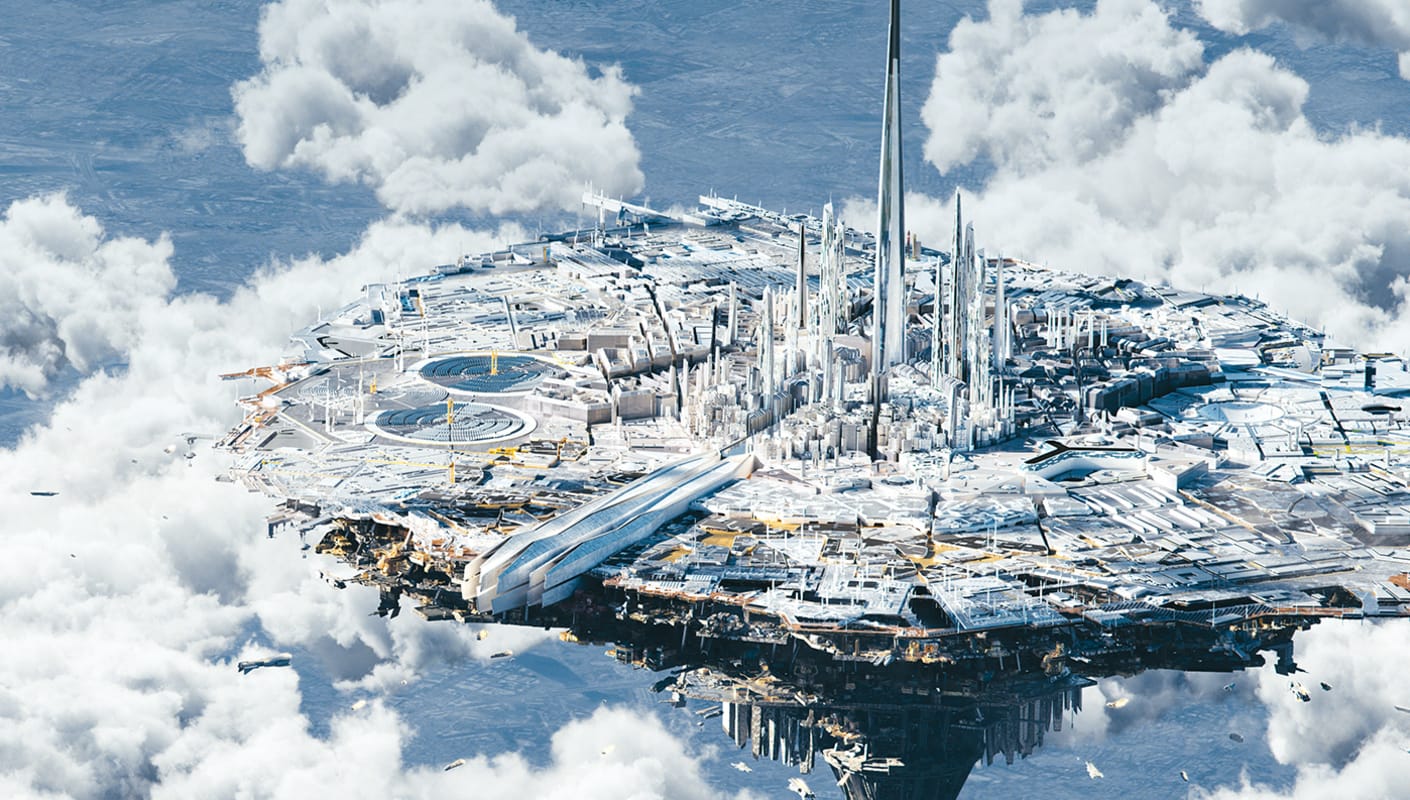
Chaos
Architecture

Industry solutions

Explore our ecosystem

Products

Media & Entertainment

Industry solutions

Explore our ecosystem

Products

Product & E-Commerce

Industry solutions

Explore our ecosystem

Products

Education & Community
The State of AI in Architecture.

New insights from 1,200+ architects.

Help

Chaos Help Center


What are you looking for?

featured-image-kitchen-part_-2-1920x600.jpg

How to create a realistic kitchen interior in 3ds Max: Part 2


Learn how to set up and tweak the camera, materials and natural lighting in V-Ray 5 for 3ds Max to create a realistic kitchen interior. 


In the previous post we covered how to set up V-Ray Denoiser, start the Interactive Production Render (IPR), and take advantage of the Chaos Cosmos asset library to enrich your scene.   


V-Ray_5_for_3ds_Max_—_How_to_create_a_kitchen_interior_visualization_0-6_screenshot.pngV-Ray_5_for_3ds_Max_—_How_to_create_a_kitchen_interior_visualization_0-6_screenshot.png

Continue watching the video tutorial from where you left off, or keep reading to learn the next steps in how to create a realistic kitchen interior visualization. If you’re already familiar with the tools outlined below, jump to the final part of the tutorial. 


In the second part of the tutorial, you will learn how to:

  1. Create a VRayPhysicalCamera and edit its properties
  2. Choose materials, apply them to objects, and tweak their textures
  3. Set up natural lighting using an HDRI from Chaos Cosmos 


1. Working with V-Ray’s Physical Camera

Finding the right camera position is important when setting up a composition. First, you should decide what areas of the scene you’d like the viewer to focus on in the shot. A frontal view of the kitchen will allow us to see all the assets and the way the light interacts with the materials.

Tip: Leave some space on both sides of the frame so the shot doesn’t look clustered.

Click the VRayPhysicalCamera icon to create a camera in the exact position of the previous camera.


P2-blog-post-screenshot-1.jpg


You can move the camera around and experiment by creating several different shots. To preview all the cameras in your scene, you should first stop the viewport IPR by clicking on the Standard menu and unticking it.


P2-blog-post-screenshot-2.jpg


Next, open the V-Ray Camera Lister and click on the gray toggles to view the different cameras you have created. 


P2-blog-post-screenshot-3.jpg


Once you’ve selected the camera you like best, open up the V-Ray Frame Buffer to start the IPR once again. You may notice that your image is very underexposed. Since V-Ray’s camera behaves the same way as a real camera, you can decrease the shutter speed to make the image brighter. 


P2-blog-post-screenshot-4.jpg


You can adjust the Sh.speed  and other camera settings from the V-Ray Camera Lister. In the video tutorial example, you will see a dramatic difference as its value is lowered from 500 to 50. You can also change the F-Number to add more depth to the image. Higher values will produce darker images where the out of focus areas will be less blurry. 


P2-blog-post-screenshot-5.jpg


You can change the Exposure from Physical Exposure to Exposure value and enter a constant value that will keep the exposure the same while you’re changing other exposure settings such as depth of field. Another important setting to consider is white balance. The color temperature is adjusted to match the color of the light source in order to achieve true whites.  


P2-blog-post-screenshot-6.jpg


White balance is very tricky to adjust manually, which is why we suggest you set it automatically. Click the Render Setup button and tick the checkboxes for both Auto exposure and Auto white balance. Suitable values will be applied to all of your cameras. To apply the values only to your current camera, you should first stop the render. The Auto-exposure not computed field will change to Transfer to camera(s). Click on it to transfer the values. 


P2-blog-post-screenshot-7.jpg


Next, let’s turn our attention to the Depth of Field or DoF property. Since you previously set the camera to use a constant Exposure value, you can change the F-Number without worrying about the brightness of the image. 

Tip: Remember that DoF is greatly dependent on the F-Number. Higher values produce sharper areas and lower values give much more blurred foreground and background areas.  


P2-blog-post-screenshot-8.jpg


After that, you should consider setting up the Focal length or F. length of your camera. Right click on the image and select Set focus distance. 

A target cursor will appear, which you can point anywhere on the image and left click to set the focus distance to the exact position in the scene. In the video tutorial example, you can see that clicking the wooden table in the foreground, brings everything in the background out of focus.  


P2-blog-post-screenshot-9.jpg


To make the foreground stand out even more, you can decrease the F-Number to achieve the desired level of blurriness in the background. 


2. Exploring materials and textures 

Before you explore the various materials available, start the V-Ray Viewport IPR by selecting it from the Standard menu. Then, click on the V-Ray Material Library Browser icon to bring up a wide selection of material categories.


P2-9.2.png


Once you’ve chosen a material you like, select the object the material is to be applied to, then right click on the material and select Apply to selected object(s).  


P2-blog-post-screenshot-10.jpg


Let’s explore what happens when we check the Use world scale and Use triplanar mapping. By enabling world scale, your material will be scaled based on the figure at the end of its name. For example, in the video tutorial, when applied to the table, the Veneer_C01_120cm material chosen, will be scaled based on 120 cm. In cases where the objects don’t have any UVs, triplanar texture mapping will be used to project the texture onto the object with seamless tiling. 


P2-blog-post-screenshot-11.jpg


Next, let’s explore the fabric category. As you’re browsing through the materials, you can right click and Preview them or select Add to favorites, and they will show up to the right side of the library browser. 

Tip: For fabric materials, you can disable Triplanar mapping and world scale since the object already has UVs.  


P2-blog-post-screenshot-12.jpg


After applying a fabric to the blanket, let’s tweak some of the materials, starting with the wooden table. Click on the Material Editor icon and then on Pick Material from Object.  Then right click and select Maps > General > Color Correction.  


P2-blog-post-screenshot-13.jpg


After creating the Color Correction Map, assign it to the diffuse texture by clicking and dragging the point to move it and link it to the Diffuse map. You can edit the Basic Parameters Saturation, Lightness, Brightness and Contrast so that it matches the color scheme of the room. 


P2-blog-post-screenshot-14.jpg


Next, let’s see how to turn a basic floor with repetitive tiling into one with an interesting texture. You can add a VRay UVW Randomizer Map to rotate, scale, position different segments of the map seamlessly, as well as randomize the texture on any floor material. A material can be randomized by many parameters including By name, By object or By element. Since there are a lot of elements in this tutorial’s scene, randomizing By element achieves a great wood pattern that looks less repetitive.  


P2-blog-post-screenshot-15.jpg


How about adding some sheen to the fabric material? In the past, cloth materials required fall off maps in order to achieve the proper fabric reflections. Now, we have a parameter called Sheen, a reflective layer on top of the diffuse color, making the fall off effect easier than ever. If the sheen affect isn’t visible, you can lower the value of Sheen glossiness. Higher values let more light reach the defuse and diminish the sheen's visibility, whereas lower values reflect more light, so the sheen effect is more pronounced. 


P2-blog-post-screenshot-16.jpg


Finally, let’s learn how to tweak lamp material. The lamp material in the tutorial’s scene has a black coating which could use some extra shine. The lamp is composed of a MultiSub material with multiple V-Ray materials assigned to it. The parameter Coat adds a new reflective material on top of the original one. Editing the Coat amount value affects the blending weight of the coat layer – 0 meaning no coat layer and higher values gradually increasing the blending of the coat. Increasing the Coat glossiness will add more shine to the material. 


3. Setting up natural lighting

Lighting plays one of the most important roles in creating a realistic render. In this tutorial, you will learn how to set up natural lighting. You created a Sun and Sky in part one of the tutorial, which gives you a light source to work with. You can now adjust the sun to your liking.


P2-blog-post-screenshot-17.jpg


Click your sun to select it and bring up the Sun Parameters menu. There are many different parameters you can set, but in this tutorial we’ll focus on the Size multiplier. As the disk of the sun becomes larger, the shadows will be softer. Entering a value greater than 1, will soften the hard shadows of the tree branches in the scene example. 


P2-blog-post-screenshot-18.jpg


The best way to set up natural lighting is by adding the Sky inside a Dome light. This method will allow the Sky’s light to be sampled more efficiently. Click on the V-Ray Dome Light icon, and then place the dome light outside the grid. From the Environment and Effects menu, click DefaultVraySky (VRaySky) and copy it to your scene. Select Instance for the Method and hit OK.  


P2-blog-post-screenshot-19.jpg


Open Chaos Cosmos Browser, type HDRI in the search bar, and select a suitable HDRI for your scene. 


P2-blog-post-screenshot-20.jpg


Next, turn off the Adaptive Dome light and the Sun. 


P2-blog-post-screenshot-21.1.jpg


Select the new Dome you just imported from the Cosmos Browser, and tick Enabled under Sun Parameters. 


P2-blog-post-screenshot-22.jpg


 Under the Dome light drop down menu select Lock texture to icon. This option allows you to rotate the Dome in the viewport, the HDRI rotating along with it. By rotating the dome you can see the effect of your new HDRI.

Tip: Your point of reference is the line sticking out of the dome’s circle. This is the sun’s orientation. This is only valid when the sun is in the middle of the HDRI. 

Don’t forget to turn the dome light and the sun back on from the right side panel, as we are going to need them in the third and final part of the tutorial.


Onwards to the final part 

In the third part of the tutorial, you will learn how to apply various render settings and establish an effective post processing workflow in order to achieve a high quality render each time.


Go beyond rendering.

Try V-Ray for 3ds Max free for 30 days.
© Škoda Design

Subscribe to our blog.

Get the latest news, artist spotlight stories, tips and tricks delivered to your inbox.

By submitting your information you are agreeing to receive marketing messages from Chaos. You can opt-out at any time. Privacy Policy.

Chaos
© 2024 Chaos Software EOOD. All Rights reserved. Chaos®, V-Ray® and Phoenix FD® are registered trademarks of Chaos Software EOOD in Bulgaria and/or other countries.