
Your cart
There are no items in your cart.

Back in 2017, we decided to release a tool called V-Ray Benchmark. The idea was simple — and a response to one of the top questions that many of our users ask us every day: What hardware should I invest in to get the most out of V-Ray?
We put out a standalone application, free of charge, that would allow people to test their hardware for both CPU and GPU rendering. They could then choose to post their results onto our Benchmark page and see how their hardware would compare to others. And if they didn’t want to post their own results — or maybe didn’t have any hardware to test yet — they could still check out other results online and make informed choices from there.
Since then, we have updated the application to V-Ray 6 Benchmark. Additionally, we have also noticed that it's not just users making use of this software. A lot of hardware manufacturers and hardware reviewers have also used the V-Ray Benchmark application to test the latest and greatest innovations in hardware. This has made it one of the defacto tools used by the computer graphics and hardware industry to test performance. What’s more, unlike some other benchmark tools, like Cinebench, V-Ray Benchmark uses a program that people will actually be using in their work.
But first, let’s go back and take a brief look at the history of the tool and examine just what it has come to mean in the CG industry today.
The initial thoughts behind the tool
Like we said: The tool came out of a demand from our users to have something that would truly benchmark their V-Ray performance with other hardware. While some benchmark scenes have existed in the past, it required the users to load the scene into their DCC application and render it there. But these types of tests are not always reliable, as some settings might vary from different users — and some users might change some settings to skew their results. Additionally, some users may not actually own a license of V-Ray yet and might just want to test their hardware before they consider buying one.
So we decided to make a standalone, license-free application that uses the same rendering core as our commercial products — that anyone can download and run on their computer. By making it standalone, we don’t need to worry about settings that a DCC application might be using. Then we removed all other settings that might be manipulated so that we can get a true apples-to-apples comparison.
Why are there two tests: CPU vs. GPU?
The only exception in terms of an apples-to-apples comparison was rendering with V-Ray vs. V-Ray GPU. V-Ray runs on the CPU only and V-Ray GPU runs on the GPU and/or the CPU. As many of you might know: V-Ray processes differently than V-Ray GPU — even when both are running on CPUs. As such, there is no way to get a true apples-to-apples comparison of these two types of hardware. Additionally, while V-Ray GPU can also take advantage of your CPU hardware, there are certain efficiencies that run in one renderer that would not be taken into account in the other.
Therefore, we decided to make two different benchmarks with two different scenes so as to truly separate the results of each test.
How V-Ray Benchmark 1.0 got outdated
When we first created V-Ray Benchmark in 2017, we decided to measure the results of the benchmark in terms of the time to complete the render once it achieved a certain noise threshold. Our initial idea was to use a scene that would take about one to two minutes on fairly standard hardware. As the popularity of the benchmark application took off, we noticed that many users — and hardware manufacturers — were testing it on some extremely fast systems, both on the CPU and the GPU. Once people started testing on systems with 128 cores, or 16 GPUs, the benchmark times quickly dropped from one or two mins to 20 seconds or less. When the render times get that low, the results of the test start to become unreliable because the I/O starts to have a bigger impact on the overall time compared to the actual compute time.
Additionally, the original version of the V-Ray Benchmark was based on V-Ray 3. Since V-Ray Next, we have updated V-Ray’s core engine to be much faster and take advantage of new hardware features. So V-Ray Benchmark 1.0 was no longer going to be a good test for people to test their hardware, or the true performance that the current V-Ray has to offer.
It was clear that we needed to update V-Ray Benchmark and that we had to take a different approach to measuring speed: Something that wouldn't become obsolete as machines got faster; something that was future-proof. So on top of updating the V-Ray engine and the scenes that it renders, we decided to have all the renderings run for a fixed amount of time. Our new results measure the amount of samples that are shot in that fixed time for the CPU and the amount of ray-traced paths that are shot for the GPU. That way, we can consistently see every machine’s performance without worrying about the tests not running long enough.
Again, since the V-Ray test and the V-Ray GPU test run two very different rendering hardware architectures, we kept the results of each test to be two different types of results — ksamples for V-Ray and mpath for V-Ray GPU — to make sure users didn’t accidently try and compare their V-Ray results with V-Ray GPU results. After all, this is a test for how well machines perform with each renderer, and not a test between the renderers themselves.
How to run the V-Ray Benchmark test
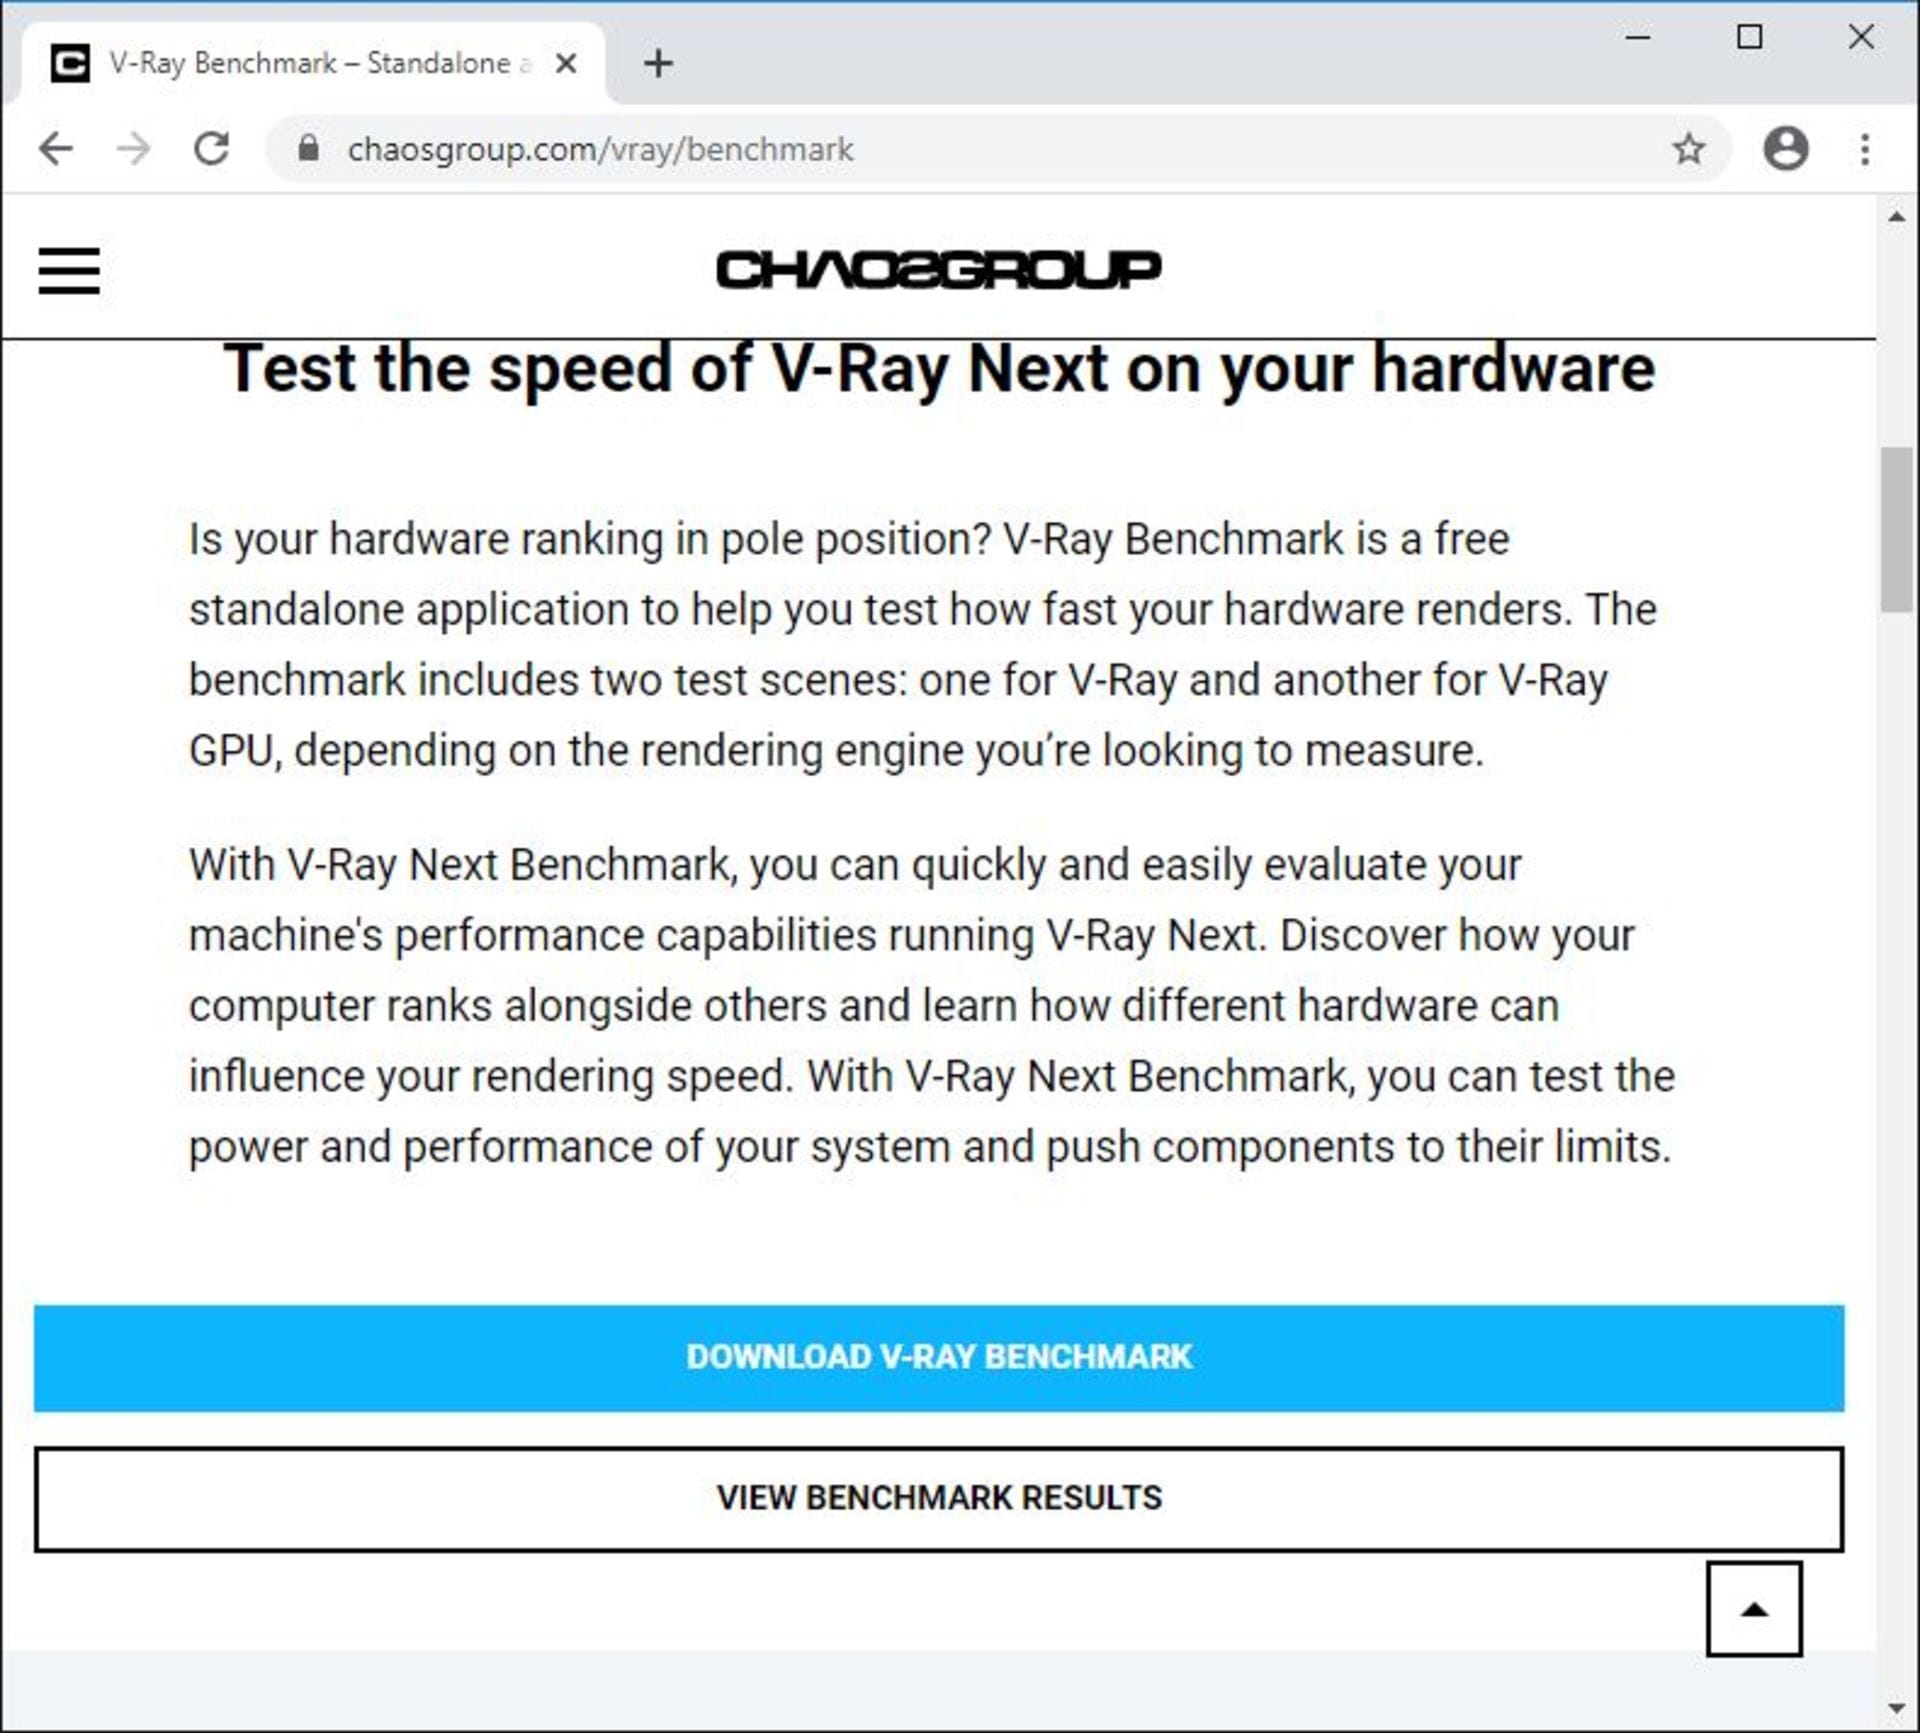
Running the test is extremely easy. The first thing you want to do is to download the V-Ray Benchmark application. In order to download it, you might need to register on our site if you have not already done so. (Registering is free.)
Once you have done that, download our latest version and run it on your computer. The application is standalone and doesn’t even require an installation.
It should be noted that if you install a new GPU, or a new GPU driver, that you will notice a slight delay before it runs the first test. This is because V-Ray GPU needs to configure itself for the new hardware and/or driver.
Once the V-Ray Benchmark application is up and running, you will see two options on the left. You can run the V-Ray test, which is CPU-only, or you can run V-Ray GPU on both GPUs and CPUs.
For the V-Ray GPU test, you will see a list of the hardware you can choose to test on. It will list all the supported GPUs and CPUs in your system. You can select one, a few, or all of them. If you want to test the system only using GPUs, make sure to deselect the CPU(s) listed — which is a useful measurement of how much benefit your CPU is giving on top of your GPUs.
Then just hit the Start button and let the tests run their course. Each test will run for exactly one minute, regardless of your machine’s speed. Once the tests are done your results will be presented to you. And that outlines the results. You can then add more information about your rig if you want to, and submit your score.
If you’re not satisfied with your score because you think other programs might have interfered with your results, you can always run the test again.
How to analyze V-Ray Benchmark results
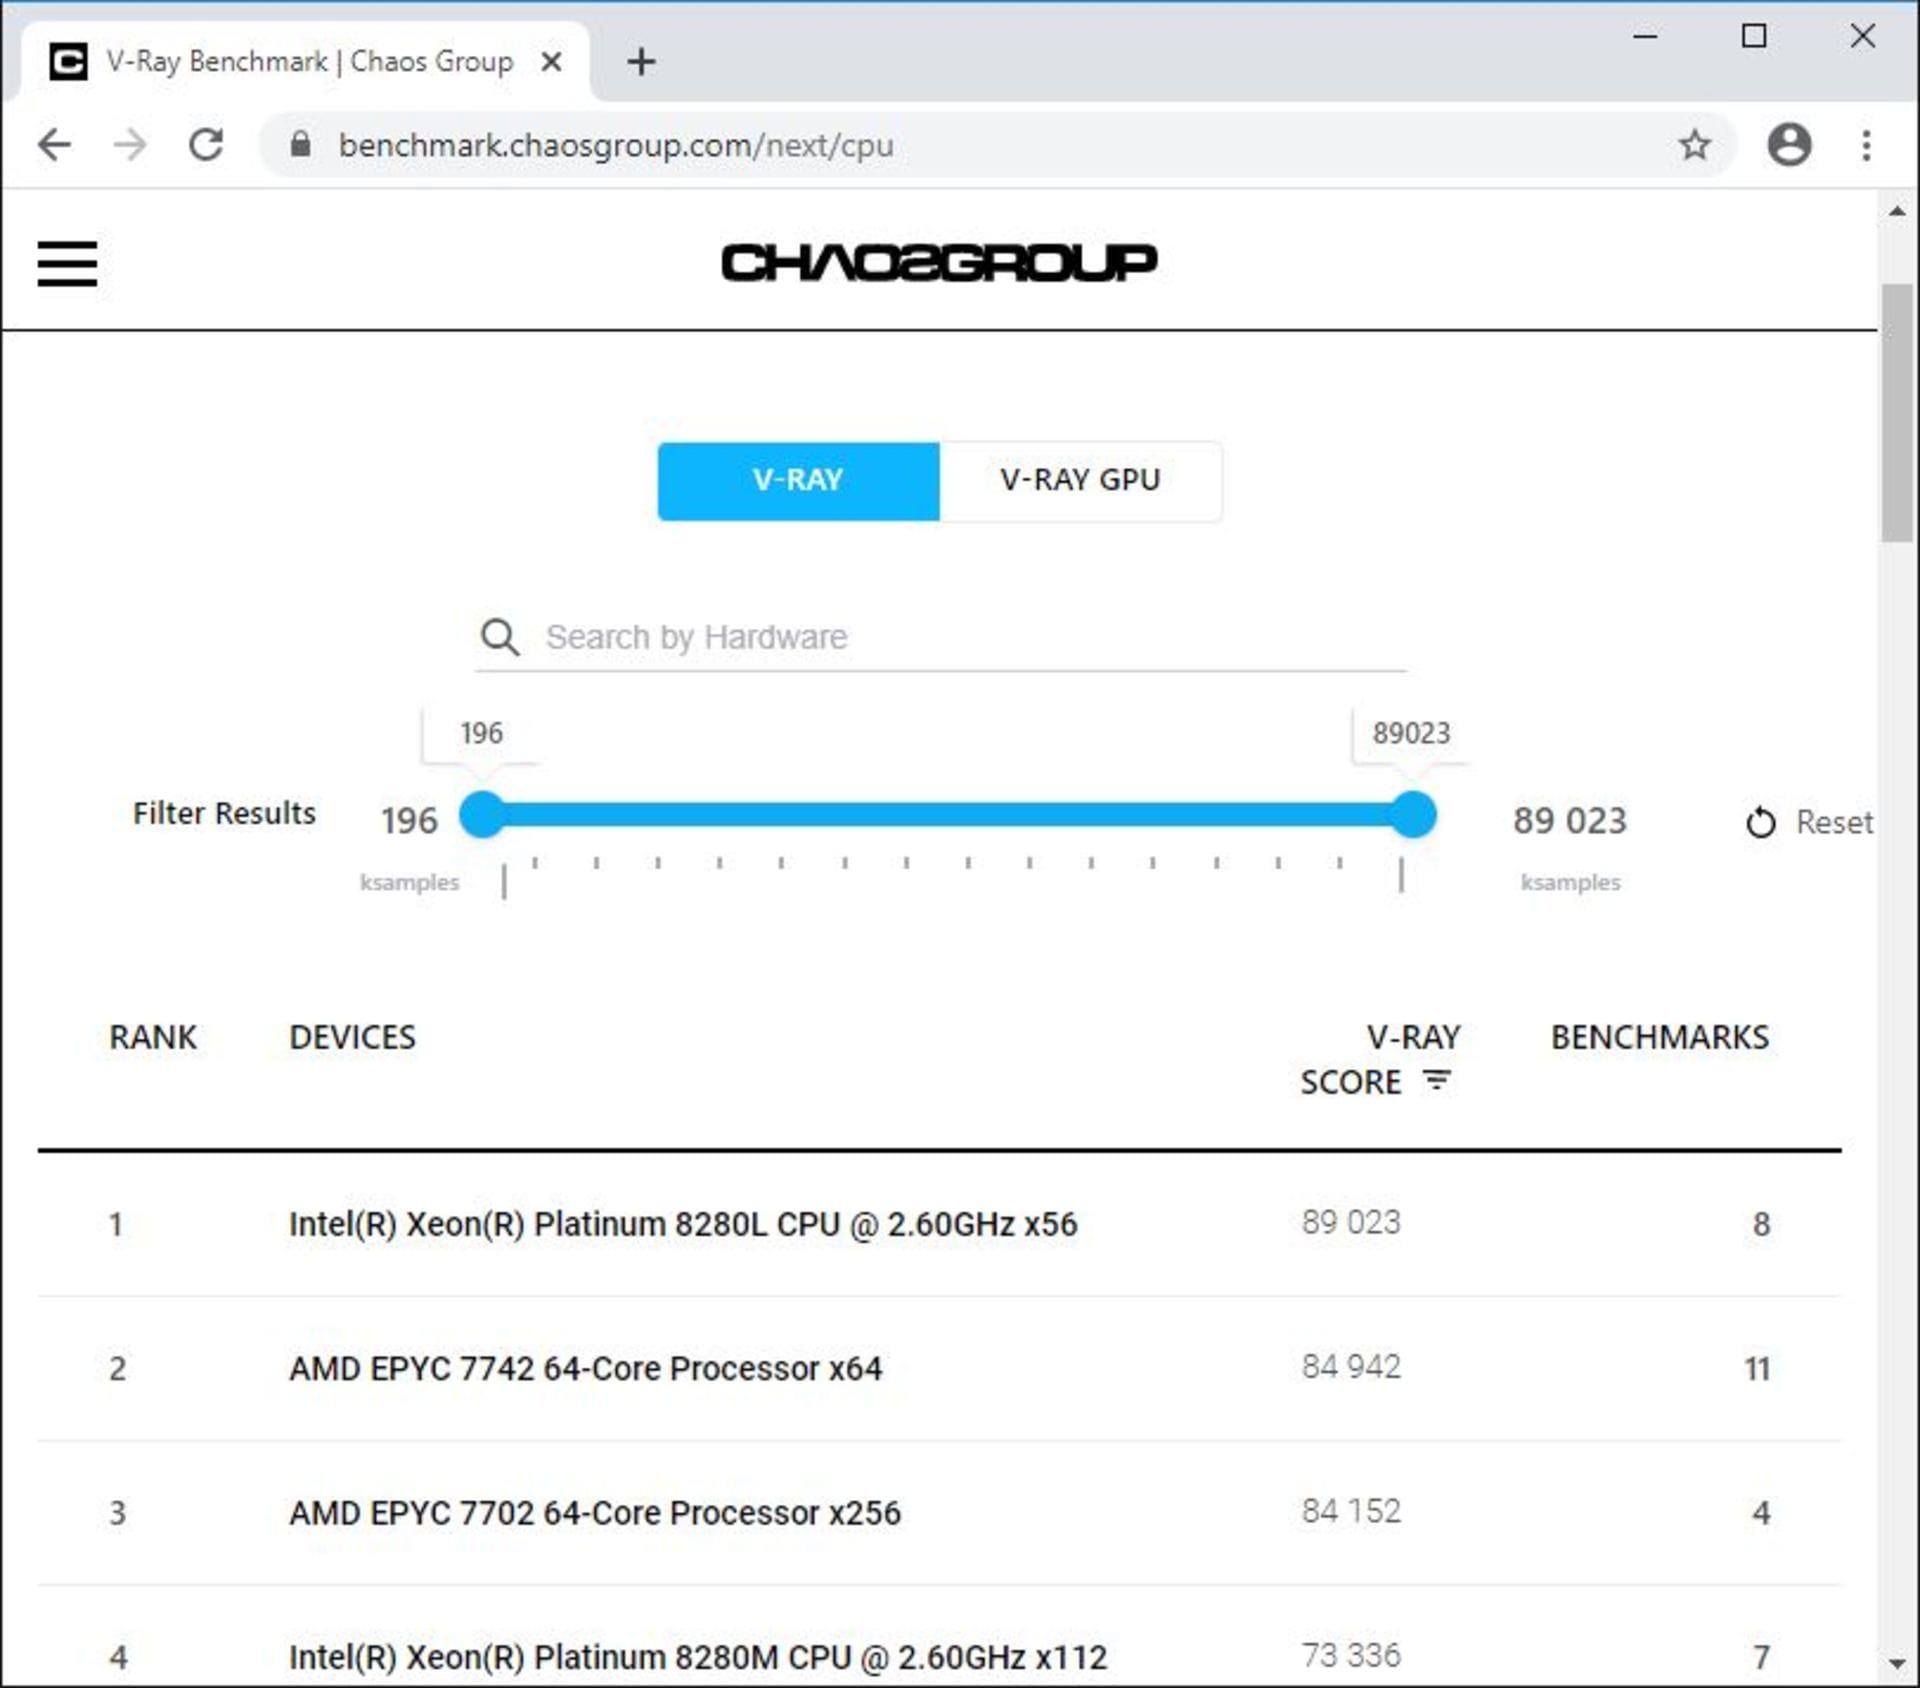
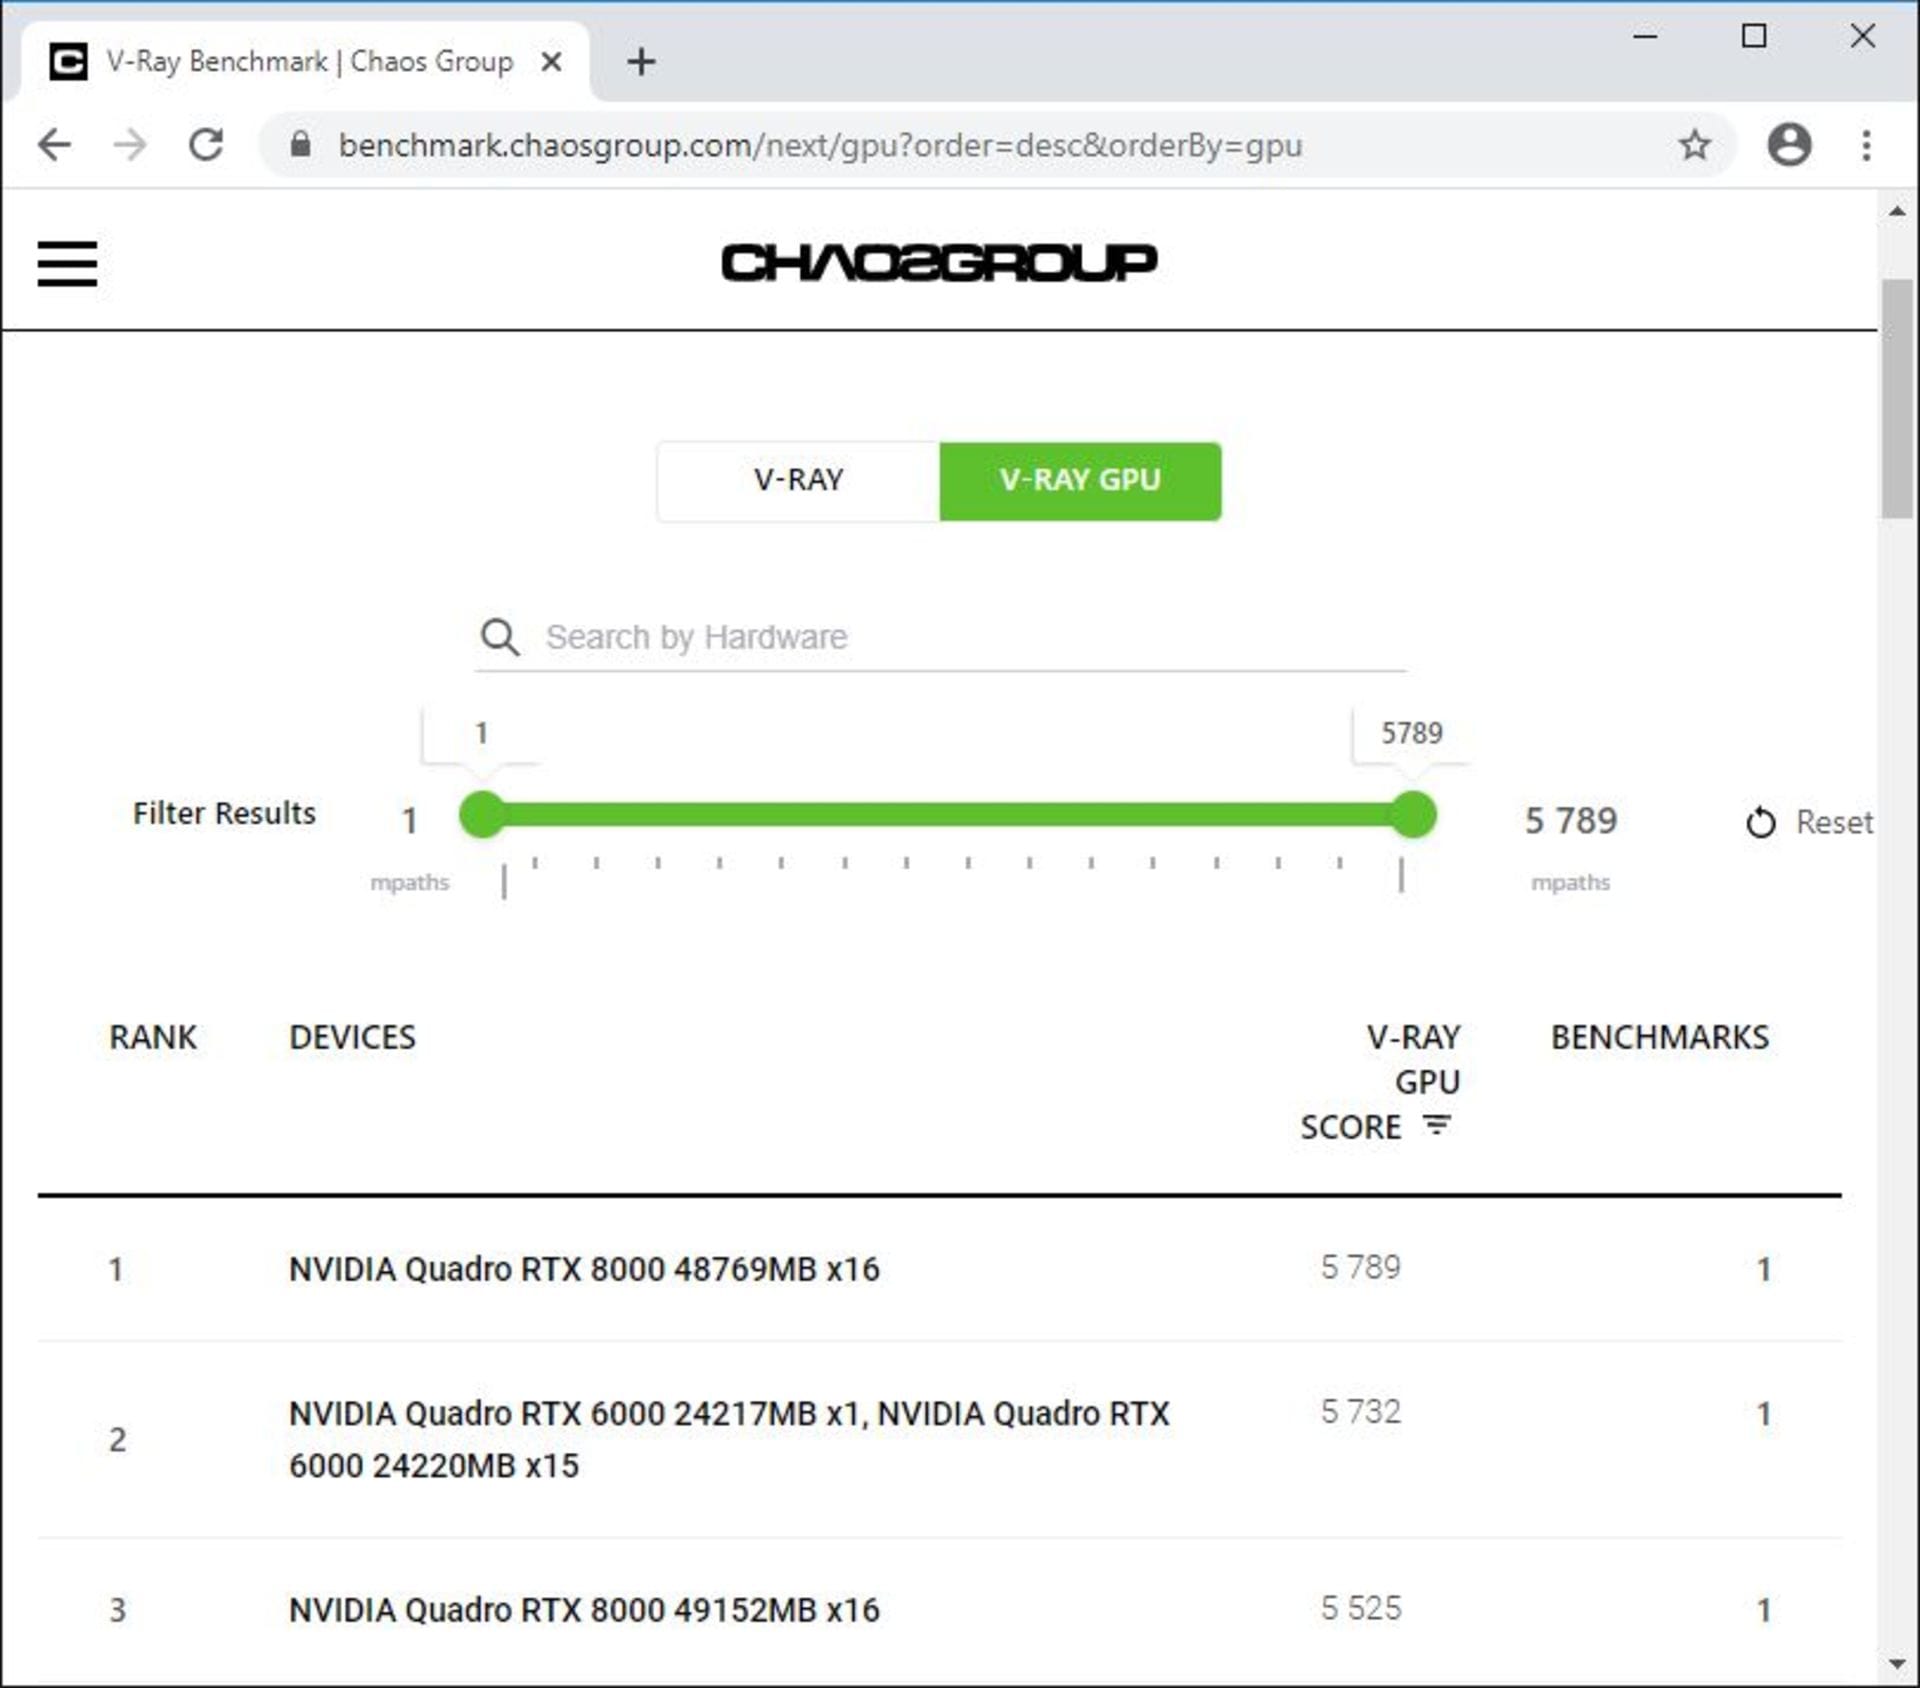
When you go to the V-Ray Benchmark site you will notice a few things. The first is that we have two separate lists. There is a list called “V-Ray,” which only runs on the CPU(s), and “V-Ray GPU,” which runs on the GPU(s). As we already noted: CPUs can also be used when doing a V-Ray GPU test. But more on that later . . .
Next there is a Search bar where you can search for any specific hardware that is listed. So, for example, if you only want to list AMD CPUs, you can do that, or if you want to see the results of any tests that use the RTX 2080 Ti, you can do that as well.
You can then look at certain results that land within a certain range. So for example, if you test your own machine and you get a certain result, you can see what other hardware falls within a similar performance range.
As for the list itself, the results are listed under four columns. The first is the actual ranking, while the second lists the hardware used for the result. The third is the actual benchmark score. And lastly, it lists how many times the test was run.
A big note in terms of the V-Ray GPU results. You might notice that many of those results also include the CPU contributing to the rendering time. Depending on your hardware setup, your CPU will increase the performance of your test. So two identical GPU setups can have a big difference in performance depending on the CPU contribution. Therefore, if you want to only compare your GPUs vs. other GPUs, you need to make sure that the benchmark tests you are comparing do not include CPUs — or ensure that they, at the very least, have similar CPUs.
This should give you enough information to help filter the results to what you need to know, and compare your hardware with other hardware.
As we now have a good understanding of these results, let’s look at some great hardware we have in the Chaos Group Labs and check out some of the interesting results we got from running V-Ray Benchmark.
1. Lenovo P920 workstation
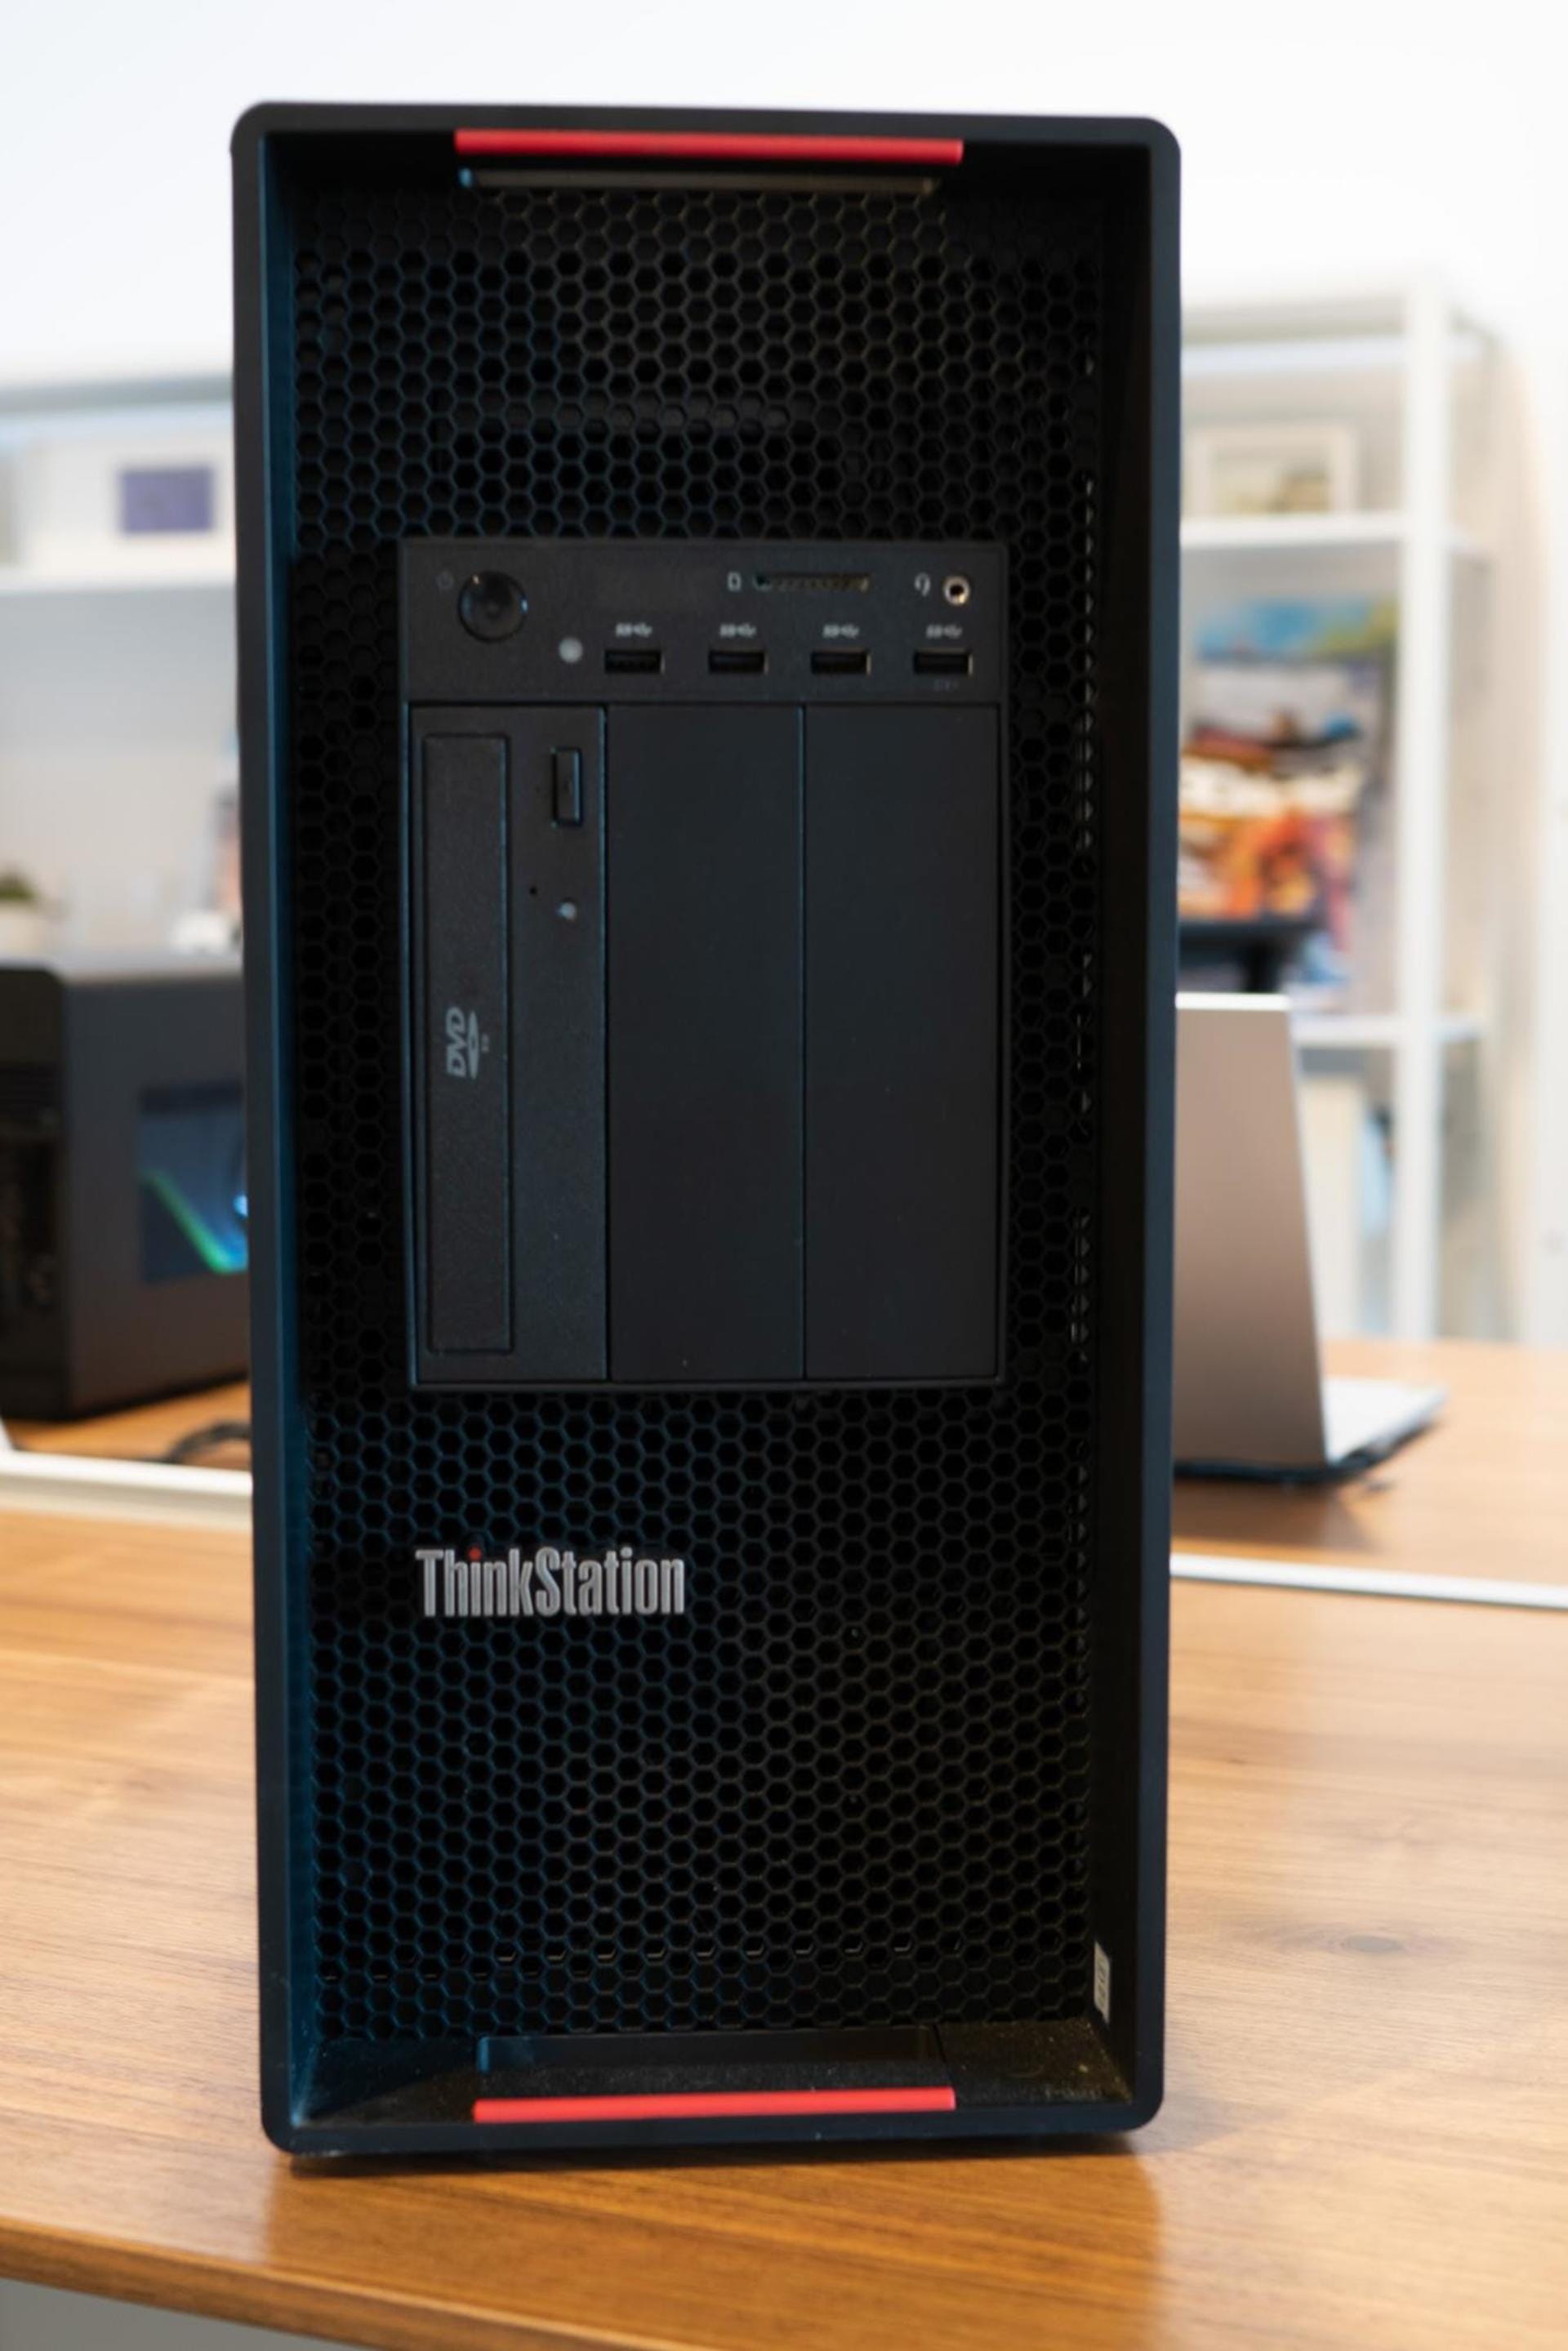
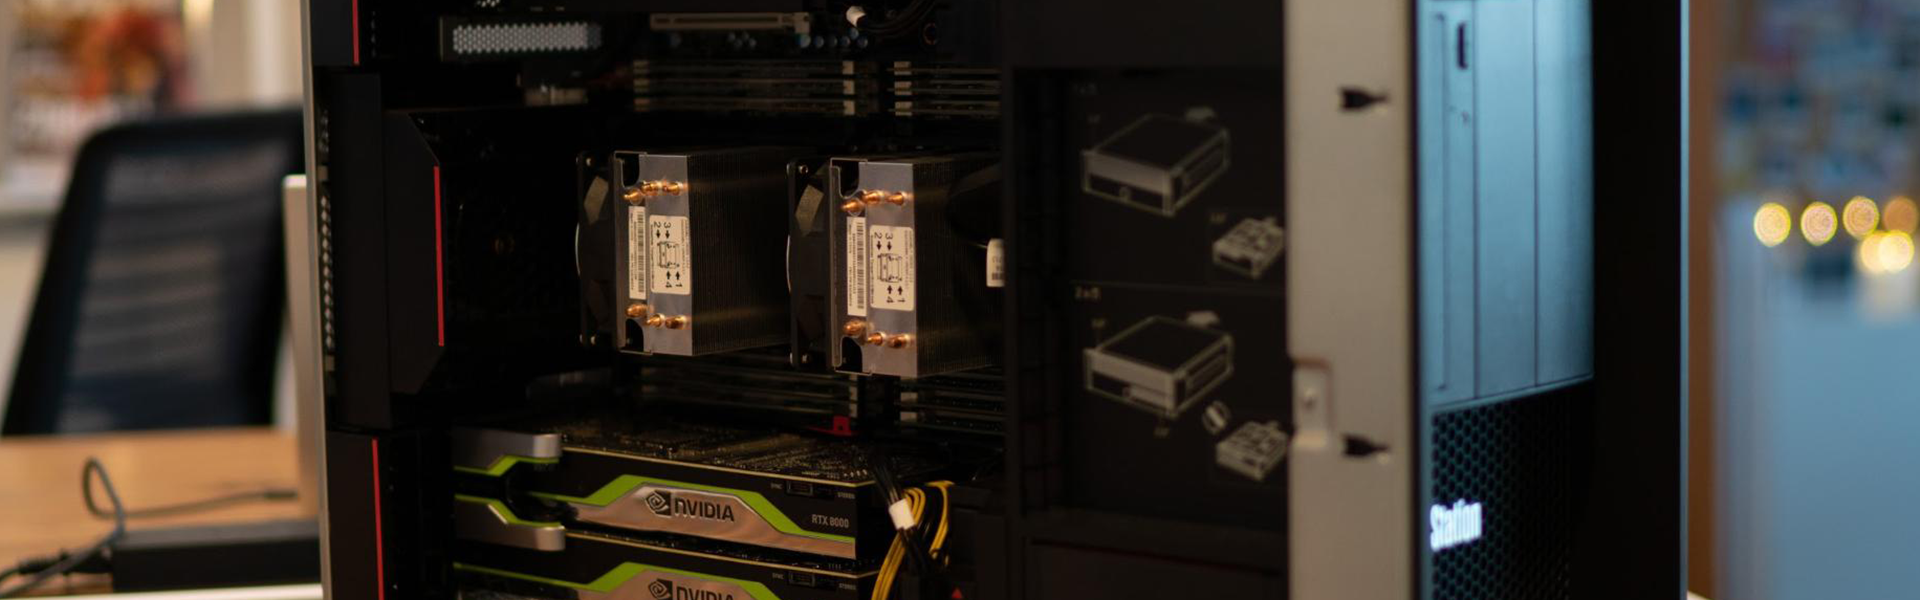
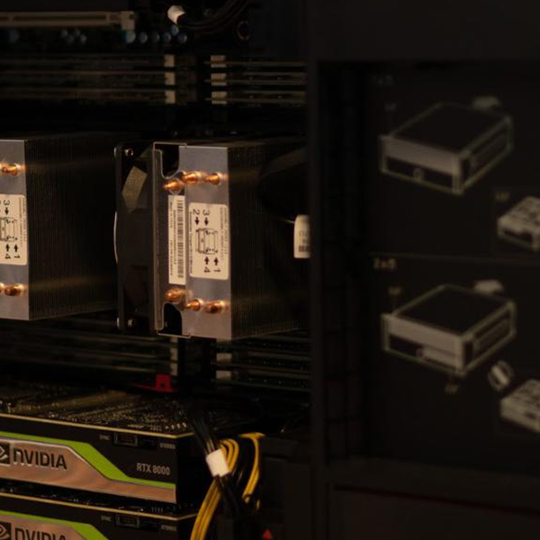
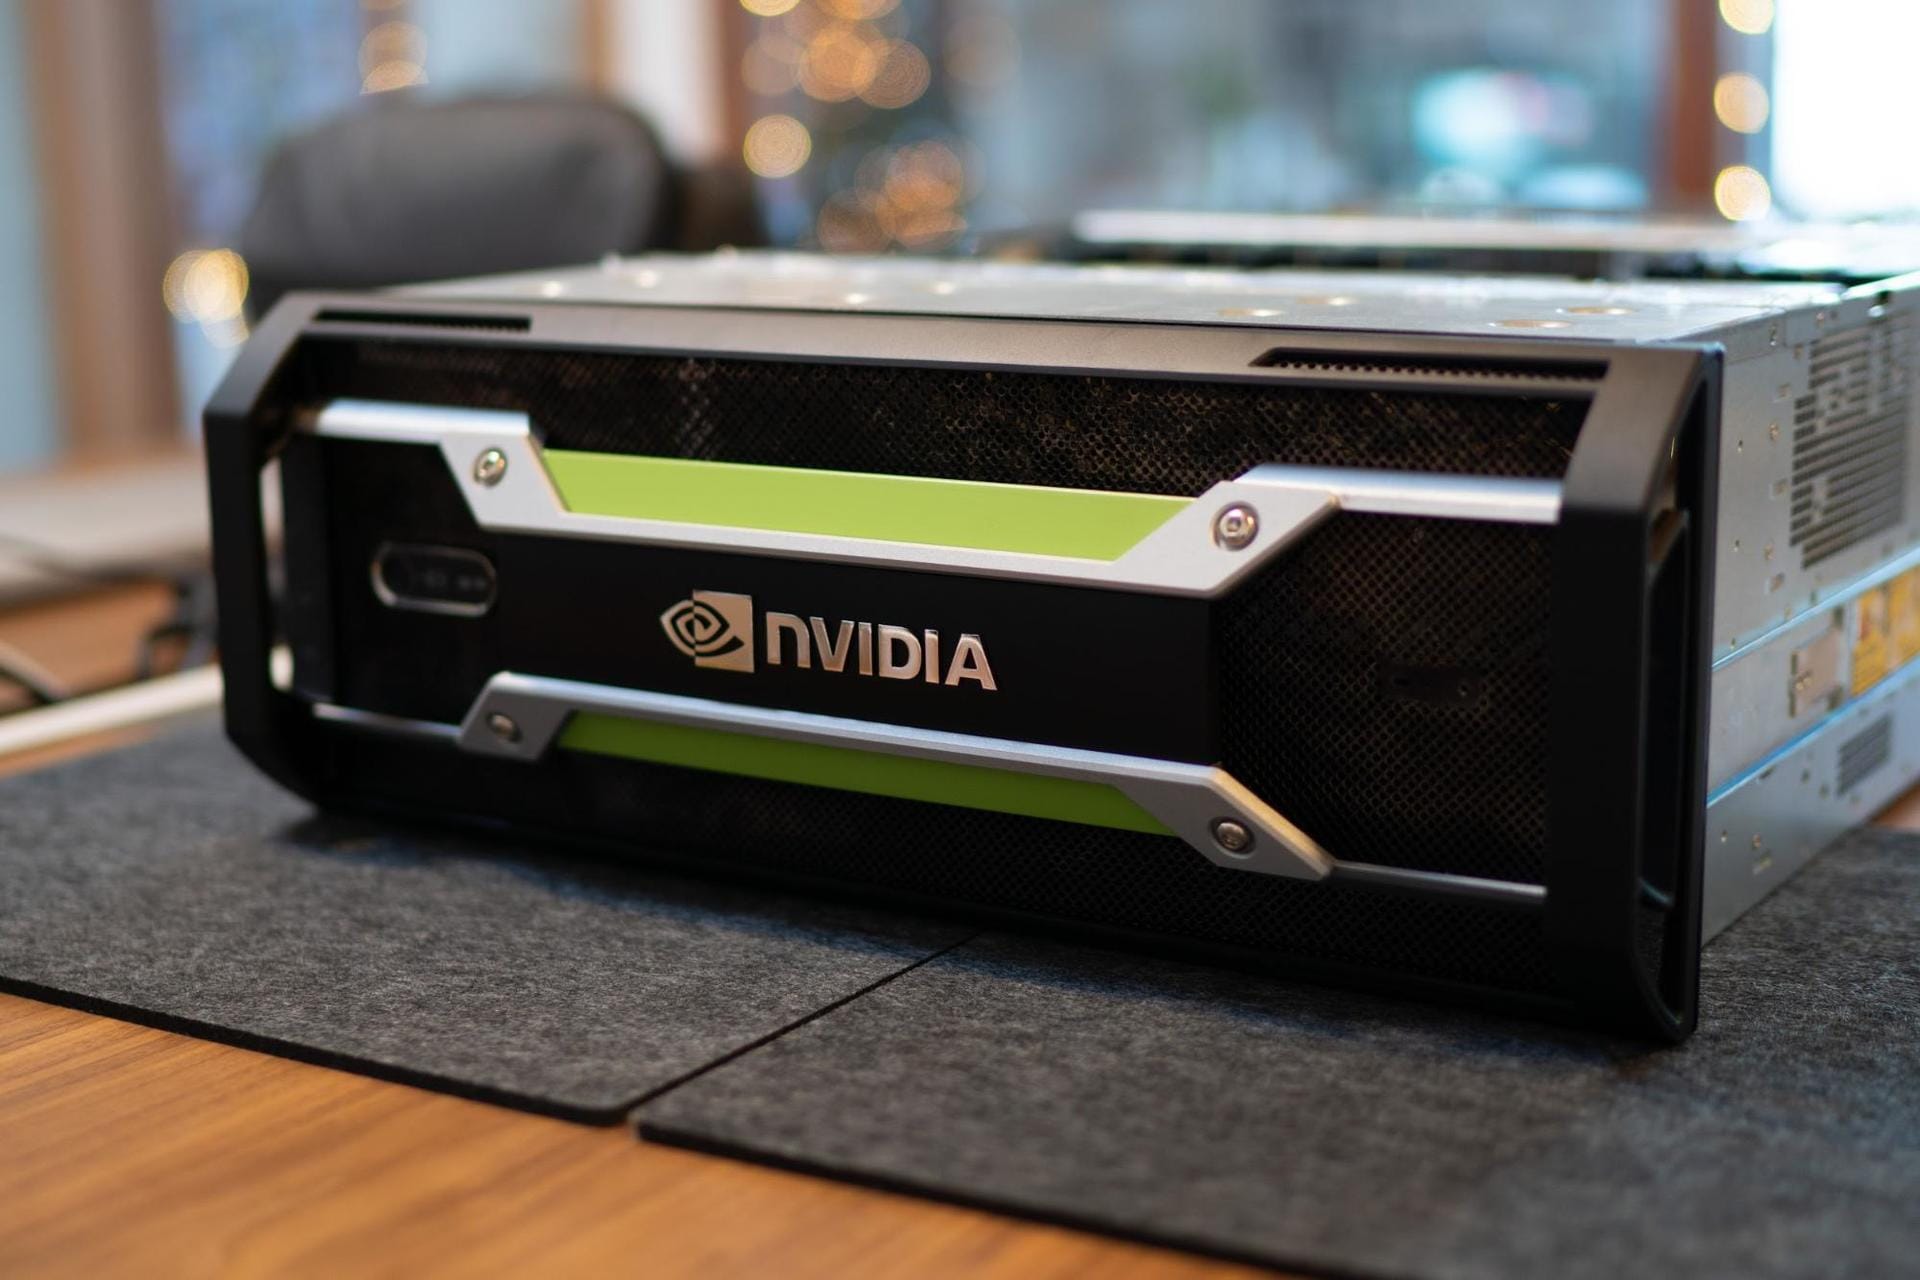
Our friends at Lenovo were kind enough to give us a Lenovo P920 workstation computer for testing. It is an ideal computer for Chaos Group Labs as it has a ton of power and, most importantly, it makes swapping out different GPUs fast and painless due to its sleek form factor and tool-less design. Like a racecar, I can swap out video cards nearly as fast as swapping out tires on a Formula One car. Thanks also to our partners at NVIDIA, we get to test many of their latest GPUs, as pictured here inside the Lenovo P920.
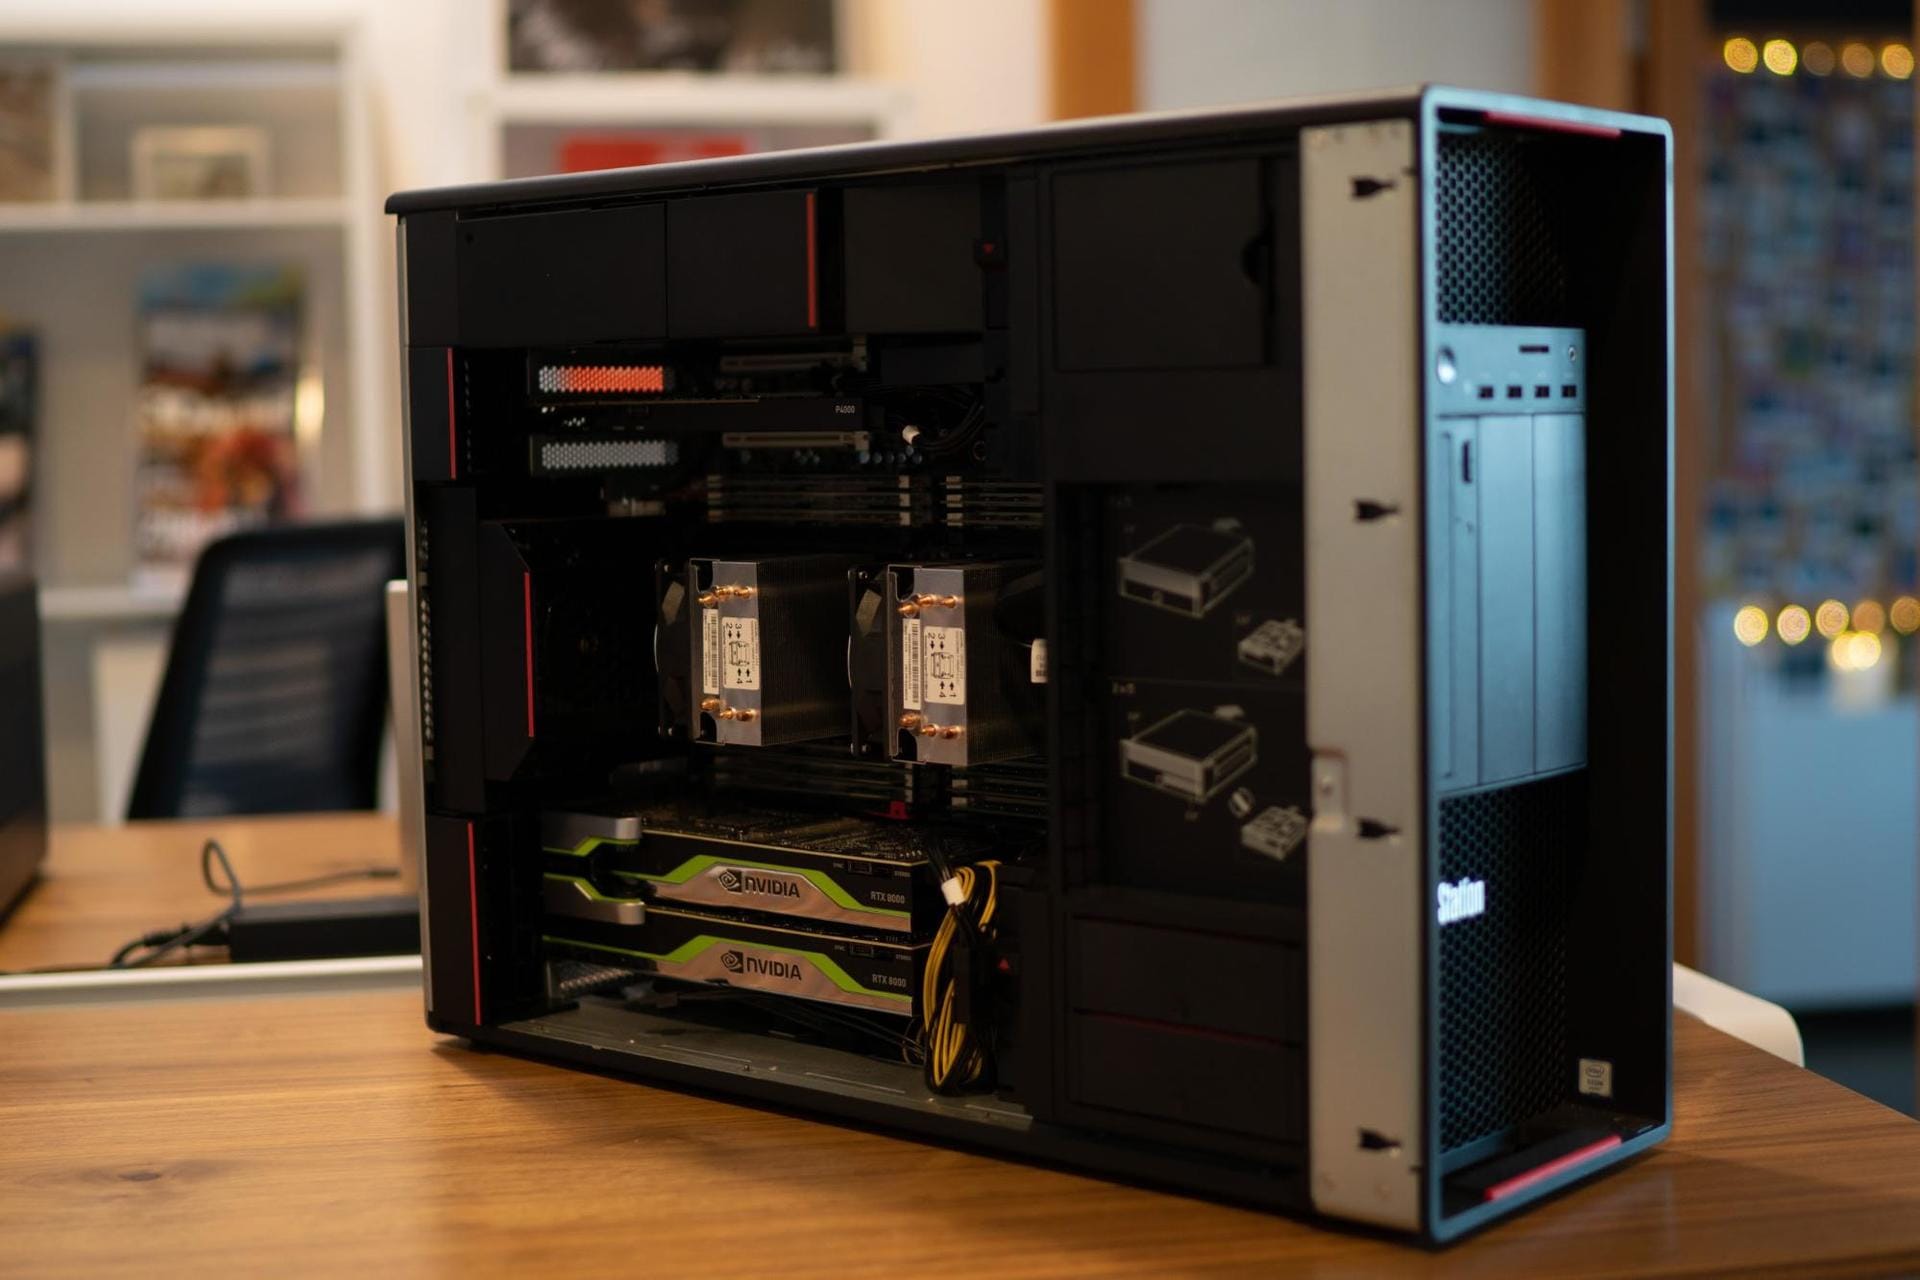
The configuration of the setup above is as follows:
CPU: 2 x Xeon ® Gold 6136 @ 3.00 GHZ with 24 cores (48 threads).
GPU: 2 x Quadro RTX 8000 with 48 GB of GPU memory using NVLINK (96 GB combined) + Quadro P4000 with 8 GB of GPU memory (mainly used for display).
First, let’s look at the CPU test:
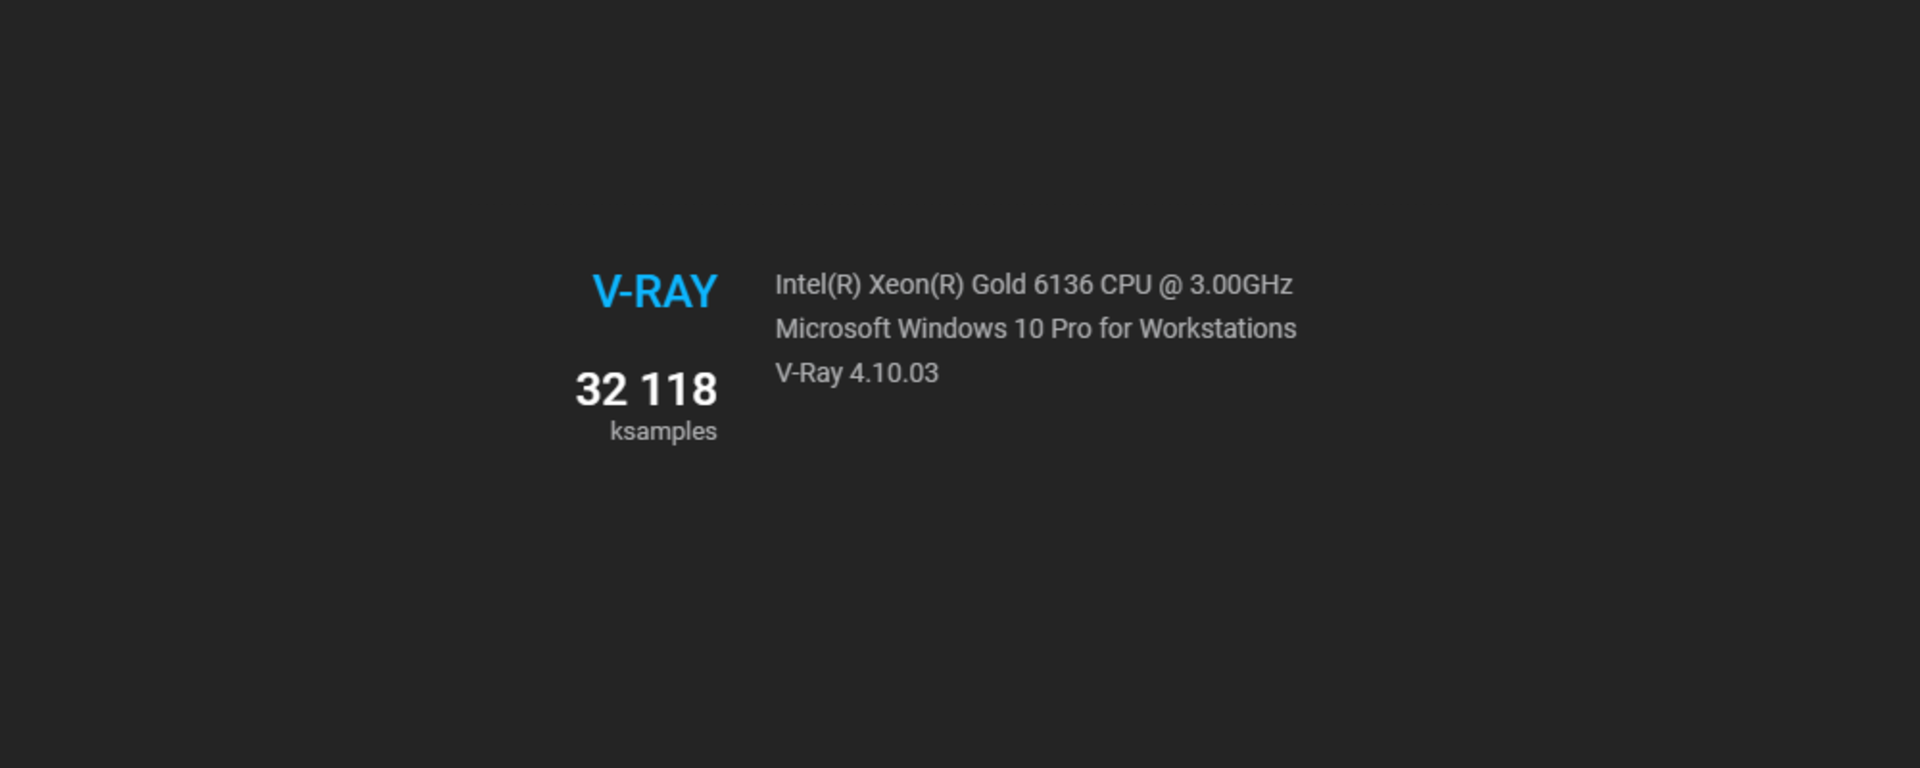
The results ran just over 32,000 ksamples, which is right on par with other CPU configurations of the same kind. However, when looking at the list you will notice that the 32-core AMD Threadripper 2990WX is not that far behind.
As we have a lot of different GPU configurations, we decided to run the test many different ways, as follows:
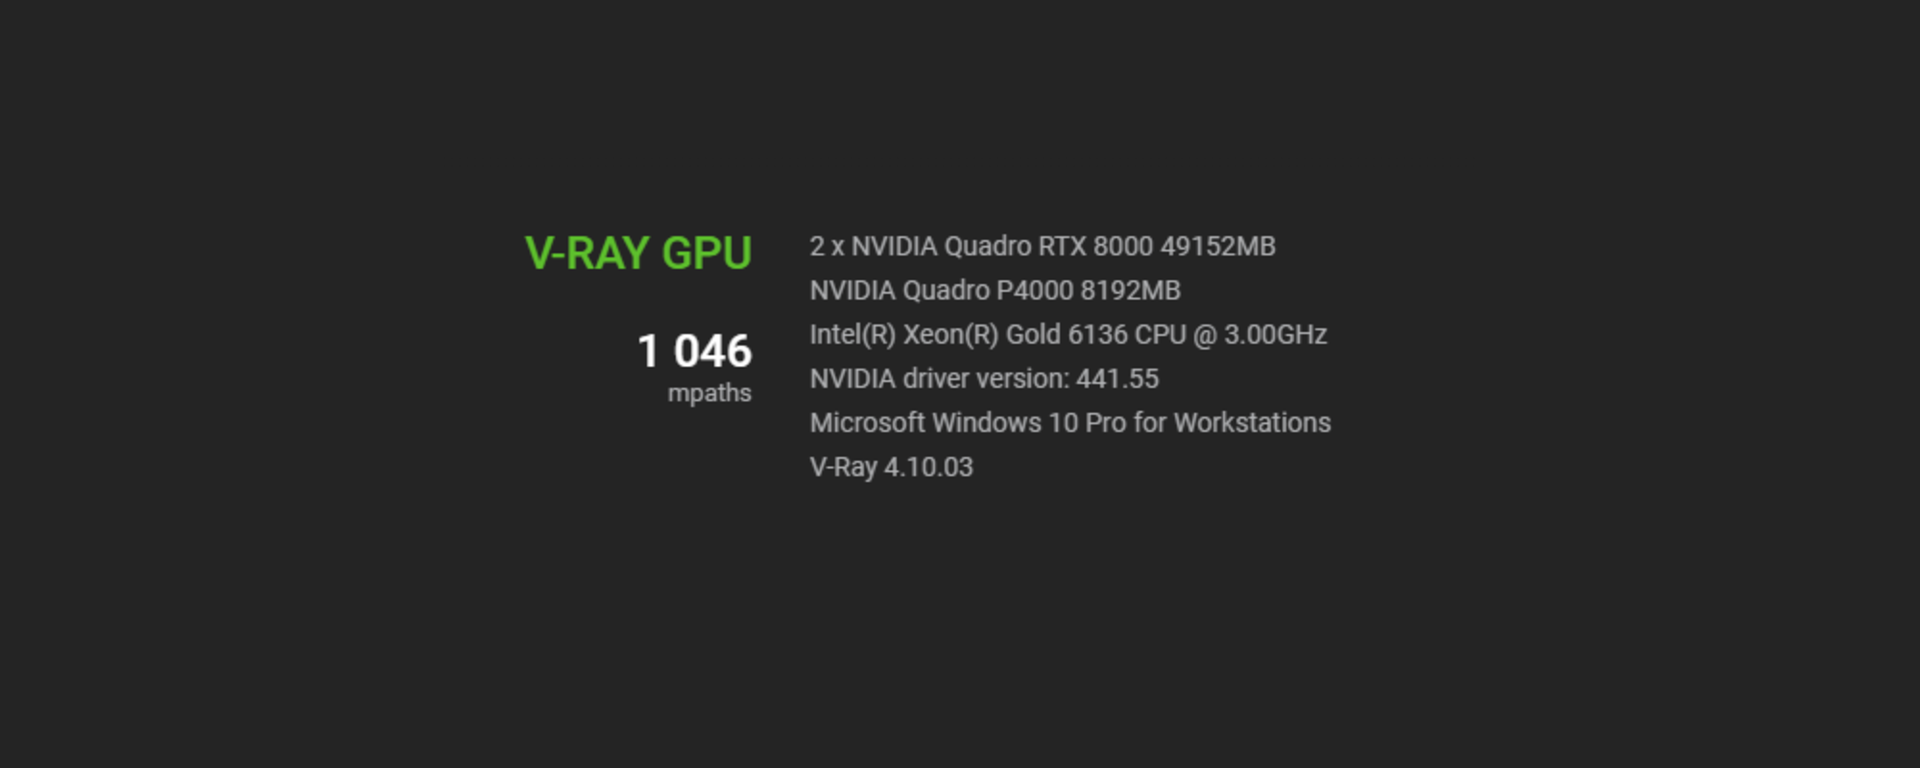
2 x Quadro RTX 8000s —
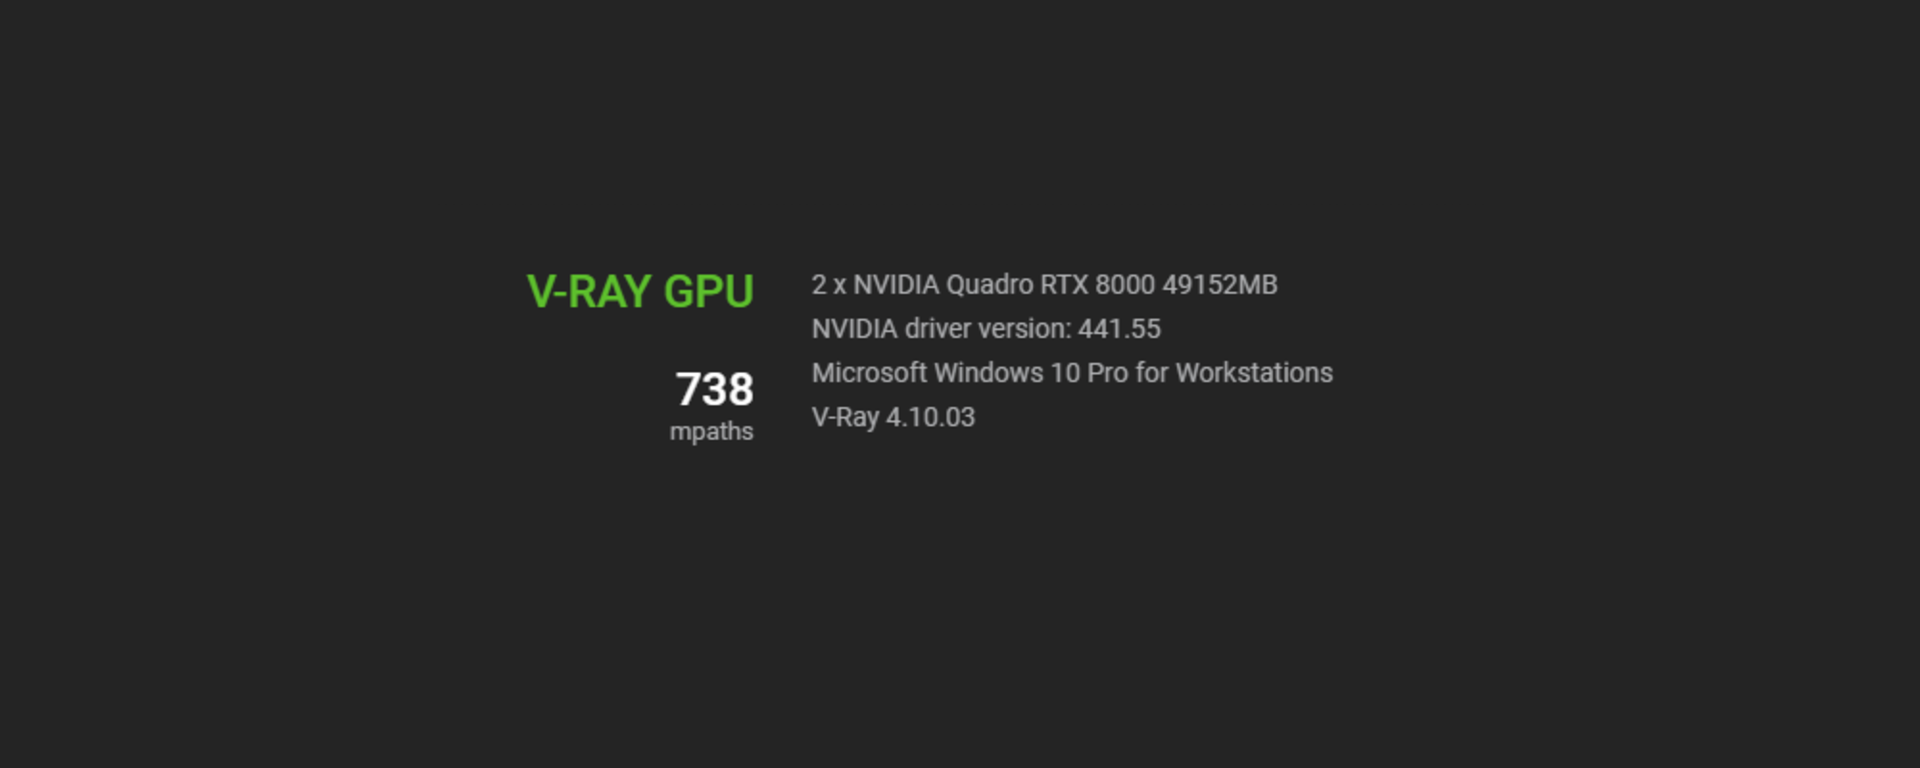
First, let’s remember that when you go to the V-Ray Benchmark page, look for results in the GPU listing that list GPUs only. If you see a CPU listed, it means that the result includes using the CPU in hybrid mode.
But, back to our results: If you’re looking for a fast GPU setup with as much GPU memory as possible, this is your best choice. The test ran at 738 mpaths, which is right on par with other RTX 8000s and 6000s. This makes sense since the only real difference between those two cards is the GPU memory, not the speed. It’s also interesting to note that there are several configurations with 2 GeForce RTX2080s that are right around the same score.
The RTX2080 is a great choice of a card based on its performance and price. However, those tests tend to also have the CPU in hybrid mode. There is one test that is very close to our score with 3 GeForce RTX 2080s. But remember that, while the Quadro RTX 8000 is much more expensive compared to the GeForce cards, it has four times the GPU memory. So while the render times might be the same, the Quadro RTX 8000 can render much larger production scenes.
2 x Quadro RTX 8000s + Quadro P4000 —
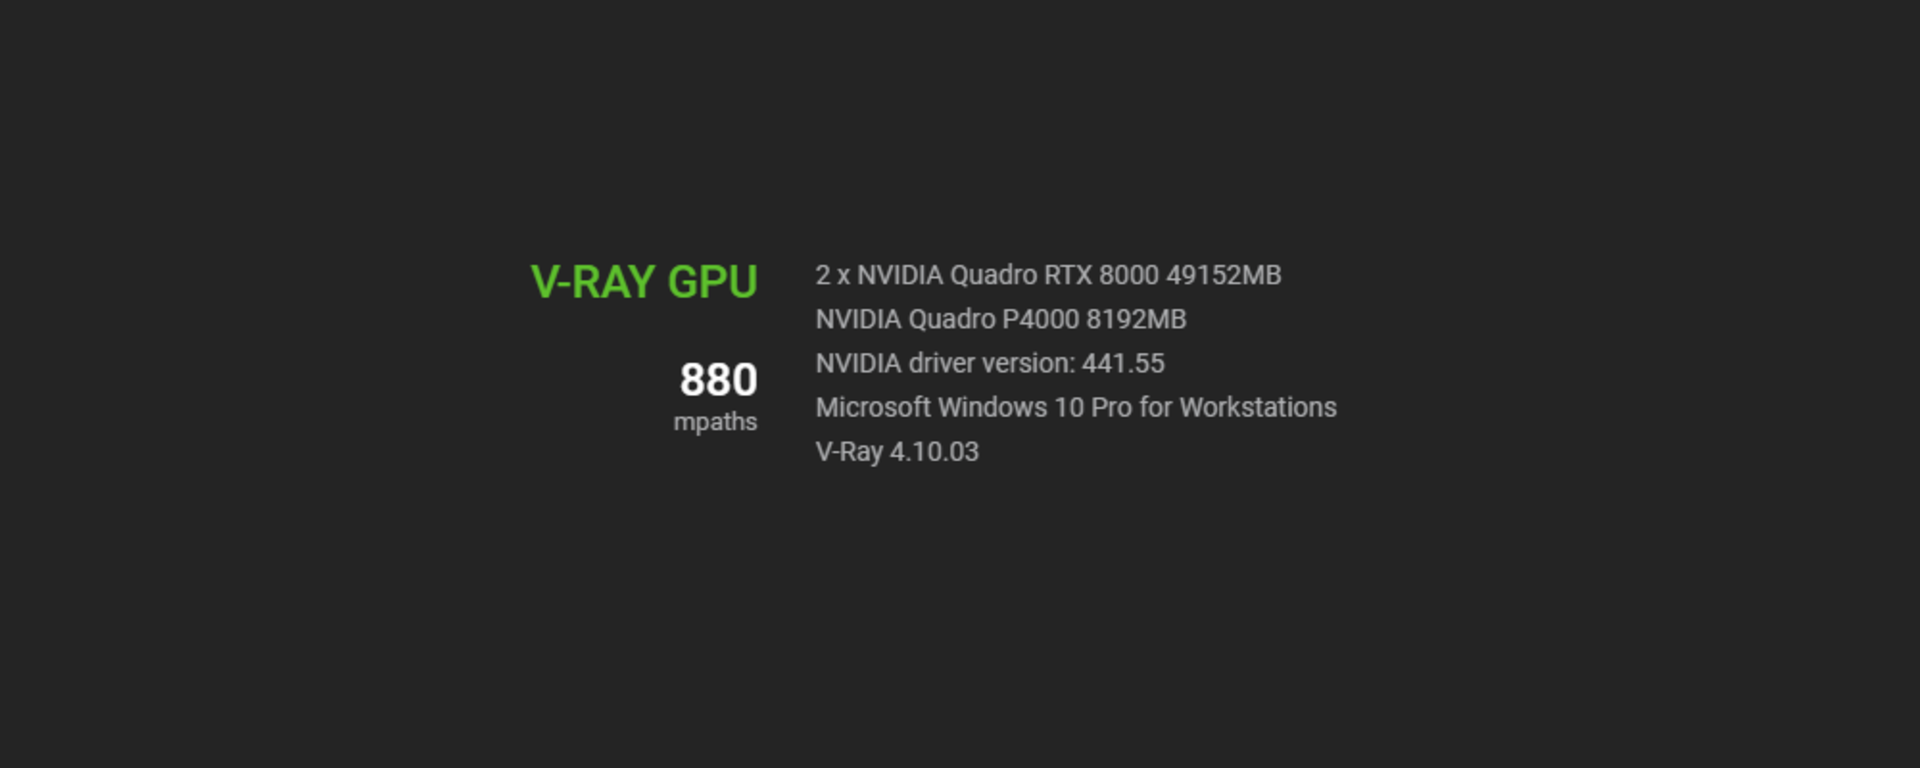
Since we have a P4000 in the same box, which is no slouch, let’s go ahead and add it and see how much it helps the benchmark.
It ends up boosting our performance 142 mpaths, which is a nice little boost. But remember that the P4000 only has 8 gigs of GPU memory, which is not shared. So if your entire scene does not fit on that card, it will fail. By design, V-Ray Benchmark is not that demanding on GPU memory, so the P4000 has more than enough for testing.
2 x Quadro RTX 8000s + Quadro P4000 + 2x Xeon ® Gold 6136 @ 3.00 GHZ —
At this point, let’s use the full power of the computer and see how much more our CPUs can help boost our performance of our V-Ray GPU rendering.
It turns out we get an extra 166 mpaths of performance by adding the CPUs, which is yet another good boost to our performance. However, the CPUs do not have the same RAM limitation of the P4000 as they access system RAM and the current system has 192 GB.
Now let’s take a look at another system.
2. Razer Blade Studio Edition Laptop
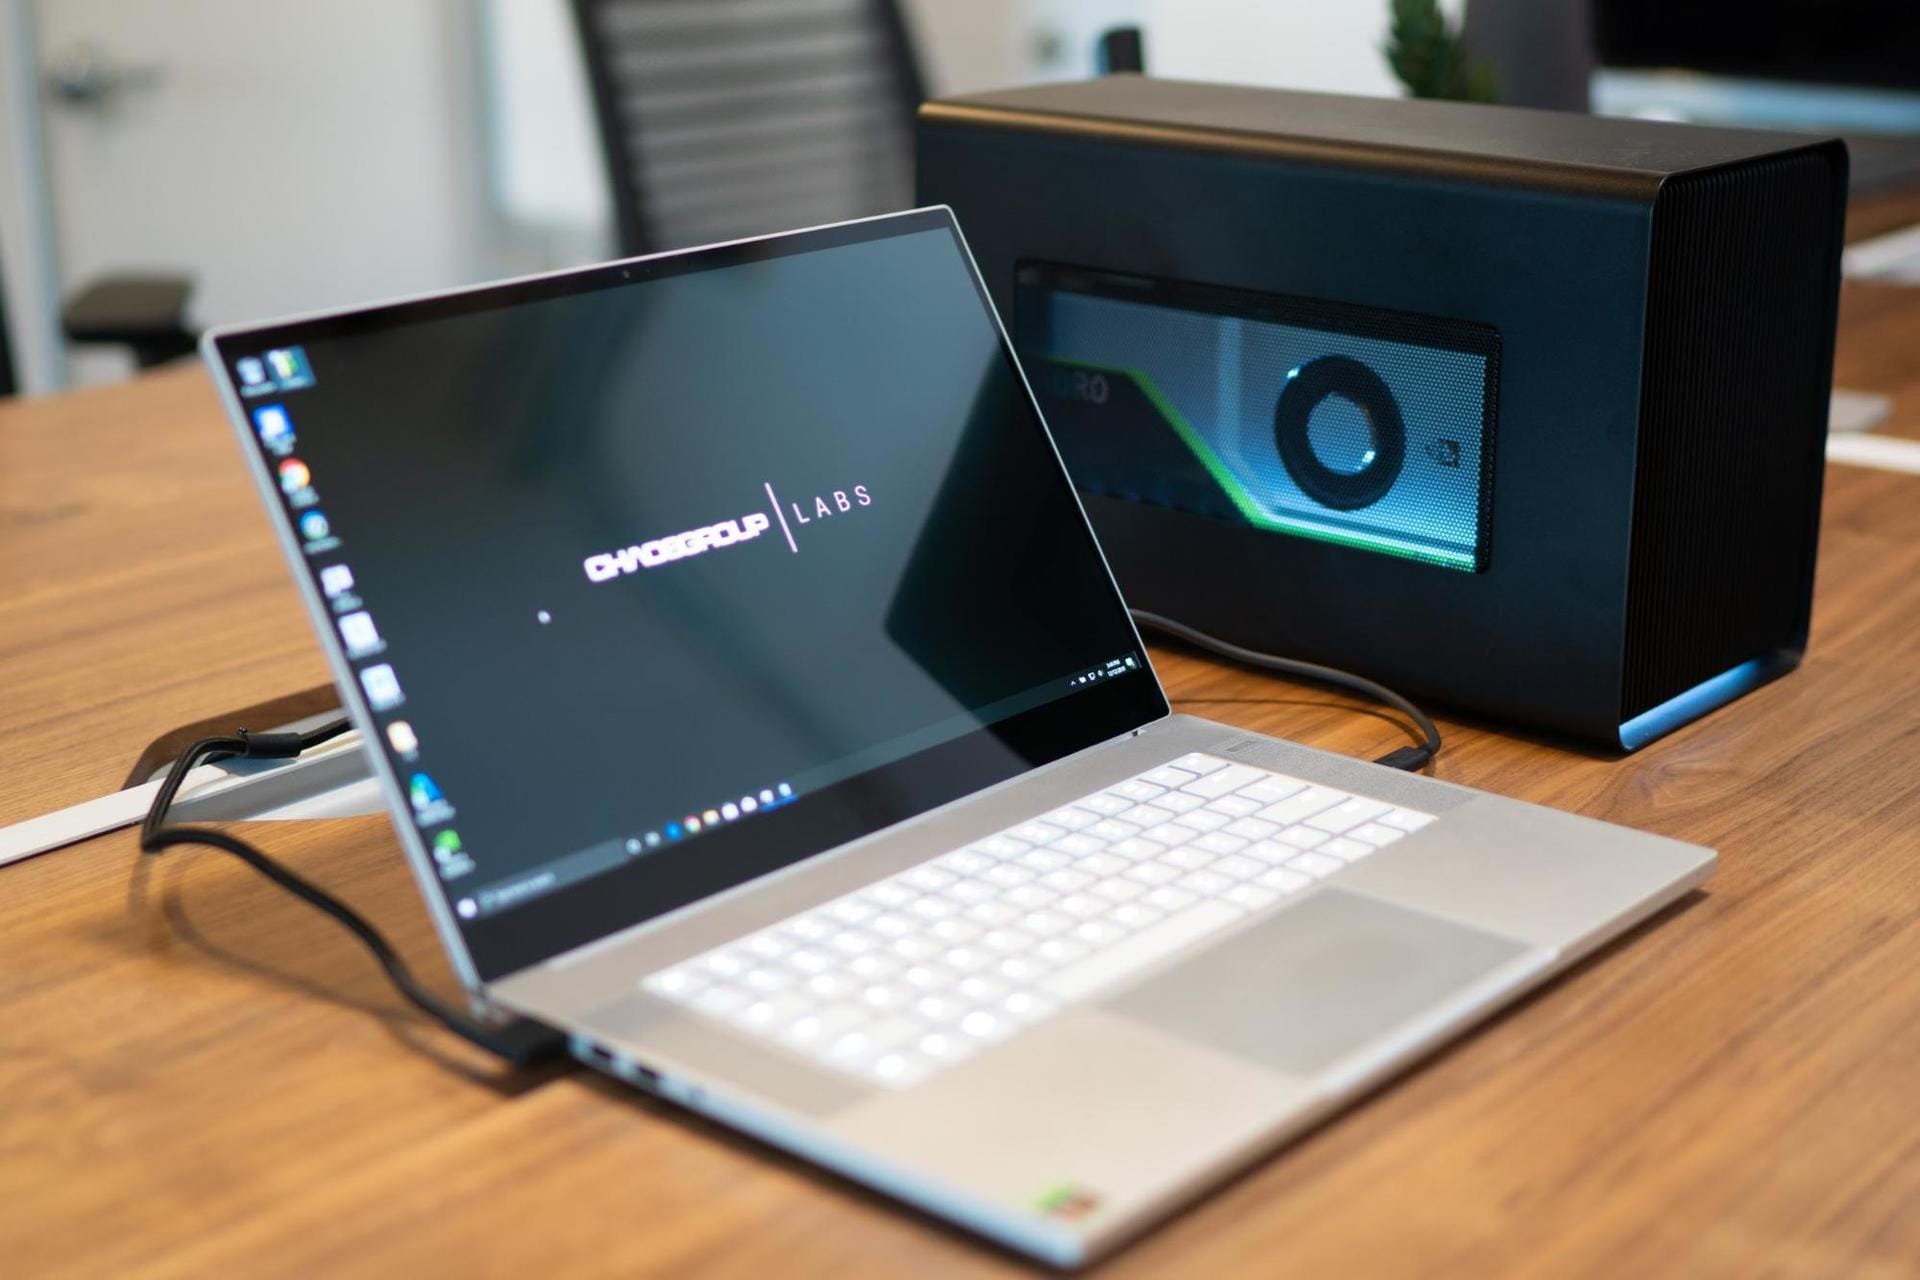
Thanks to our strong relationship with NVIDIA, they were kind enough to have us kick the tires on the new generation of laptops that have recently come out, called the “Studio” line. Razer, which is best known for its slick and fast gaming laptops, decided to enter the professional workhorse laptop market. These new laptops are extremely special because, besides being extremely powerful, they are actually fairly compact — and relatively light at just 4.88 lbs (2.21 kg). Even at that size, this laptop is a beast. On top of that, we decided to get a Razer eGPU enclosure and add another full-sized GPU to the mix, just for fun.
The configuration of the setup is as follows:
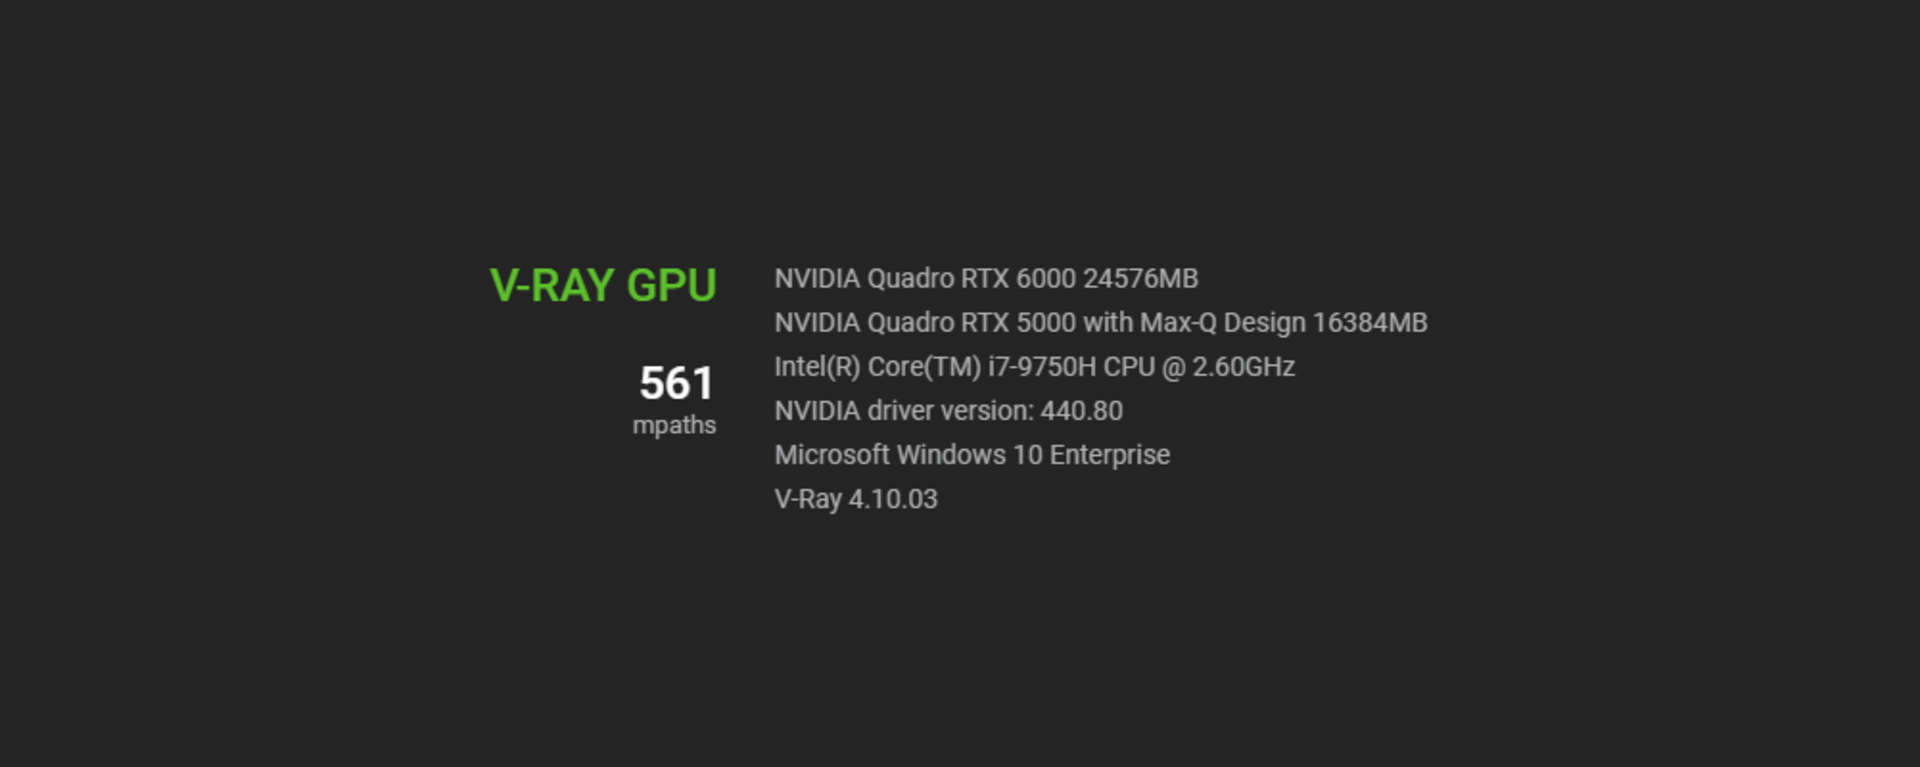
CPU: Intel ® Core (™) i7-9750H @2.60 GHZ with 6 cores (12 threads)
GPU: Quadro RTX 5000 with Max-Q Design with 16 GB of GPU memory
eGPU: Quadro RTX 6000 with 24 GB of GPU memory
First, let’s look at how the CPU did on its own using the standard V-Ray test. The results are around 6,900 ksamples, which is a really great score for a laptop CPU.

Next, let’s try different GPU configurations:
Quadro RTX 5000 with Max-Q Design —
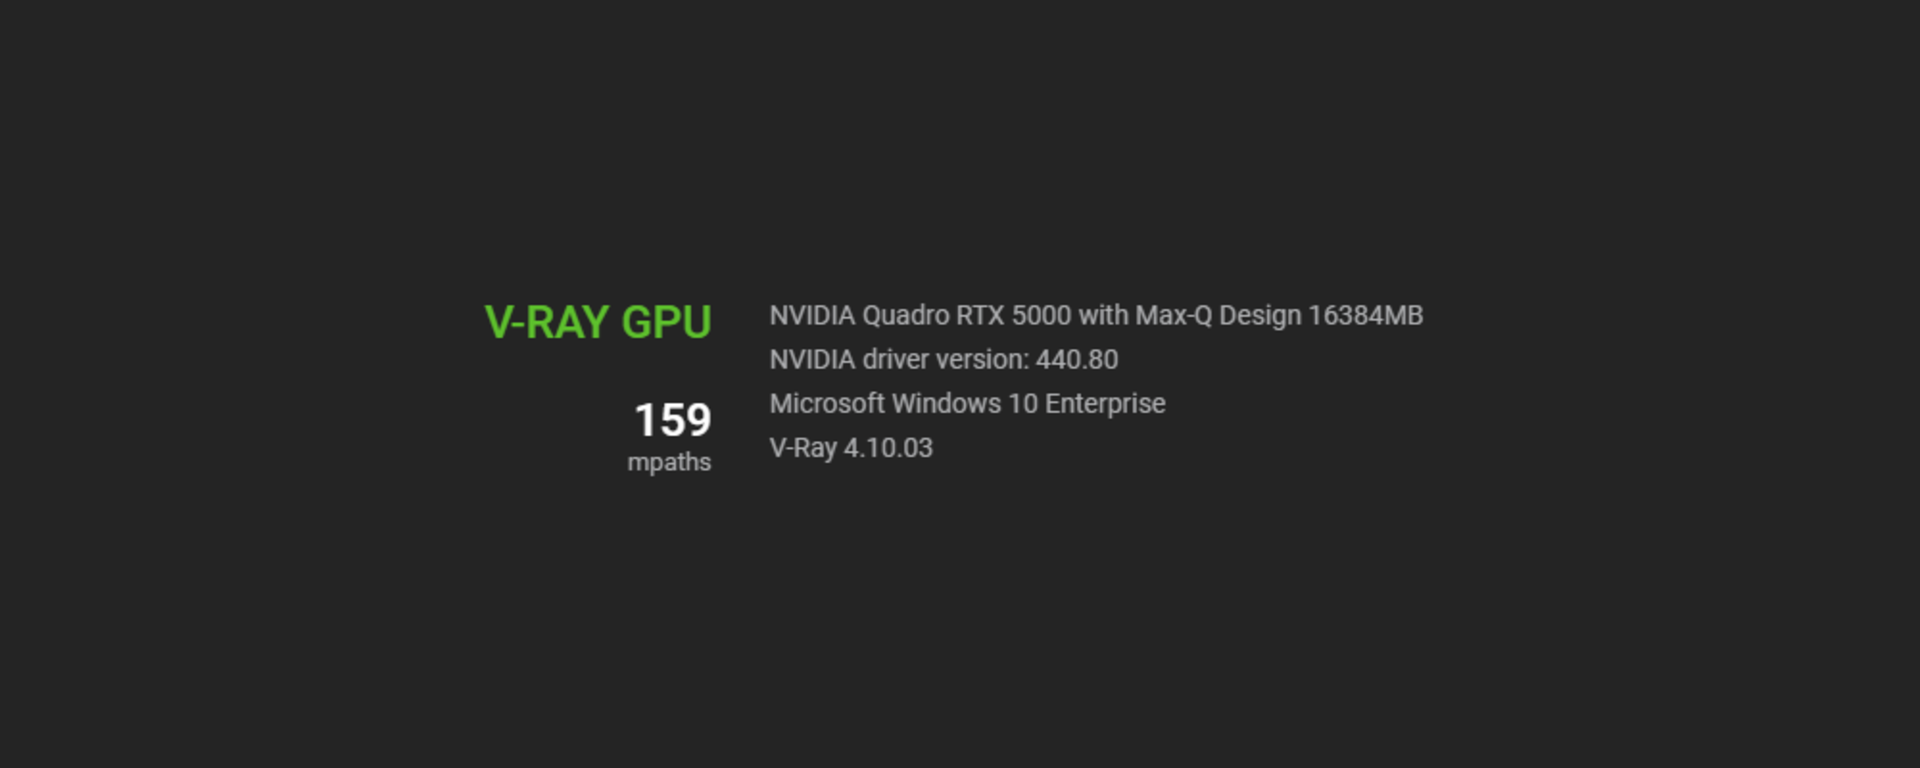
Here we get a result of around 159 mpaths. This is a pretty amazing result considering how small that GPU is and that it fits inside a laptop that is under 5 lbs.
Quadro RTX 5000 with Max-Q Design + Quadro RTX 6000 inside an eGPU —
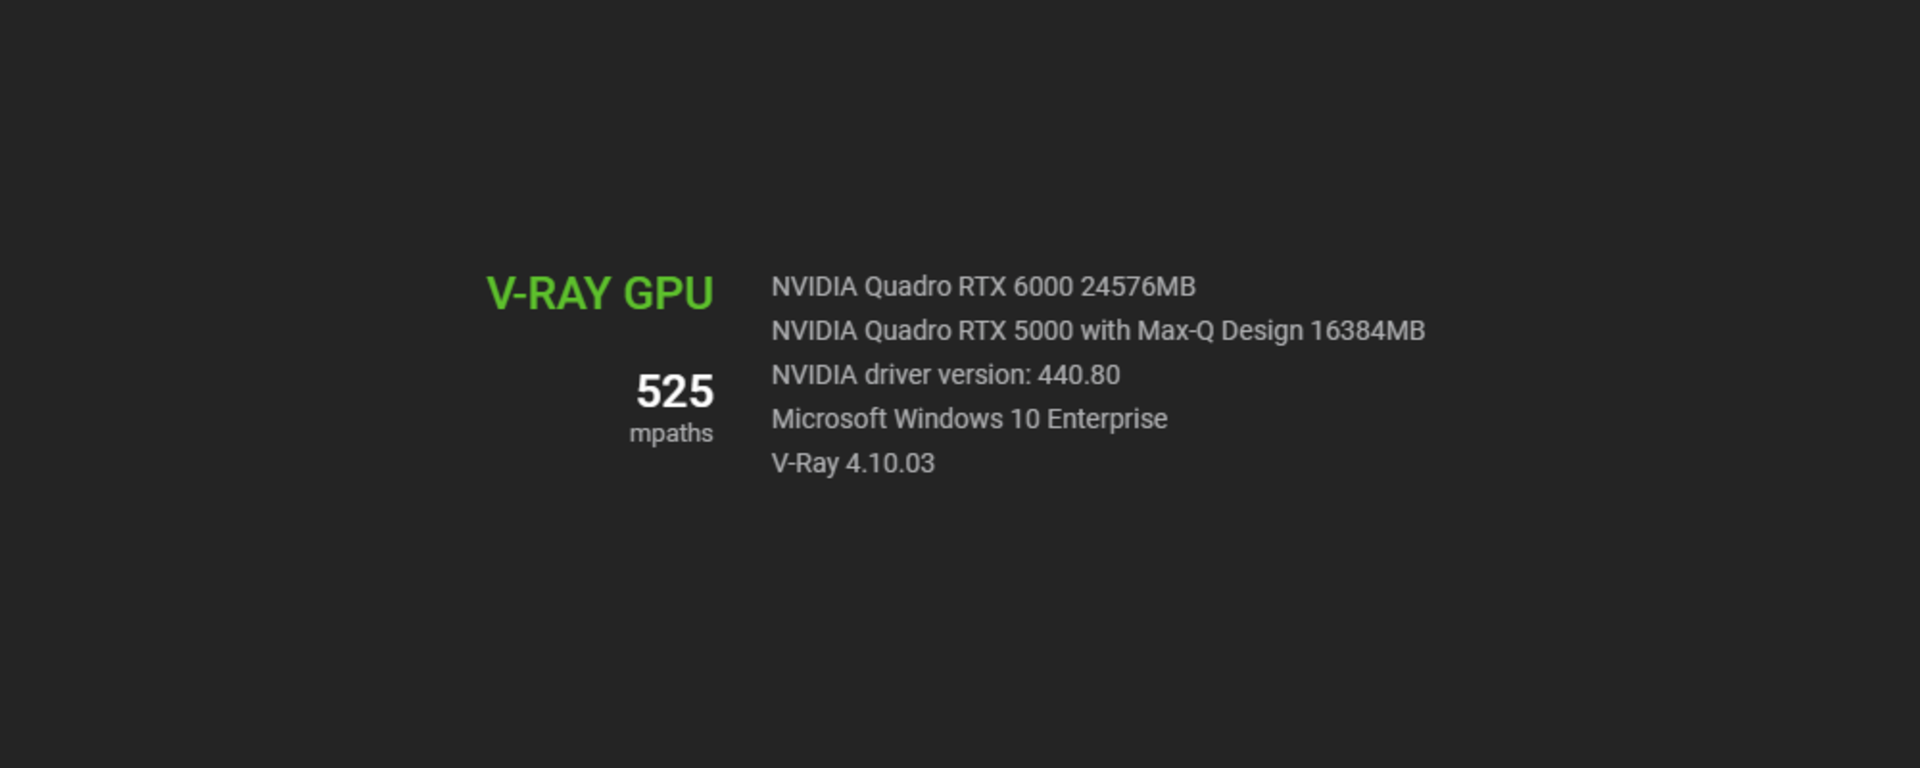
Obviously, since this is a full-sized, top-of-the-line GPU with a lot of power, we should expect a big boost. Adding it gave us a boost of 366 mpaths, or nearly tripling the GPU power of this laptop. It’s nice to have this option of plugging that massive power when needed.
Quadro RTX 5000 with Max-Q Design + Quadro RTX 6000 inside an eGPU + Intel ® Core (™) i7-9750H @2.60 GHZ —
With everything firing on this configuration, we can truly see what is possible, but while the CPU only gives us a small boost of 36 mpaths, let's remember that we are still talking about a mobile CPU, so there is only so much it can do. Of course, this is only when the laptop is plugged in and not running off battery; being on battery generally reduces the power of the CPU speed.
Nonetheless, this new generation of mobile Studio laptops are not just reasonable in size, they can outperform many mid-level tower computers from just a few years ago.
3. A GPU beast (or an older, reconfigured VCA)
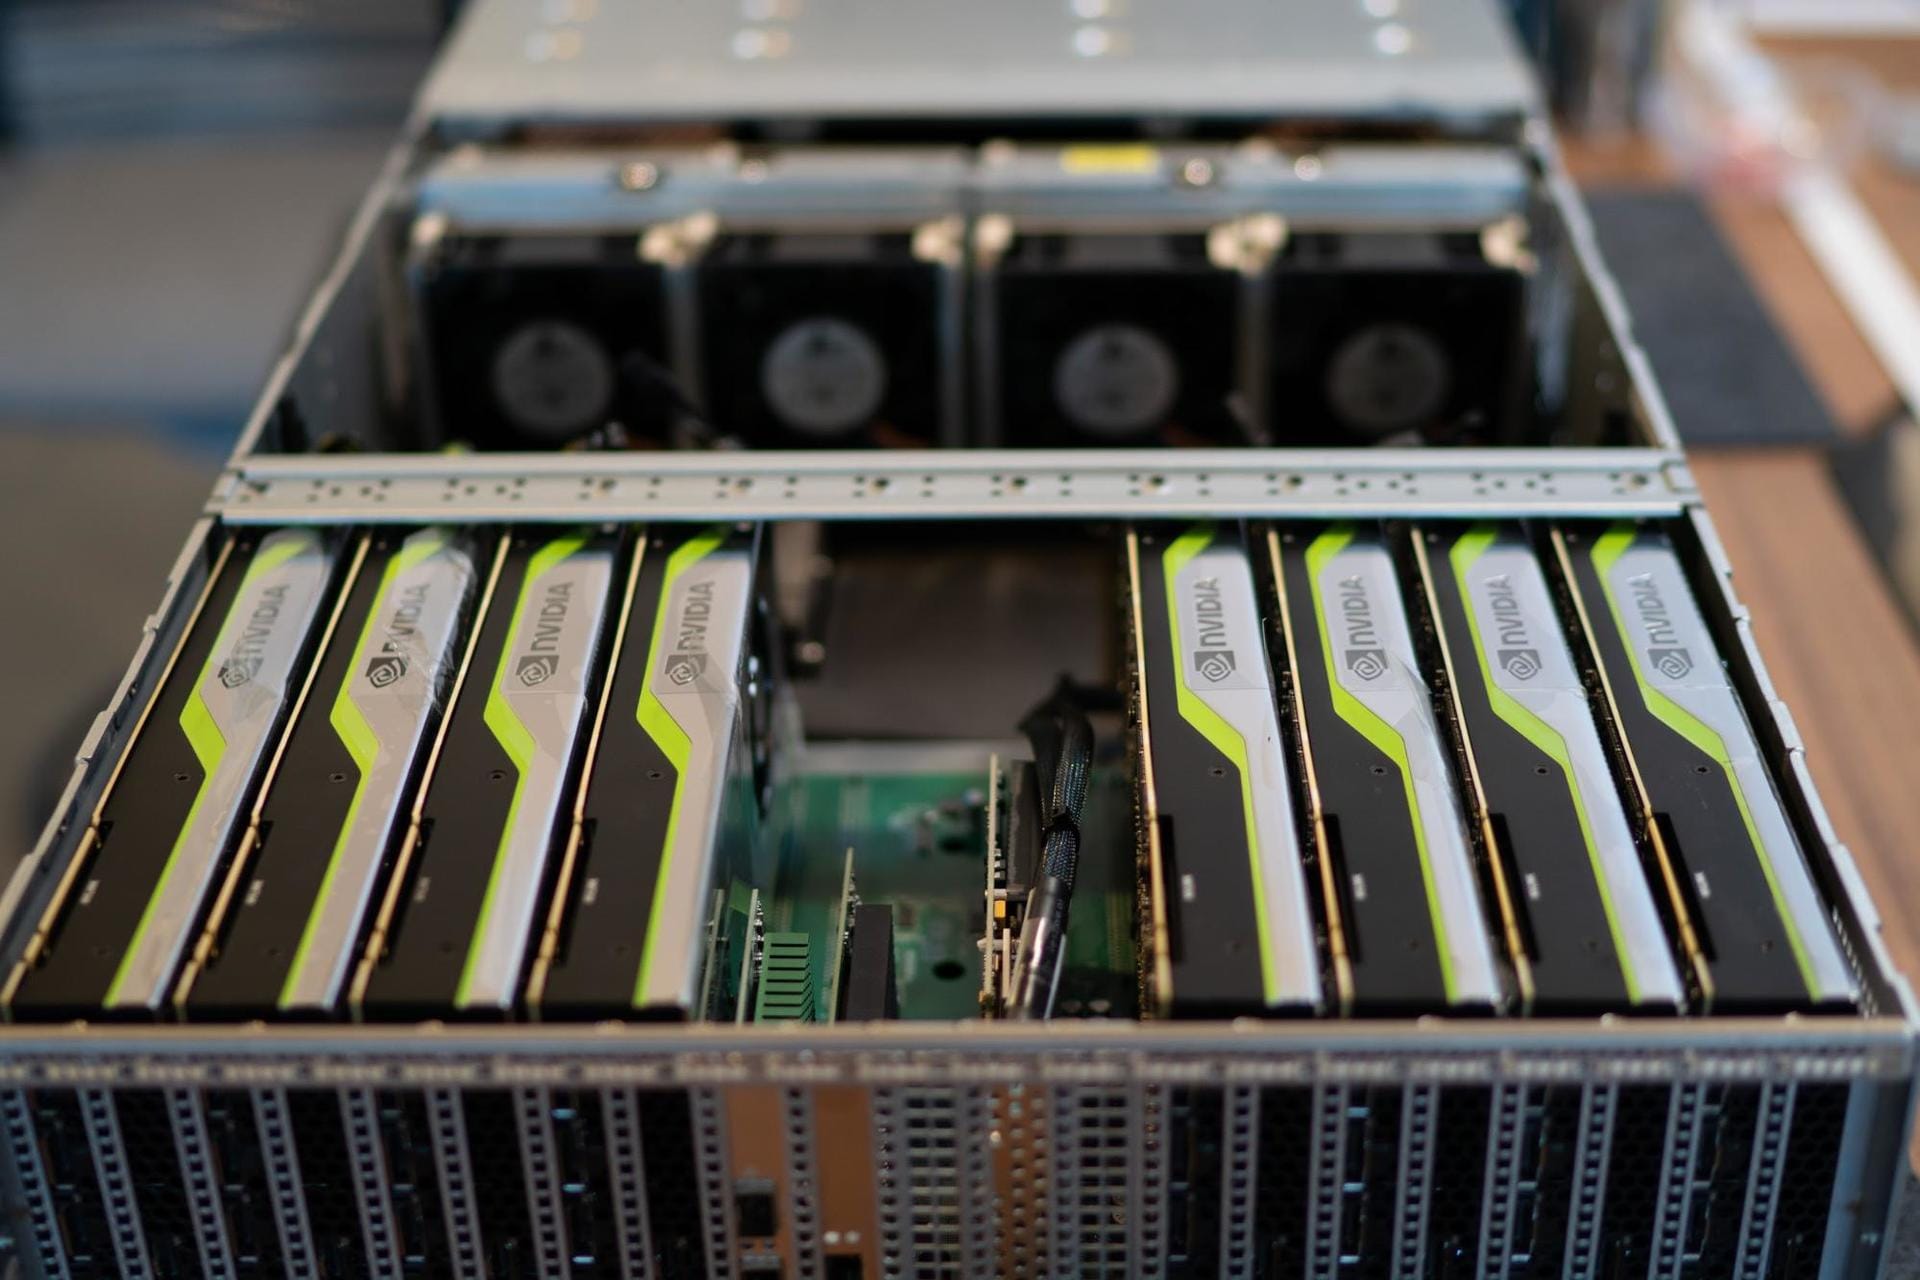
As we do test a lot of different hardware internally, we sometimes have older hardware sitting around. This includes an old VCA that we initially used to help produce the CONSTRUCT short. NVIDIA was kind enough to send us 8 Quadro RTX 8000s, which we swapped out and put into this monster of a box.
Here is the configuration:
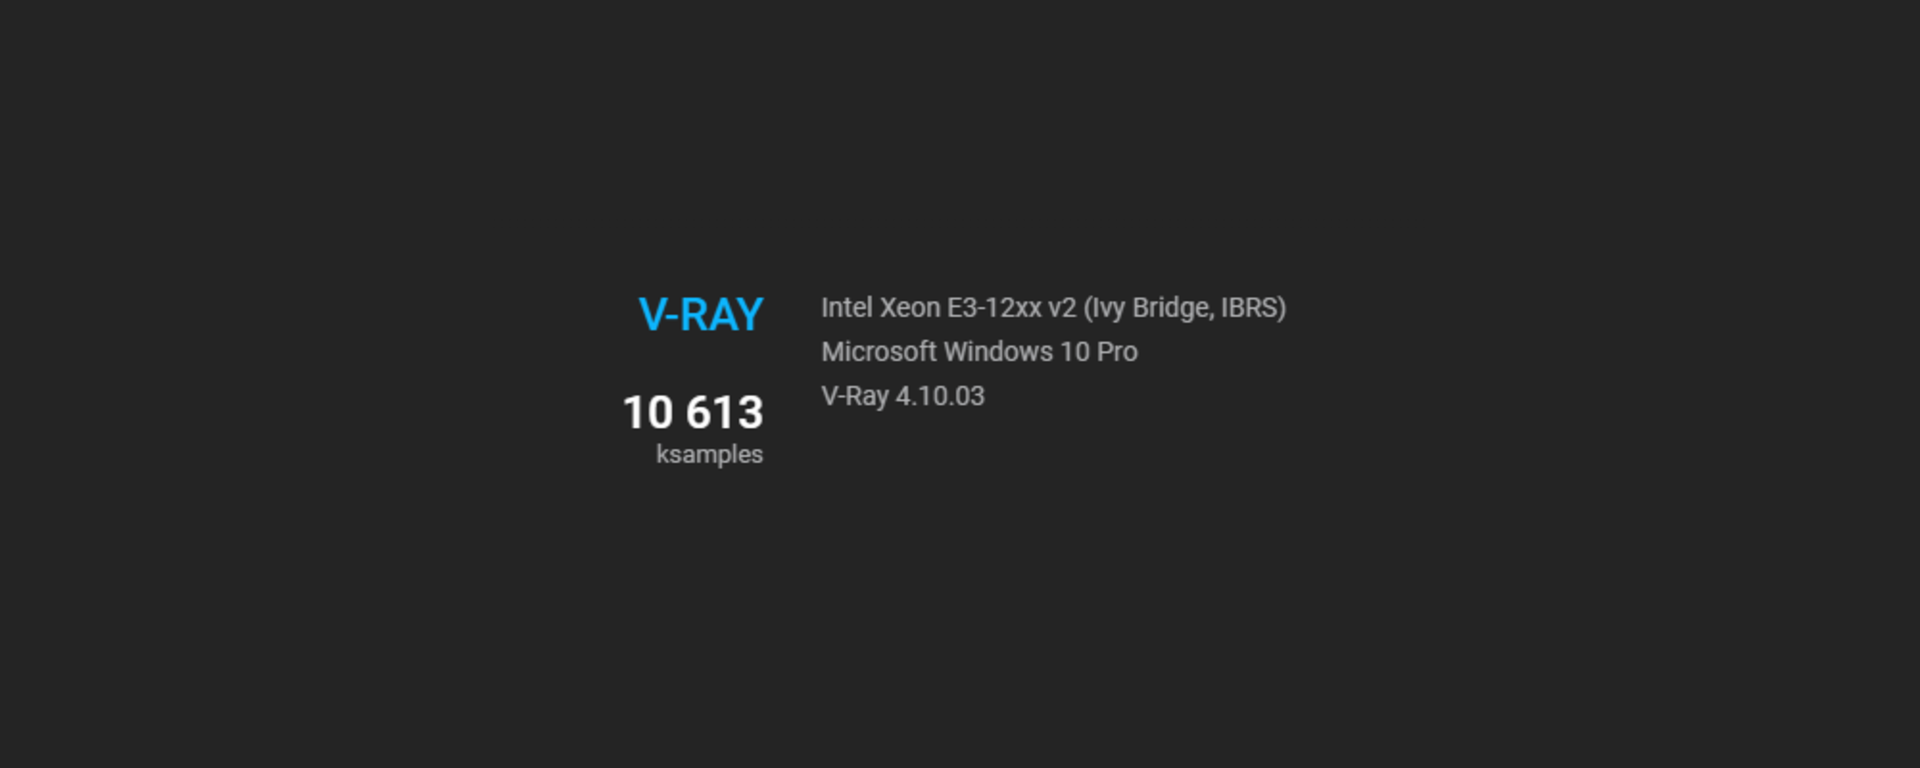
CPU: 2 x Intel Xeon E3-12xx at 3.7 GHZ 8 cores (16 threads)
GPU: 8 x Quadro RTX 8000 with 48 GB
First, let’s try our CPU test. Keep in mind that these CPUs, while very powerful and expensive server CPUs at the time, are from 2012, and therefore fairly old. Nonetheless, they did manage to pull a score of 10,613 ksamples, which is not bad but still only around 60% faster compared to our new mobile laptop CPU.
But the test you really want to see is how well do those 8 top-of-the-line GPUs do.
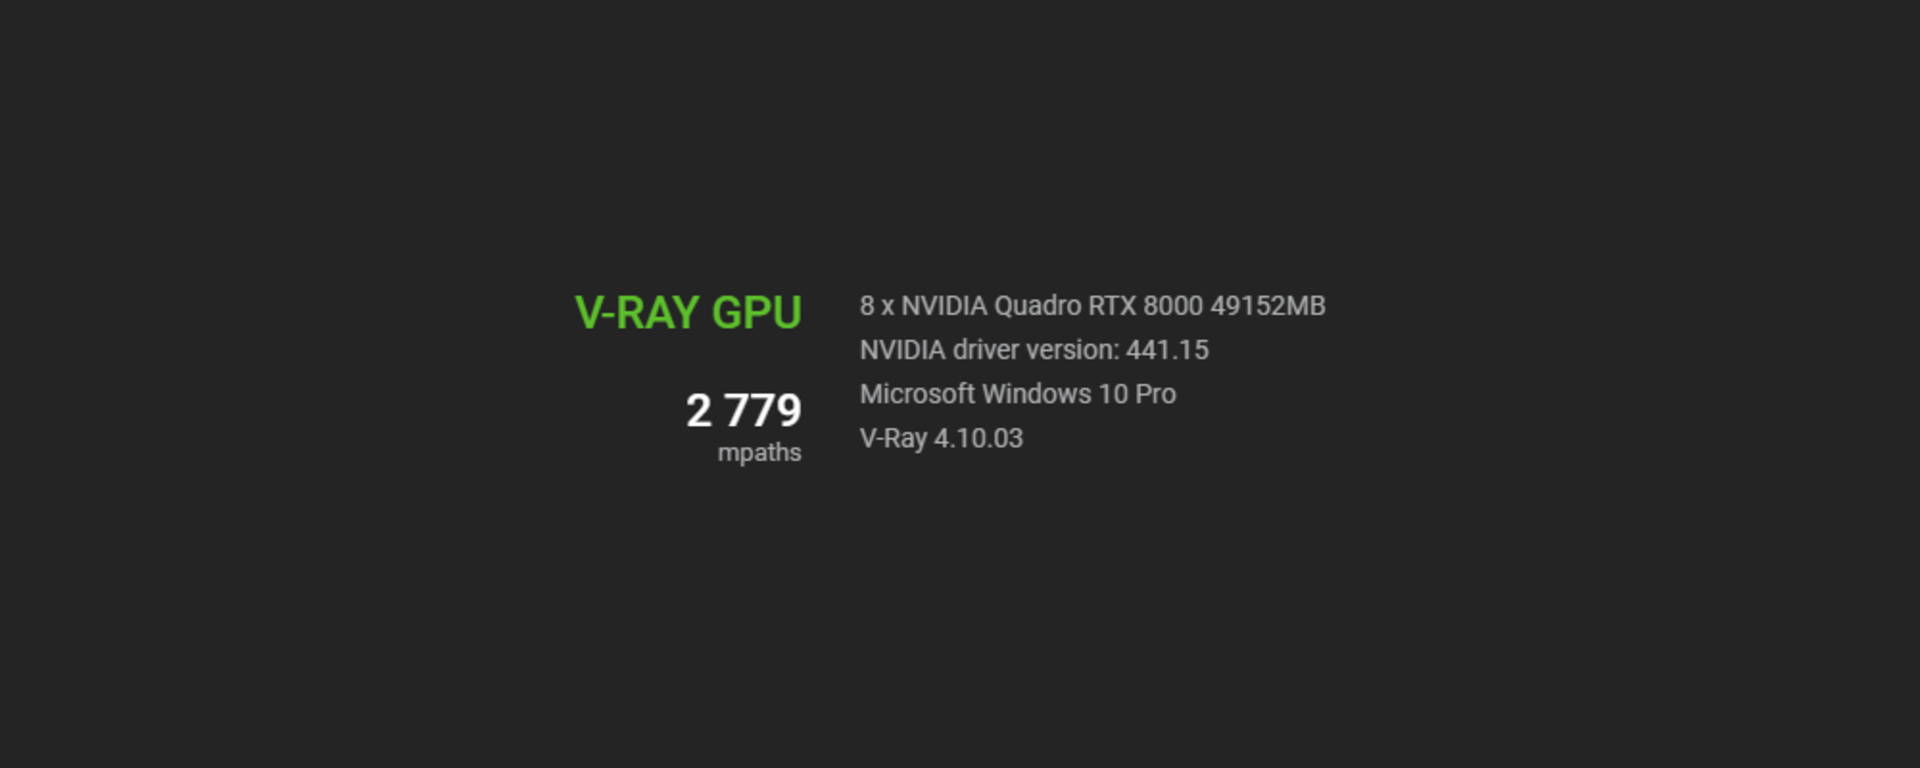
Here, we get a whopping 2779 mpaths. This is a lot of GPU power! What is also interesting is that if you divide that by 8, you get 347. Then if you take the results from the P920 using 2 of the same GPUs and divide that by 2, you get 369 — which is remarkably close considering how wildly different these two computers are. This means that V-Ray and these GPUs scale very linearly, which is really nice to see.
Also, an interesting thing happens when we decide to add the old CPUs from 2012 to the mix:
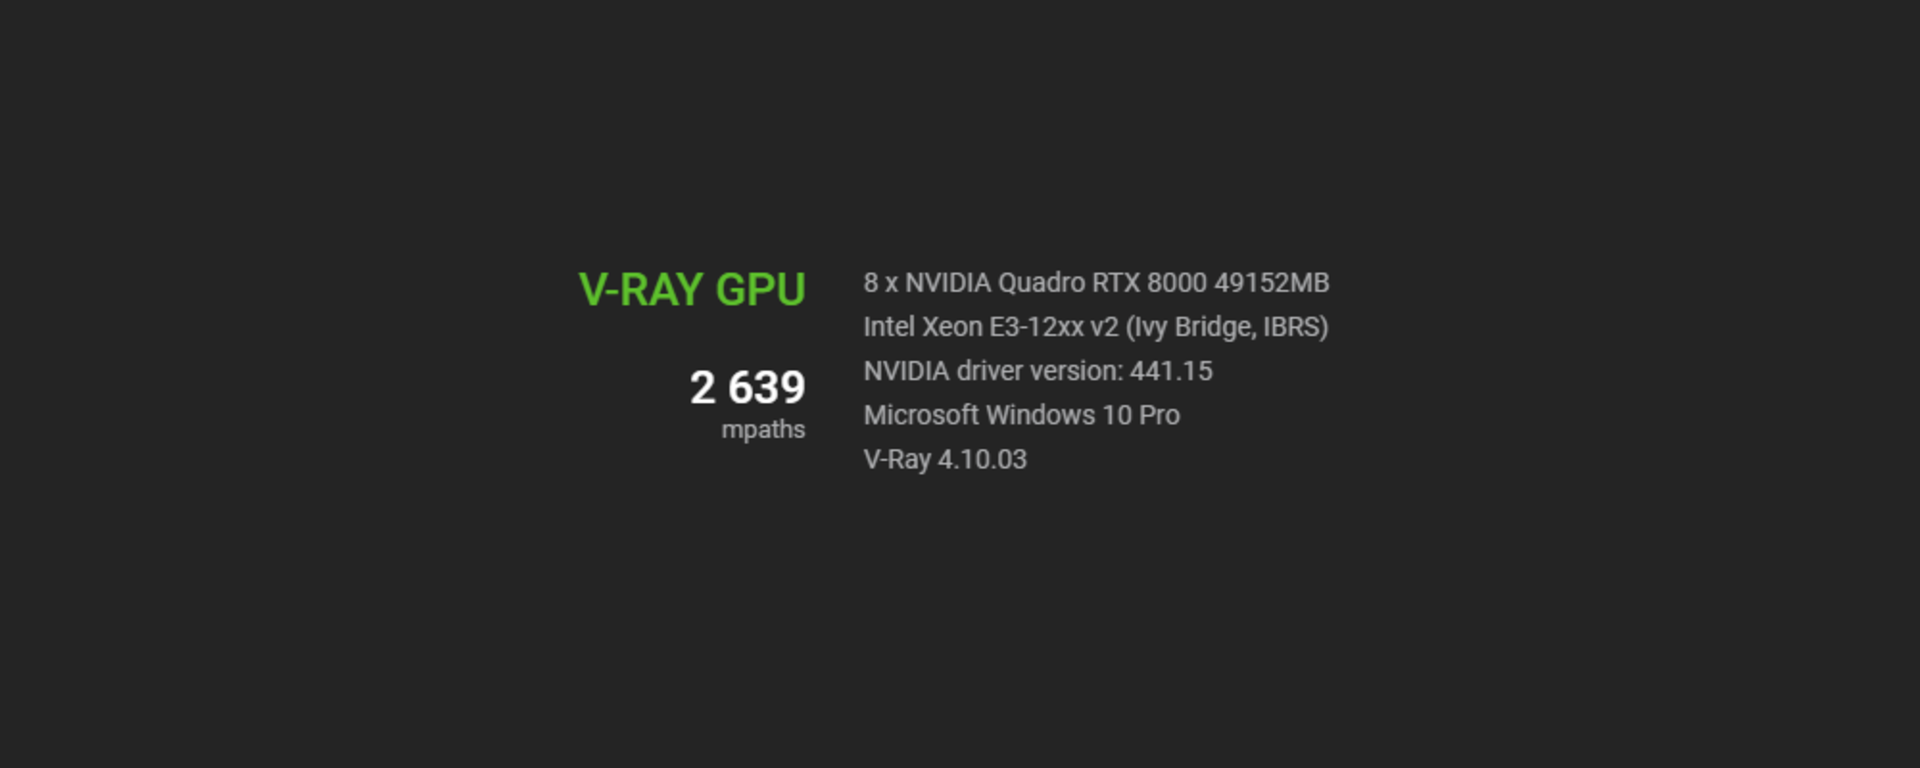
Instead of getting even a small boost, our score actually goes down by 140 points. Normally, V-Ray scales very linearly, meaning that, the more computer power you add, the faster it goes. 8 cores is very close to 8-times faster than 1 core, and 4 GPUs is very close to 4-times faster compared to 1 GPU.
However, in this case, while we are technically adding more computer power with the CPUs, they are much older CPUs that are so much slower compared to new GPUs. V-Ray GPU's processor balancing is tuned for a higher ratio of CPU-to-GPU speeds, so using brand-new GPUs with 8-year-old CPUs is falling outside of its tuning.
There are a lot of different ways to look at all the data you get from V-Ray Benchmark. In fact, there is a lot you can do just by looking at the results on the benchmark results page before you even run the test. Using the filtering tool to isolate the hardware you want to see, looking at different ranges of speeds, you can compare different types of GPUs, plus more.
And while our latest version of V-Ray Benchmark has really helped many users, review sites, and hardware manufacturers, we will continue to improve it as new features get added to V-Ray — and hardware that we want to take advantage of. Stay tuned!
Ready to run your test drive? Download V-Ray Benchmark for free.
Read the V-Ray Benchmark Chaos Docs.
 © Bertrand Benoit - bbb3viz.com
RTX acceleration brings a speed boost to new V-Ray Next updates

Caustics are everywhere in the real world. Learn why they’ve been ignored in renders and how you can render them effortlessly in Corona.
 © Dabarti Studio
With the big announcement of new GPU ray-tracing hardware, Vlado explains what this breakthrough means for the future of rendering.
 © Škoda Design
Get the latest news, artist spotlight stories, tips and tricks delivered to your inbox.